If any of those reading this have any interest in the 'Outlander' movie still undergoing principle photography apparently:
Vandy was poking around the web yesterday, and has discovered a fan based website at:
http://outlander.solsector.net/
This is obviously not an 'official' movie site, but the author has managed to paste together a fair number of bits and pieces into an information and rumor collection. Of interest may be the photos of both the sets under construction and various props.
A couple of other tid bits I can offer :
A close friend of mine - David Cox, also created a number of historically accurate objects for the background sets. Dave has worked with me both as a historic interpeter and assisting on construction of 'World of the Norse'. He was also contacted by Ian Greig, in this case to make a number of larger wooden objects. Dave built a number of Norse style 'warp weighted' looms, with the associated textile production tools. Again these were all close replicas of known historic artifacts from the period. His wife, Anne Crown, wove texiles on these same looms to they could be seen 'in use'.
Those wanting to see what these kind of looms look like (both detail and historic context) can check the web site of the 'Dark Ages Re-Creation Company' at:
http://www.darkcompany.ca/photos/textiletools.htm
Dave also has provided a bed, based on the one from the Oseburg ship burial. A little digging on any of the DARK web site should get you an image of that exact piece (look for 'Grimmi's Bed').
I also know the leatherwork for 'Outlander' was done by another Canadian craftsman with considerable film experience - Adam Smith. I'm sure Adam supports a web site, one clue I can give you to find him is that he is from Hamilton, Ontario.
Darrell
Sunday, December 31, 2006
Friday, December 29, 2006
On Copy - Who Holds the Rights
The genesis of this piece is a recent discussion that came up from my work as the webmaster for the Ontario Artist Blacksmith Association. For those not familure. OABA is a chapter club of a larger organization - Artist Blacksmith Association of North America (ABANA). With a new editor just coming on board for their newsletter (the Iron Trillium), the topic of sharing content between the various chapter club newsletters came to the front. In the past, ABANA had a tradition of freely swapping newsletters and reprinting articles from them between the various individual chapters.
Now those of you who know me are aware that theft of my past written materials has been a MAJOR problem with me. Original writings I had created in conjunction with training programs I was hired to undertake were flat out stolen by other individuals - in clear violation of the contracts that had been signed. Needless to say, the repeated theft of my materials, and the subsequent loss of opportunities this represented (when others signed their own names to the texts and claimed the contents as their own) was a very bitter experience. So its fair to say I'm a LOT more sensitive to the whole area of ownership of 'intellectual property' than most. As a result I have done more research into Copyright than many other artists do.
There has been a revision of Law in the area of Copyrights over the last decade in particular. This largely from development of new technologies and the massive growth of the internet. In the 'old days' it was relatively cumbersome to copy existing writings. The invention of the photocopier, and the eventual drop in price that resulted in easy access to this machinery for direct duplication, changed all that. I'm of an age when I remember that access to the new Xerox machines was strictly controlled, and bulk copying of existing works was just not permitted by those who operated them. Before those days, any attempt to plagiarize someone else's work required tediously hand copying or use of a manual typewriter for duplication. The slowness of the methods limited someone's ability to copy anything wholesale.
But that was then - and this is now. The widespread use of computers has resulted in a trivial amount of effort being required to copy existing works. With a scanner, entire books can be transfered to electronic files, washed through text recognition software, and stored, duplicated, or altered. Anyone reading this could easily 'cut and paste' the content to their own computer, or hit a simple 'save as' button to create a copy. Change the authors name... In the case with my troubles with the Viking Trails Tourism Association, this exactly what was done (without even changing the spelling mistakes - if you can believe it!).
The important thing to remember is this:
The initial creator of any original work retains FULL RIGHTS and ownership of that work - unless specific WRITTEN permission is given to re-assign those rights to another.
This is the DEFAULT legal situation. You do not have to do anything else to enshrine your rights to your own work. This absolutely applies to ANYTHING ON THE WEB. A common misconception is that if someone 'publishes' something (written or image) on the internet that it has automatically become 'public domain'. This is NOT THE CASE.
If any of the readers are interested in learning more about the issues of Copyright, I would suggest you take a look at the excellent article written by Brad Templeton "10 Big Myths About Copyright Explained".
Available on line : www.templetons.com/brad/copymyths.html
Tuesday, December 19, 2006
2007 - TENTATIVE dates...
I have been getting requests for course dates in 2007 for some weeks now! I got out the calendar and worked up some TENTATIVE dates. These are the 'public' events (so far).
April 21 : Lecture(s) at Forward to the Past - Kitchener/Waterloo
April 27 - 29 : Introduction to Blacksmithing - the Wareham Forge
May 11 - 13 : Introduction to Blacksmithing - the Wareham Forge
May 19 - 20 : Blacksmithing Demo at 'Gathering of Friends' - Amealiasburg
June 1 - 2 : Introduction to Iron Smelting - the Wareham Forge
June 9 - 10 : DARK Iron Smelt (invitational) - the Wareham Forge
June 15 - 17 : Introduction to Blacksmithing - the Wareham Forge
June 30 - July 1 : (possible?) DARK demonstration camp at EWP - Scarborough
July 7 - 8 : one of - Basic Bladesmithing
Intermediate Blacksmithing
Introduction to Layered Steels - the Wareham Forge
July 21 - 22 : (NEW) Introduction to Metal Casting
August 6 - 9 : Basic Blacksmithing at the Celtic College - Goderich
August 11 - 12 : Blacksmithing Demo - the Celtic Festival - Goderich
August 17 -19 : (possible?) Summerfolk - Owen Sound
September 8 - 9 : Blacksmithing Demo - Walkworth Fall Fair
September 14 - 16 : DARC Presentation at Haffenreffer Museum - Bristol RI
October 5 - 8 : Early Iron 4 - Peters Valley RI
October 12 - 14 : Introduction to Blacksmithing - the Wareham Forge
October 20 - 21: one of - Basic Bladesmithing
Intermediate Blacksmithing
Introduction to Layered Steels - the Wareham Forge
November 3 - 4 : DARK Iron Smelt (invitational) - the Wareham Forge
November 9 - 11 : Introduction to Blacksmithing - the Wareham Forge
Looking this over you will see that there are TWO additional weekends for the Introduction to Blacksmithing course - April and November. Also a new program in July - Introduction to Cast Metals. This course will combine two popular classes from the Celtic College : pewter in soapstone and bronze in sand molds.
I will have details on the courses posted up on the Wareham Forge web site by mid January.
Friday, December 15, 2006
(Re:Comment) On Custom Work...
Posted by STAG to Hammered out bits at 12/15/2006.
" I don't mind creating new designs and creations, however my clients don't want to pay for development time. I dread those conversations that start out with "I went to the Anime convention and I saw this armour...."
... Normally it doesn't pay to do truly custom work...and when the client hates it and returns it, it doesn't even pay in satisfaction..."
I hope this reader doesn't mind me using his comments as a jump off point for an expansion on the last posting here.
Development time is always a problem in any hand intensive skill. An important truth about blacksmithing is that repetition produces speed and control, which is seen as fluidity of work to the observer. Each individual will develop skill with differing amounts of practice time - but EVERYONE needs to spend countless hours with the hammer. To often the novice smith does not appreciate this. You can of course substitute tools or machines for skill. Often this has another price tag - one measured in dollars rather than hours.
An illustration: One of my original 'best sellers' was a J shaped candle holder, the 'Loom Light'. This was a design I adapted from artifacts from various museum collections that date from the early 1800's and earlier. So right off the top, there was the time spend hunting through collections and examining the artifact samples. Then I had to convert the design of the artifacts to something that both made sense for modern buyers, and could be made quickly enough to keep the purchase price at a reasonable range. This involved making a number of potential prototypes. Once I had a workable product design, there was a learning curve to speed up the individual steps, and determine the best order of these for efficient production. This all happened before I sold a single one.
In the 1990's, I would normally sell as many of these as I had on hand, for a price of $10 each. I could make them at a rate of 6 per hour. This may seem like good money, but remember that I consider a productive workshop day contains 2 hours actually hammering - out of a normal 10 hour working day. (Lighting the forge correctly takes 45 minutes for example.)
I would also make these pieces as part of demonstrations. With the related explanations, it would take about 15 minutes to make one. Normally I would be asked by some member of the public if they could purchase the sample I had just made. Into the late part of the 1990's, I found increasingly that people would complain about this price. After all, they had just seen 'how easy' it was to make the piece. My own skill was seen not as valuable experience, but in fact a measure of LACK of perceived value. I stopped producing these as demonstration pieces.
Back in my own workshop, I had invested in a small air hammer. With the required compressor, the set up cost me about $3000. Now add installation time, plus a still ongoing learning process to work effectively with the new machinery. I'm also 15 years older, and at 50 + I just do not work as fast. So the net result is that if I use the air hammer for the tedious drawing out of the candle holder, I can make the pieces at about 8 per hour.
But another thing has happened. Back about 2000, I wanted to increase the cost of the loom light from that magic $10 to $12. My business had also grown to the point that I was forced (here in Canada) to charge the 7% GST federal tax. As you might suspect, all my own materials and shop costs had increased over the decade. I invested in a large wholesale order for very high quality decorative candles, which even at wholesale cost me $2.65 each (with a normal retail price of $6). With the expensive candles, I set the price at $15. The same object that sold extremely well at $10, just would not sell at a total of $17.25 each, despite a decade of inflation and those $6 candles included.
Certainly over the last 15 years, the potential scope of my work has increased dramatically. If you check the web site, you will have seen that I concentrate on one of a kind art pieces, mainly for gardens. These pieces average $800 - $1500 each. Just like STAG, I have an increasing number of finished pieces sitting around the workshop - or on consignment to local 'artist maker' gallery shops. These pieces sell slowly, but if they are good pieces, they do eventually sell. I decided about 2000 that I'd rather create one large piece per month and eventually sell it (at about that same rate) - than make 80 items at $10 and work craft shows for the same kind of income. Frankly, I put more strain on my body making so many repetitive pieces, and there is far more artistic satisfaction in creating larger 'more significant' pieces.
Now, I have more than one ore in the water. I teach hand skills, consult to museums, undertake private commissions, as well as sell these individual pieces. I've certainly found that in any given year the balance between these aspects of my business will ebb and flow, but generally my gross business income is relatively stable. Maybe not as much as I would like, but at least enough for me to get by on. (That is another whole topic of conversation however)
One last point I'd like to bring up from STAG's comment: At the Wareham Forge, my standard policies on custom orders are posted on the web site. In brief:
• A signed contract agreement for any project over $500
• A deposit of 50% before work starts - non refundable against work undertaken (which includes design and consultation time)
• For elaborate projects a sample piece is made, which defines the work quality
• FULL balance is paid BEFORE delivery of the finished work
Over the years, I have only had one customer complain about the quality of the finished work. I offered a full cash refund, but the fellow ended up keeping the piece. I put this down to effective communications with my customers.
I must admit that STAG makes reference to "Anime convention" - and I fully agree that FANS are often the most difficult customers. Few fully appreciate that what they see on film is the result of props and film magic - not REALITY. There is often no understanding for the cost of creating a one of kind object. (i mean, Aragorn's 'hero' sword in Lord of the Rings cost them $10,000. What do you EXPECT a real functioning copy is going to cost?) A steel sword will NOT handle like the aluminum ones - and metal armour does NOT function like painted plastic. A real maile shirt weighs 30 lbs - and you can't swim in one.
I feel for you man...
Wednesday, December 13, 2006
'Career' as Artisan Blacksmith?
"... My son/daughter has become interested in blacksmithing. Would your recommend this as a good career choice ..."
I am getting an ever increasing number of requests like this one. In an attempt to provide one well reasoned commentary, I have drafted up this article.
IF you put that question inside the frame of reference that question outlines, the answer is : NO
Most typically, the use of terms like 'career choice', modified by works like 'good' or 'successful' carry a certain value weight. Usually what is really being asked here:
• Are the wages / monetary return high?
• Are the working hours standard?
• Are the working conditions safe / pleasant?
• Are there normal paid benefits / pensions?
(Right now, I can hear any Artisan Blacksmiths reading this killing themselves laughing...)
Now I want to be quite specific here, and divide the field into Fabrication Blacksmithing and the Artisan Blacksmith. I am obviously an Artisan Blacksmith.
If you approach blacksmithing as one of a range of methods applied to a Fabrication shop - then it MAY be possible to maintain a standard 'career', with all of the elements listed above. Considerable investment will be required in labour saving equipment. None of the machinery required for an successful fabrication shop is inexpensive. You will find it necessary to undertake specific technical training and apply for various certifications (like a registered Welder's Certification). The types of work you will undertake will tend to the industrial and the repetitive. To make back a suitable return on your investments in equipment and training, the projects will tend to be large -and duplicate standardized designs. True success, measured by the factors listed, will see you become a workshop MANAGER, not actually a hands on worker at all. This goal is certainly achievable, given hard work and sound business decisions.
The opposite side of the coin is that of the Artisan Blacksmith. Undertaking this path means adopting the life of an ARTIST, with all that entails:
• Working long, hard hours for very little money returned.
• Expecting to work almost every weekend, with no 'holidays' in the classic sense.
• Fully expecting the work undertaken to result in the slow accumulation of physical damage over the years.
• No benefits are likely, and certainly no possibly of paid retirement.
To support yourself as an Artisan Blacksmith, you must be designer, fabricator, salesman, and business manager. Four separate roles, all undertaken with some measure of effectiveness if you expect to produce any income.
Why on EARTH would anyone become an Artisan Blacksmith? Put simply - it is a LIFESTYLE, one to which you are driven to because of the work you enjoy. It can be immensely satisfying, but any financial rewards are entirely separate from exercising your urge to create. The objects you form using forged metals as the medium of expression have a durability that no other medium can match. The life span can potentially extend to centuries. The mark of your own hands will be borne by each and every object which leaves your workshop. Given time, good work will almost always find its level.
So in framing the question 'Is becoming a Blacksmith a good career choice', the answer must be considered in light of what your expectations for your life will be.
Tuesday, December 12, 2006
on Runes...
from a recent discussion on Norsefolk:
" Wouldn't it beg the question of the Literate person? If (the runes) were an alphabet, did people actually use them to "write" or are they just symbols used by the local shamen only? I can see using a protective one or so as a pictorial symbol, but unless the average man (or woman) read them, would you have more than one or two on an (object)?"
The types of objects we find runes on - and what those runes actually say, certainly suggests a wide basic level of literacy. Is not 'knowledge or the runes' considered one of the 'nine basic skills' mentioned in the Havemal?
We find rune stones used as markers for property, and as memorial texts. Not very effective if the casual passerby can't read them! Also consider the numourous 'Thorfin was here' type markings found all over the known world. What about the wide range of everyday messages found on birch bark slips found at Viking Age Novgrod in Russia? All these suggest both males and females over a fairly wide range of social levels are both writing and reading runes as simple text - with no ritual implications at all. This tends to prove that at least a basic functional literacy existed in Norse culture. Perhaps not to the 'read a book' level that we employ today - but at least at a 'read the signs' level. (I compare that with exactly the way many of those reading this can actually read runes themselves- puzzling out each letter to gather the meaning of a text - not reading runes as you are reading this message!)
There is a tendency to cast a modern eye on past ritual practices and enshrine them as Religion, with the modern method of a professional being required (the Priest) to carry them out. I suggest instead that in Norse culture, the practices that involved communications to Powers existed on several layers. There were rituals that were part of the everyday - and could be carried out by almost any one. There were also 'more significant' ceremonials which were undertaken by specific individuals for a group (heads of households for example). Then there were certain rituals known only to dedicated practitioners (the 'wise women' of the sagas for example).
The magical use of runes is a particular problem. The completely modern concept of 'casting the runes' (use of markers as divination) is not supported by a single piece of archaeological evidence. There have been partially burned slips of wood bearing partial runic texts found, suggesting that communications to the gods may have been burned - to 'bare the text to heaven'. I have been told by a reliable university professor that the first description of 'casting the runes' was in fact written out of thin air by a friend of his in the mid 1950's who needed money while on sabbatical - as a complete fabrication. Over the years I have been absolutely amazed at the number of people who continue to insist that their set of carved stone or wood markers represents an accurate ancient practice. At the very least, in the absence of a single artifact sample, how could your possibly claim authenticity, much less knowledge of the actual use and meanings?
Years back, I was given a large set of 'runes of power' that were (honestly) stated to be ancient Icelandic magical symbols. The only problem is that in the interveining years I have NEVER seen a single one of these on actual Norse artifacts. On top of that - if these symbols actually represented lost arcane knowledge, how would anyone modern know the meanings?
The truth is that we can speculate all we want - but we are looking at practices that represent a completely dead tradition. Speculate all we want, but we can never really KNOW what was done during the Viking Age - by whom and to what purpose.
Darrell
PS - Check the source! Virtually ALL references that clain to detail Norse ritual practice will start quoting each other - and come to a dead end sometime about 1880.
Tuesday, November 28, 2006
Minden Ore Goo - Loki Smelt
Marcus was able to run a sample of the Minden 'Iron Goo' ore through his testing. This gives us the values bellow, along with his comments.
As a background here, the source material was gathered at a roadside ditch just south of Minden Ontario in the spring of 2006. David Robertson and I had discovered the deposit quite by accident on a trip up to the area. A rock cut along the road contained a layer that was an iron ore deposit. Some of the rock was gathered, but it proved to be only a small amount of iron oxide layered in with a course sand and compressed into a sandstone like material. When this material was roasted, it became only slightly magnetic - which I took to mean only a small amount of iron was actually present.
I was hopefull that the presence of even some iron in the rocks might lead to a bog ore deposit close by. The contour of the land is such that the drainage from the rock cut runs down about 100 meters to a low bog. On a second trip to the site, I did examine the bog itself, but although some of the surface signs for bog ore existed, I did not find a deposit of primary bog ore.
What I did find was a particular material throughout the drainage ditch along the base of the rock cut. This was a redish brown colour, and about the consistancy of chocolate pudding, that layed in a loose layer just at the bottom of the water in the ditch. It could be gathered by straining it out through your fingers. Over roughly two and half hours I pulled out enough of this material to fill about five standard 5 gallon plastic pails. As you might guess this incuded a lot of water.
Over the next several months, I allowed the pails to dry in the sun, eventually rendering down the material to a dry clay like consistancy yielding 22 pounds (10 KG) total.

Showing the ore source
This is 'just barely' enough ore material to undertake a smelt. Most definately the relative iron content becomes very important in determining this. The DARC smelt series points to a threshhold amount or ore required - which also relates to the smelter size. Given our own use of a relatively standard size at roughly 25 cm diameter (10 inches), we have consistantly found that we need at least 8 - 10 kg of ore to get the correct formation of a slag bowl and what I'm going to call a 'seed bloom'. This using the Virigina Rock Ore sourced by Lee and Skip, which is in the 60 % iron oxide range. Ore addtions OVER that amount just appear to increase the overall size and density of the bloom being created. (Note that this is at best a rough rule of thumb - I'd be happy to hear from those experimenters who have gotten different and better results!)
For those of you who attended Early Iron 3 this year, the demonstration smelt I carried out on Saturday used the Minden Iron Goo as the ore material. The 'Loki' smelter was somewhat reduced in diameter - to roughly 20 cm / 8 inches. Detailed notes on the conduct of the smelt can be found at:
www.warehamforge.ca/ironsmelting/Early Iron 03/LOKI-EI3.html
And also on the BLOG at the posts:
Friday, October 20, 2006
'Loki' Smelter - part 2
Thursday, October 19, 2006
'Loki' Smelter at Early Iron
SO - to the POINT
Skip had commented at the time when the smelter was pulled apart that he wondered about a possible high silica content to the starting ore material. He remarked how the slag was much more glassy than what is normally seen - almost like a poor quality soda glass. This observation is borne out by the content of the ore sample - with about 18% silicon dioxide present. The relative iron content of the ore is also certainly on the low end - at only 42 %.
If you extract the volatile elements (as Marcus comments on) the starting ore is closer to 60 % iron oxide. Note that the ore was NOT roasted before it was added, which of course we would normally do. In this case this initial step was not undertaken because of the powdery quality of the material. Although roasting would have increased the relative purity of the ore, it also means that the total effective amount of iron ore added to the smelt was closer to 6.3 KG / 14 lbs total. This is again under what we are finding as our minimum threshold.
The Loki smelt did produce some metallic iron. There was only a small amount, about .68 kg / 1.5 lbs. This was mainly in the form of some small fingers of high carbon cast iron, plus a number of small oval shaped balls of similar material spread through the glass slag. If the effective ore amount is considered to be that 6.3 kg / 14 lbs however, this means a return of ore to iron at about 9 %.
One obvious concern is the smaller particle size for this ore material. I think this is primarily responsible for the high carbon content of the metal produced. Higher additions of ore to charcoal might correct for this. Without a doubt, considerably more of this specific ore needs to be used if any useful result is expected.
Yet ANOTHER series of experiments to add to the list!
Darrell
****************************
Tuesday November 28
Hi Darrell,
On Friday, I got back the data for the sample of the Minden goo that you
gave me. I have reproduced it below. Looking at the data, the high loss
on ignition value (LOI) shows that there are a lot of volatile
components there. This is most likely structurally bound water, but may
include some carbon dioxide from decomposition of carbonates. I did not
request total carbon analysis, so have do not have the information with
which to comment on this. If all these volatiles can be removed by
roasting prior to smelting, then the ore could produce an initial
material that is ~61 wt% Fe2O3. If not, then a lot of the weight that
goes into the smelter will not be iron and will be driven off at an
early stage of smeltin (taking heat to do it). Although the volatile
content of the ore is similar to that which you gave me from LAM, it is
much more silica rich, so has an overall lower Fe content (42 vs. 66 wt%
Fe2O3). Full analyses of the LAM material are on the web site. If you
have any questions about these data, let me know.
Regards,
Marcus.
*Sample ID* 06-0356-0001
Client ID Det Limit MIN01 Volatile-free
units wt% wt% wt%
SiO2 0.01 17.88 25.67
*TiO2* 0.01 0.13 0.19
*Al2O3* 0.01 3.11 4.46
*Fe2O3T* 0.01 42.4 60.87
*MnO* 0.01 0.42 0.60
*MgO* 0.01 0.61 0.88
*CaO* 0.01 3.55 5.10
*Na2O* 0.01 0.78 1.12
*K2O* 0.01 0.71 1.02
*P2O5* 0.01 0.07 0.10
*LOI* 0.05 29.61
*TOTAL* 99.26
Fe2O3T = total Fe expressed as Fe2O3
As a background here, the source material was gathered at a roadside ditch just south of Minden Ontario in the spring of 2006. David Robertson and I had discovered the deposit quite by accident on a trip up to the area. A rock cut along the road contained a layer that was an iron ore deposit. Some of the rock was gathered, but it proved to be only a small amount of iron oxide layered in with a course sand and compressed into a sandstone like material. When this material was roasted, it became only slightly magnetic - which I took to mean only a small amount of iron was actually present.
I was hopefull that the presence of even some iron in the rocks might lead to a bog ore deposit close by. The contour of the land is such that the drainage from the rock cut runs down about 100 meters to a low bog. On a second trip to the site, I did examine the bog itself, but although some of the surface signs for bog ore existed, I did not find a deposit of primary bog ore.
What I did find was a particular material throughout the drainage ditch along the base of the rock cut. This was a redish brown colour, and about the consistancy of chocolate pudding, that layed in a loose layer just at the bottom of the water in the ditch. It could be gathered by straining it out through your fingers. Over roughly two and half hours I pulled out enough of this material to fill about five standard 5 gallon plastic pails. As you might guess this incuded a lot of water.
Over the next several months, I allowed the pails to dry in the sun, eventually rendering down the material to a dry clay like consistancy yielding 22 pounds (10 KG) total.
Showing the ore source
This is 'just barely' enough ore material to undertake a smelt. Most definately the relative iron content becomes very important in determining this. The DARC smelt series points to a threshhold amount or ore required - which also relates to the smelter size. Given our own use of a relatively standard size at roughly 25 cm diameter (10 inches), we have consistantly found that we need at least 8 - 10 kg of ore to get the correct formation of a slag bowl and what I'm going to call a 'seed bloom'. This using the Virigina Rock Ore sourced by Lee and Skip, which is in the 60 % iron oxide range. Ore addtions OVER that amount just appear to increase the overall size and density of the bloom being created. (Note that this is at best a rough rule of thumb - I'd be happy to hear from those experimenters who have gotten different and better results!)
For those of you who attended Early Iron 3 this year, the demonstration smelt I carried out on Saturday used the Minden Iron Goo as the ore material. The 'Loki' smelter was somewhat reduced in diameter - to roughly 20 cm / 8 inches. Detailed notes on the conduct of the smelt can be found at:
www.warehamforge.ca/ironsmelting/Early Iron 03/LOKI-EI3.html
And also on the BLOG at the posts:
Friday, October 20, 2006
'Loki' Smelter - part 2
Thursday, October 19, 2006
'Loki' Smelter at Early Iron
SO - to the POINT
Skip had commented at the time when the smelter was pulled apart that he wondered about a possible high silica content to the starting ore material. He remarked how the slag was much more glassy than what is normally seen - almost like a poor quality soda glass. This observation is borne out by the content of the ore sample - with about 18% silicon dioxide present. The relative iron content of the ore is also certainly on the low end - at only 42 %.
If you extract the volatile elements (as Marcus comments on) the starting ore is closer to 60 % iron oxide. Note that the ore was NOT roasted before it was added, which of course we would normally do. In this case this initial step was not undertaken because of the powdery quality of the material. Although roasting would have increased the relative purity of the ore, it also means that the total effective amount of iron ore added to the smelt was closer to 6.3 KG / 14 lbs total. This is again under what we are finding as our minimum threshold.
The Loki smelt did produce some metallic iron. There was only a small amount, about .68 kg / 1.5 lbs. This was mainly in the form of some small fingers of high carbon cast iron, plus a number of small oval shaped balls of similar material spread through the glass slag. If the effective ore amount is considered to be that 6.3 kg / 14 lbs however, this means a return of ore to iron at about 9 %.
One obvious concern is the smaller particle size for this ore material. I think this is primarily responsible for the high carbon content of the metal produced. Higher additions of ore to charcoal might correct for this. Without a doubt, considerably more of this specific ore needs to be used if any useful result is expected.
Yet ANOTHER series of experiments to add to the list!
Darrell
****************************
Tuesday November 28
Hi Darrell,
On Friday, I got back the data for the sample of the Minden goo that you
gave me. I have reproduced it below. Looking at the data, the high loss
on ignition value (LOI) shows that there are a lot of volatile
components there. This is most likely structurally bound water, but may
include some carbon dioxide from decomposition of carbonates. I did not
request total carbon analysis, so have do not have the information with
which to comment on this. If all these volatiles can be removed by
roasting prior to smelting, then the ore could produce an initial
material that is ~61 wt% Fe2O3. If not, then a lot of the weight that
goes into the smelter will not be iron and will be driven off at an
early stage of smeltin (taking heat to do it). Although the volatile
content of the ore is similar to that which you gave me from LAM, it is
much more silica rich, so has an overall lower Fe content (42 vs. 66 wt%
Fe2O3). Full analyses of the LAM material are on the web site. If you
have any questions about these data, let me know.
Regards,
Marcus.
*Sample ID* 06-0356-0001
Client ID Det Limit MIN01 Volatile-free
units wt% wt% wt%
SiO2 0.01 17.88 25.67
*TiO2* 0.01 0.13 0.19
*Al2O3* 0.01 3.11 4.46
*Fe2O3T* 0.01 42.4 60.87
*MnO* 0.01 0.42 0.60
*MgO* 0.01 0.61 0.88
*CaO* 0.01 3.55 5.10
*Na2O* 0.01 0.78 1.12
*K2O* 0.01 0.71 1.02
*P2O5* 0.01 0.07 0.10
*LOI* 0.05 29.61
*TOTAL* 99.26
Fe2O3T = total Fe expressed as Fe2O3
Tuesday, November 21, 2006
Lectures in Peterborough This Week
If anyone is in the Peterborough area over the next couple of days...
I will be giving two evening lectures this week;
TUESDAY - November 21
Peterborough Public Library
7:30 PM - Lower Level
for the Peterborough Historical Society
'Vikings West to Vinland'
One thousand years ago the first Europeans sailed west from Iceland, to Greenland and eventually on to the territory they called Vinland. Who were these people, and how were they able make such a voyage? What did the Norse see there that made them pick this spot for their outpost? Today we can travel east to that same spot, the tip of Newfoundland's Northern Peninsula at L'Anse aux Meadows. What will we see there today that proves that this is the site of 'Leif's Houses'? Explore an archaeological puzzle through images and examine replica objects with Viking Age specialist Darrell Markewitz.
WEDNESDAY - November 22
Catherine Par Trail College - Trent University
about 7:00 PM - Room 102
for the Society for Creative Anachronism
"Iron in the Middle Ages'
How was iron manufactured from raw ore in the Middle Ages. How did the blacksmith then transform it to useful objects. Just what was the typical smith making? Our examination of artifacts and replicas will centre on just what kind of objects are most useful in re-creating daily life of the Medieval period. A special focus will be the most recent experimental iron smelts by the Dark Ages Re-creation Company.
I believe both lectures are open in interested members of the general public. Hope to see you there...
Thursday, November 16, 2006
Gilling West Sword Replica # 2
This is a longer post than normal - in that it is a photo essay of the ongoing work on this project. In an earlier post (Tuesday, July 18, 2006 - 'Replica of the Gilling West Sword') I had talked about the process of taking this early Viking Age artifact sword and preparing to forge a modern day replica.
After the plates that make up the individual billets that are used to form the core rods are prepared, the next step is to weld the blocks and draw them out to rough length. As a reminder, each of the stacks are made up of 9 layers of wrought iron / mild steel / L6 alloy, and are roughly 6" long by 1" wide and about 1 1/4" tall. Each is bound together with three loops of 'soft iron' fencing wire.

This first image shows the starting stack, the billet after welding and the rough drawn out core rod. For knives, I normally start with a stack roughly 4 inches long. My main coal forge has a good sized rectangular fire box, but even still, the six inch length of these stacks was about the longest that can be easily brought to an even welding heat.

For successful forge welding, the key is managing the fire. You can see here I have laid two lines of fire brick alongside the fire pot to further increase the size of the heat zone. The total height of the fire is roughly 12 inches, with at least four inches of burning fuel below the work being heated here. Use of a classic 'cavern' style fire is also essential to both evenly heating the metal and achieving the correct oxygen free atmosphere around it.

As soon as the stack has come up to a dull red heat, I generously flux all edges of the metal with borax. I personally use 'Twenty Mule Team' washing soda. This material still contains water in its matrix, so tends to bubble up a lot when first applied. This certainly DOES lead to more of a mess around the forge and quicker accumulation of heavy slag / clinker in the bottom of the fire pot. However, the washing borax is quite cheap (about $2 per pound) and easily available at the local grocery store. (For a longer discussion of Welding and Fluxes, see Wednesday, August 23, 2006 - 'Norse Meat Spit - Period Fluxes?'.)

This is certainly a dramatic image, if not the best illustration. Once the stack is fluxed, it is carefully brought up to an even welding heat. The stack is constantly rotated, as the lower surface in the fire is hotter than the upper. It is critical to a successful weld that the heat evenly penetrates the entire stack. A balance must be made between producing high temperatures in the forge, but at the same time not interjecting excess oxygen into the atmosphere surrounding the metal. Once the ideal temperature is reached (judged by colour and experience), the stack is quickly moved to the anvil and a series of rapid hammer strokes are worked down the surface on both sides. The pattern of these strokes not only 'tack welds' the loose plates, they also serve to sweep out the flux. This in tern floats out any debris or oxide that may have formed in between the individual plates. After 10 to 15 minutes of careful heating - the actual weld itself takes about 30 seconds! I like to do my first weld using a hand hammer, usually a 1000 gm / 2.2 pound for a combination of control and penetration.
(Sorry that I do not have an image of the actual welding. I was taking these photos myself while I worked, so they represent places in the ongoing process where I could stop for a couple of seconds to grab the camera.)

Just after the weld, while the block is still yellow hot, those binding wires should be removed. Remember these have been holding that loose stack of plates together during the initial heat to welding temperature. There is a bit of a trick to this - getting the thick stack to temperature WITHOUT burning off the much thinner wires. An alternative to using wires would be to MIG weld the plates together at the end. I'm more of a traditionalist - and the wire method is how I learned (and teach for that matter). Reguardless, the wires are now loosely welded into the flat side of the block. These are removed by grabbing the loose sides with a pair of pliers and then with a rolling motion pulling each set free. You could weld the wires into the block of course, but the way they project from the sides would make this difficult and messy. Removing the wires should be done as quickly as possible to preserve the heat in the block and reduce exposure to room oxygen (limiting scale formation).

Once the wires are removed, the block has the edges quickly wire brushed to remove old flux and any fire scale. If the hammer stokes of the first weld have been controlled and even, the sides should have remained relatively straight. The sides all round are fluxed again and the block returned to the fire. The block is once again returned to an even welding heat throughout. Careful observation during this heating will point out any areas were the initial weld may be imperfect. This will show in colour breaks through the material. Ideally there will be none of this, but if its obvious an area of the block is not welded, a second hand hammered weld may be required.
Now, I used to do my second consolidation weld using a heavier (1.5 kg / 3.5 lb) hand hammer. And then go on, again by hand, to flatten and draw out the welded billet. This process of a single weld and draw, undertaken alone, would take me roughly 2 1/2 hours. I could manage this heavy work three times over the course of two days - and then would have to take a half day off to rest. A couple of years back I invested in the first prototype of David Robertson's small air hammers. This tool, with the required air compressor, was not cheap. It does have the great advantage of not only speeding the time of drawing out, but more importantly to me (especially these days!) using MACHINE rather than MUSCLE power.
The second consolidation weld is thus taken under the air hammer. The force of the hammer ensures that the entire height of the stack is correctly welded. Starting at a welding heat also means a considerable amount of the drawing out also can occur in the same step. I work over the entire bar quickly to ensure the welds, then concentrate on drawing out using the residual orange heat.

This shows the relative size of that first weld to draw sequence. The upper stack is ready for the fire, the lower billet has been tack welded, consolidation welded with first draw. the width of both of these remains at roughly 1". You can clearly see how the thickness has been converted to length. The dark bands that show on the welded billet are the iron layers. The central bar is a core rod drawn to rough length for comparison.
I have been welding the prepared stacks two at a time. The process is to weld and run the first draw, then weld the second stack. Once both billets look pretty much as you see above, I will then finish up drawing the two to rough length. I never make it practice to attempt more than TWO billets welded as described in a single fire - or as a single work session. Both the fire and myself are too tired to perform correctly on a third weld series!

Here you can see the process of drawing the roughly 1/2 thick by 10 inch long billet out to a rough core rod. At this point I am taking each of the potential cores out to roughly 3/8 square by 24". Once all the stacks are welded, I will determine the actual length and dimension required and prepare them for the twisting process that is the hallmark of a pattern welded blade.
More to come...
After the plates that make up the individual billets that are used to form the core rods are prepared, the next step is to weld the blocks and draw them out to rough length. As a reminder, each of the stacks are made up of 9 layers of wrought iron / mild steel / L6 alloy, and are roughly 6" long by 1" wide and about 1 1/4" tall. Each is bound together with three loops of 'soft iron' fencing wire.
This first image shows the starting stack, the billet after welding and the rough drawn out core rod. For knives, I normally start with a stack roughly 4 inches long. My main coal forge has a good sized rectangular fire box, but even still, the six inch length of these stacks was about the longest that can be easily brought to an even welding heat.
For successful forge welding, the key is managing the fire. You can see here I have laid two lines of fire brick alongside the fire pot to further increase the size of the heat zone. The total height of the fire is roughly 12 inches, with at least four inches of burning fuel below the work being heated here. Use of a classic 'cavern' style fire is also essential to both evenly heating the metal and achieving the correct oxygen free atmosphere around it.
As soon as the stack has come up to a dull red heat, I generously flux all edges of the metal with borax. I personally use 'Twenty Mule Team' washing soda. This material still contains water in its matrix, so tends to bubble up a lot when first applied. This certainly DOES lead to more of a mess around the forge and quicker accumulation of heavy slag / clinker in the bottom of the fire pot. However, the washing borax is quite cheap (about $2 per pound) and easily available at the local grocery store. (For a longer discussion of Welding and Fluxes, see Wednesday, August 23, 2006 - 'Norse Meat Spit - Period Fluxes?'.)
This is certainly a dramatic image, if not the best illustration. Once the stack is fluxed, it is carefully brought up to an even welding heat. The stack is constantly rotated, as the lower surface in the fire is hotter than the upper. It is critical to a successful weld that the heat evenly penetrates the entire stack. A balance must be made between producing high temperatures in the forge, but at the same time not interjecting excess oxygen into the atmosphere surrounding the metal. Once the ideal temperature is reached (judged by colour and experience), the stack is quickly moved to the anvil and a series of rapid hammer strokes are worked down the surface on both sides. The pattern of these strokes not only 'tack welds' the loose plates, they also serve to sweep out the flux. This in tern floats out any debris or oxide that may have formed in between the individual plates. After 10 to 15 minutes of careful heating - the actual weld itself takes about 30 seconds! I like to do my first weld using a hand hammer, usually a 1000 gm / 2.2 pound for a combination of control and penetration.
(Sorry that I do not have an image of the actual welding. I was taking these photos myself while I worked, so they represent places in the ongoing process where I could stop for a couple of seconds to grab the camera.)
Just after the weld, while the block is still yellow hot, those binding wires should be removed. Remember these have been holding that loose stack of plates together during the initial heat to welding temperature. There is a bit of a trick to this - getting the thick stack to temperature WITHOUT burning off the much thinner wires. An alternative to using wires would be to MIG weld the plates together at the end. I'm more of a traditionalist - and the wire method is how I learned (and teach for that matter). Reguardless, the wires are now loosely welded into the flat side of the block. These are removed by grabbing the loose sides with a pair of pliers and then with a rolling motion pulling each set free. You could weld the wires into the block of course, but the way they project from the sides would make this difficult and messy. Removing the wires should be done as quickly as possible to preserve the heat in the block and reduce exposure to room oxygen (limiting scale formation).
Once the wires are removed, the block has the edges quickly wire brushed to remove old flux and any fire scale. If the hammer stokes of the first weld have been controlled and even, the sides should have remained relatively straight. The sides all round are fluxed again and the block returned to the fire. The block is once again returned to an even welding heat throughout. Careful observation during this heating will point out any areas were the initial weld may be imperfect. This will show in colour breaks through the material. Ideally there will be none of this, but if its obvious an area of the block is not welded, a second hand hammered weld may be required.
Now, I used to do my second consolidation weld using a heavier (1.5 kg / 3.5 lb) hand hammer. And then go on, again by hand, to flatten and draw out the welded billet. This process of a single weld and draw, undertaken alone, would take me roughly 2 1/2 hours. I could manage this heavy work three times over the course of two days - and then would have to take a half day off to rest. A couple of years back I invested in the first prototype of David Robertson's small air hammers. This tool, with the required air compressor, was not cheap. It does have the great advantage of not only speeding the time of drawing out, but more importantly to me (especially these days!) using MACHINE rather than MUSCLE power.
The second consolidation weld is thus taken under the air hammer. The force of the hammer ensures that the entire height of the stack is correctly welded. Starting at a welding heat also means a considerable amount of the drawing out also can occur in the same step. I work over the entire bar quickly to ensure the welds, then concentrate on drawing out using the residual orange heat.
This shows the relative size of that first weld to draw sequence. The upper stack is ready for the fire, the lower billet has been tack welded, consolidation welded with first draw. the width of both of these remains at roughly 1". You can clearly see how the thickness has been converted to length. The dark bands that show on the welded billet are the iron layers. The central bar is a core rod drawn to rough length for comparison.
I have been welding the prepared stacks two at a time. The process is to weld and run the first draw, then weld the second stack. Once both billets look pretty much as you see above, I will then finish up drawing the two to rough length. I never make it practice to attempt more than TWO billets welded as described in a single fire - or as a single work session. Both the fire and myself are too tired to perform correctly on a third weld series!
Here you can see the process of drawing the roughly 1/2 thick by 10 inch long billet out to a rough core rod. At this point I am taking each of the potential cores out to roughly 3/8 square by 24". Once all the stacks are welded, I will determine the actual length and dimension required and prepare them for the twisting process that is the hallmark of a pattern welded blade.
More to come...
Monday, November 13, 2006
Westward Viking - Dr Birgitta Wallace
"The Historic Sites Association of Newfoundland and Labrador is very pleased to announce the recent publication of Westward Vikings The Saga of L'Anse aux Meadows, by Birgitta Linderoth Wallace. The book was edited by Shannon Lewis Simpson, and the design was by Vis a Vis Graphics. This publication is 128 pages long, with an extensive bibliography, and full colour throughout. It is designed to give the general public and visitors to L'Anse aux Meadows a background on the site and its position in the Norse/Viking settlement of the North Atlantic in an accessible manner. The book contains many photographs and pictures, and has a soft cover."

The official launch date for Dr Wallace's latest book is November 23 (at St John's NFLD). At present she is working on another book on the same topic, but this a more academic treatment. She is also working on the "Where Is Vinland?" segment of the GREAT UNSOLVED MYSTERIES IN CANADIAN HISTORY web site.
For more information on Westward Vikings, including ordering information, go to my unofficial web site:
see : www.warehamforge.ca/Westward Vikings
Birgitta is an old friend and mentor. She is a close advisor for the Norse Encampment living history program at L'Anse aux Meadows.
Darrell
Tuesday, November 07, 2006
'Redemption' Smelt - 11/07/06
Over the weekend, members of DARC gathered here in Wareham for a general workshop session. I had marked the date initially as an iron smelt. General forge work was done on Saturday, and Sunday was the day for that smelt. This turned out to be one of those times that things did not go well. We ended up with a block of slag and hardly any metal at all.
For a report on the Sunday smelt (the raw experimental data) you could go to :
www.warehamforge.ca/ironsmelting/1106data.html
I was pretty frustrated because the smelt on Sunday had not turned out. There were a couple of small lumps of iron - maybe a pound between the three. So Monday late morning I packed all the required gear out to the smelt area and ran another smelt.
This time I positioned the base using charcoal fines at the correct level - as we had learned and have been doing normally. (I feel THIS was the reason the Sunday smelt failed.) On Sunday we had used a 'natural' base of wood ash from the preheating plus settled charcoal - which proved way too porous. The slag as it forms obviously just runs through the charcoal and settles too low into the furnace - and too far away from the heat generated at the tuyere.
The height of the smelter was extended another 30 cm by the use of a sheet metal cylinder. The clay came to 60 cm above the tuyere. This extra height made a considerable improvement on the efficiency of the smelter. The charcoal used was from a local small producer. It is all oak, and comes pre sized to very even 1" pieces. This fuel is also extremely dry - so the weight per standard pail is a bit less (at 3 lb 12 oz). Neil has suggested that we start to measure volume as well as weight (basically density).
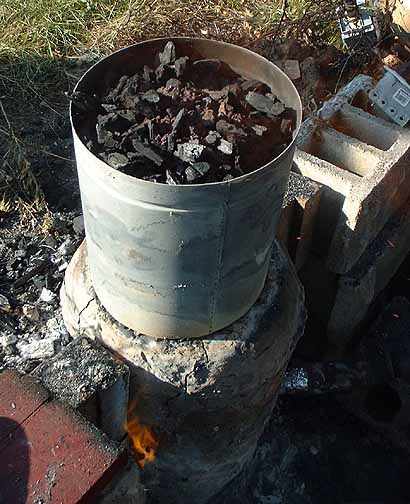
Showing the top of the smelter with a fresh charge of ore.
This is the THIRD firing of the clay cobb furnace, and the smelter itself seems to have stabilized.. There is a single crack on the front face that could use repairing, but other than the expected breakage around the tap arch, the smelter suffers hardly any damage at all. The ceramic tuyere also is almost totally intact. This was the second use of it, and it appears ready for yet another firing. As Skip had suggested, the clay sinters and then gets coated inside with a layer of slag at a stable shape. These two factors certainly appear to be protecting the smelter at a stable configuration - again as he suggested. For this firing I did nothing other than work three bricks in to form a larger tap arch.
For the Monday smelt, I gathered up all the slag from Sunday and re-cycled it through the smelter. Intentionally, I used a volume of this 'gangue' as the initial charge - to allow this material to establish the new slag bowl bottom. This seems to have worked well. I then charge the ore I had on hand. There was roughly 20 lbs of pre-roasted Virginia Rock Ore, which did have to be crushed. Once this had been added, I used the balance of the gangue material from Sunday, to a total of about 20 lbs.
Working on Mike's latest brain storm, I started charging in fairly large amounts - and kept it at that level. I was using considerably more air than we have used in the past. The 'theoretical' amount for this 25 cm diameter would be between 600 to 900 litres per minute, but the air rate was set to roughly 1050. I had a solid consumption of roughly 4 lbs charcoal every 8 minutes (see the notes). I charged ore at 3 lbs per pail and the gangue at 2.25 lbs. I kept the gangue a bit lower than the ore as the pieces were larger and figured (correctly) that they would take longer to heat.

Showing the first 'self tapping' of the smelter
What Skip calls 'Happy Slag' self tapped latter into the sequence - about when it should. The slag was dense, black and fluid - all the signs of a good iron rich slag. This was also re-cycled. I had absolutely no problem with blockage of the tuyere through the smelt.
For extraction, I burned down the charcoal to just above tuyere level and then clear remaining charcoal and thump from the top. The size of the bloom suggested it would be pretty hard to extract from the top. So I pulled the bricks and dug out the base of fines. By then thumping from the top - the bloom pretty much popped out the bottom. Even working alone, the extraction was very easy. I might suggest that at least for a slightly smaller bloom - clearing the base and then thumping the slag bowl down certainly appears to make extraction a LOT easier.

Showing the cleaned bloom with partial cutting
The biggest challenge was trying to compact the hot bloom working alone!
I got a classic bowl shape to the bloom, about 6 inches across and maybe 3 inches thick. It proved easy enough to knock off the attached slag and mother to clear the iron. I did work it over with a hand hammer to at least get rid of the really loose stuff. I started to cut - using my bloom axe in my left and a roughly 5 lb sledge with one hand (not very well!) I got maybe a third of the way down before the bloom was just to darn cold. Again thanks to Mike for the idea of using the green wood stump. I could never have held the bloom to an anvil working alone.
The finish weight is roughly 15 lbs. Note that this was off my fishing scale so only an approximation. I'll take it into town today and see if I can use the Post Office scale. This appears a very nice, classic bloom shape. Feels pretty dense. I will spark test it latter today and get back to you on the actual weight and guesstimated carbon content.
For a report on this Monday smelt (the raw experimental data) you could go to :
www.warehamforge.ca/ironsmelting/1106B-data.html
Darrell
For a report on the Sunday smelt (the raw experimental data) you could go to :
www.warehamforge.ca/ironsmelting/1106data.html
I was pretty frustrated because the smelt on Sunday had not turned out. There were a couple of small lumps of iron - maybe a pound between the three. So Monday late morning I packed all the required gear out to the smelt area and ran another smelt.
This time I positioned the base using charcoal fines at the correct level - as we had learned and have been doing normally. (I feel THIS was the reason the Sunday smelt failed.) On Sunday we had used a 'natural' base of wood ash from the preheating plus settled charcoal - which proved way too porous. The slag as it forms obviously just runs through the charcoal and settles too low into the furnace - and too far away from the heat generated at the tuyere.
The height of the smelter was extended another 30 cm by the use of a sheet metal cylinder. The clay came to 60 cm above the tuyere. This extra height made a considerable improvement on the efficiency of the smelter. The charcoal used was from a local small producer. It is all oak, and comes pre sized to very even 1" pieces. This fuel is also extremely dry - so the weight per standard pail is a bit less (at 3 lb 12 oz). Neil has suggested that we start to measure volume as well as weight (basically density).
Showing the top of the smelter with a fresh charge of ore.
This is the THIRD firing of the clay cobb furnace, and the smelter itself seems to have stabilized.. There is a single crack on the front face that could use repairing, but other than the expected breakage around the tap arch, the smelter suffers hardly any damage at all. The ceramic tuyere also is almost totally intact. This was the second use of it, and it appears ready for yet another firing. As Skip had suggested, the clay sinters and then gets coated inside with a layer of slag at a stable shape. These two factors certainly appear to be protecting the smelter at a stable configuration - again as he suggested. For this firing I did nothing other than work three bricks in to form a larger tap arch.
For the Monday smelt, I gathered up all the slag from Sunday and re-cycled it through the smelter. Intentionally, I used a volume of this 'gangue' as the initial charge - to allow this material to establish the new slag bowl bottom. This seems to have worked well. I then charge the ore I had on hand. There was roughly 20 lbs of pre-roasted Virginia Rock Ore, which did have to be crushed. Once this had been added, I used the balance of the gangue material from Sunday, to a total of about 20 lbs.
Working on Mike's latest brain storm, I started charging in fairly large amounts - and kept it at that level. I was using considerably more air than we have used in the past. The 'theoretical' amount for this 25 cm diameter would be between 600 to 900 litres per minute, but the air rate was set to roughly 1050. I had a solid consumption of roughly 4 lbs charcoal every 8 minutes (see the notes). I charged ore at 3 lbs per pail and the gangue at 2.25 lbs. I kept the gangue a bit lower than the ore as the pieces were larger and figured (correctly) that they would take longer to heat.
Showing the first 'self tapping' of the smelter
What Skip calls 'Happy Slag' self tapped latter into the sequence - about when it should. The slag was dense, black and fluid - all the signs of a good iron rich slag. This was also re-cycled. I had absolutely no problem with blockage of the tuyere through the smelt.
For extraction, I burned down the charcoal to just above tuyere level and then clear remaining charcoal and thump from the top. The size of the bloom suggested it would be pretty hard to extract from the top. So I pulled the bricks and dug out the base of fines. By then thumping from the top - the bloom pretty much popped out the bottom. Even working alone, the extraction was very easy. I might suggest that at least for a slightly smaller bloom - clearing the base and then thumping the slag bowl down certainly appears to make extraction a LOT easier.
Showing the cleaned bloom with partial cutting
The biggest challenge was trying to compact the hot bloom working alone!
I got a classic bowl shape to the bloom, about 6 inches across and maybe 3 inches thick. It proved easy enough to knock off the attached slag and mother to clear the iron. I did work it over with a hand hammer to at least get rid of the really loose stuff. I started to cut - using my bloom axe in my left and a roughly 5 lb sledge with one hand (not very well!) I got maybe a third of the way down before the bloom was just to darn cold. Again thanks to Mike for the idea of using the green wood stump. I could never have held the bloom to an anvil working alone.
The finish weight is roughly 15 lbs. Note that this was off my fishing scale so only an approximation. I'll take it into town today and see if I can use the Post Office scale. This appears a very nice, classic bloom shape. Feels pretty dense. I will spark test it latter today and get back to you on the actual weight and guesstimated carbon content.
For a report on this Monday smelt (the raw experimental data) you could go to :
www.warehamforge.ca/ironsmelting/1106B-data.html
Darrell
Thursday, November 02, 2006
Early Iron 3 - Smelt Two to Norse Anvil!
I may have mentioned that I undertook two smelts at Early Iron 3 in Peter's Valley. The second smelt was with the assistance of Dick Sargent, and was fired on the wrap up day on Monday Oct 9. In past years this day sees the departure of most all the participants early in the day, with only the four of us team leaders hanging over till the Tuesday. Also this has come to be 'weird smelt day' - usually some wild idea contributed by Mike McCarthy.
Mike's weird idea this time was 'stick it too it'. Instead of our standard slow ramping up of ore from a single scoop / pound per charcoal charge (4 lbs in this case), we STARTED ore charges at close equal amounts of ore to charcoal. This amount was increased from that level to about as large an amount as the smelter could stand. The maximum ore additions reached 6 lbs per bucket, with 4.5 lbs each 9 minutes being the averages.
Rather than try to insert another table on to the BLOG - I will just send you off to the Wareham Forge / Iron Smelting area. If you want to see the field data for this smlt - go HERE
(www.warehamforge.ca/ironsmelting/Early Iron 3/EarlyIron3-B.html)
The smelter was a re-use of the standard Flue Tyle teaching / experimental test bed developed by Lee Sauder & Skip Williams. They had set this up for a Saturday demonstration smelt, which was undertaken by Mike assisted by Lee. The furnace was in pretty good shape, just needing a bit of patching with clay around the tap arch and the tuyere. For the Monday smelt I used one of my normal ceramic tube tuyeres, but one of Lee's high volume blowers. (Sorry - I don't have air volume numbers for these - but it would be the range of 1000 litres per minute.)
The overall numbers were a bit surprising. Roughly 100 lbs of the Virginia Rock ore were charged (about 45 KG). Because of the high ore additions, considerably less charcoal than normal was consumed, roughly 130 lbs total (58 kg). The smelt was also faster considering its volumes - about 4 1/2 hours altogether (plus an hour for pre-heat).
The end result of this smelt was a very nice solid bloom. Extraction was basically from the bottom. Unfortunately there was no large sized scale on hand to get a finished weight. The bloom was slightly consolidated, then sectioned in half, and one half into quarters.
Lee and Mike had been working in the forge most of the day on a sculptural piece created from the bloom they had made on Saturday. Normally I'm pretty beat after a day long smelt, but they were keen to compress my quarter section to see what the quality was. Under Lee as forge master, with most of the striking labour supplied by Mike, and some contribution of myself as second striker, the section was forged to a very faithful replica of a Viking Age anvil.
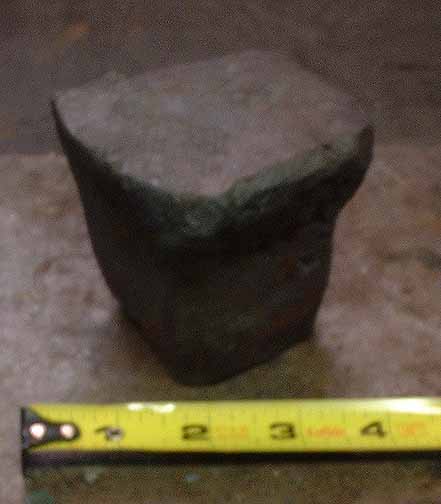
The finished object is rough cube 3 inches (7.5 cm) on a side. Finished weight is almost exactly 2 kg (roughly 4 1/2 lbs). It tapers slightly to the base (to permit solid mounting in a wooden stub latter). One of the sides shows fracturing, but it was decided to leave this crack as is rather than weld it shut. This was done to accent the nature and origin of the source material. At this point the surface is just hammer flattened. I have not decided if I will actually further smooth or polish the face. As it is the anvil will certainly serve its function. Right now the remaining three faces have two differing rough radius curves and one section that is relatively sharp. Again these edges could be dressed to even them up, but they will certainly prove functional. Lee's estimate of the relative carbon content (based on his extensive experience forging out blooms) is that this iron is some place between a 'pure' wrought iron and a modern mild steel in carbon (say equivalent to a 1010 material).
We all were extremely happy with the result. Although there are no measurements of the starting weight of the bloom before forging, the comparison of the ore weight to finished object is of note. Although not an exact ratio, the finished production yield is roughly 18% - considerably better than has been suggested by some other researchers
Darrell
Mike's weird idea this time was 'stick it too it'. Instead of our standard slow ramping up of ore from a single scoop / pound per charcoal charge (4 lbs in this case), we STARTED ore charges at close equal amounts of ore to charcoal. This amount was increased from that level to about as large an amount as the smelter could stand. The maximum ore additions reached 6 lbs per bucket, with 4.5 lbs each 9 minutes being the averages.
Rather than try to insert another table on to the BLOG - I will just send you off to the Wareham Forge / Iron Smelting area. If you want to see the field data for this smlt - go HERE
(www.warehamforge.ca/ironsmelting/Early Iron 3/EarlyIron3-B.html)
The smelter was a re-use of the standard Flue Tyle teaching / experimental test bed developed by Lee Sauder & Skip Williams. They had set this up for a Saturday demonstration smelt, which was undertaken by Mike assisted by Lee. The furnace was in pretty good shape, just needing a bit of patching with clay around the tap arch and the tuyere. For the Monday smelt I used one of my normal ceramic tube tuyeres, but one of Lee's high volume blowers. (Sorry - I don't have air volume numbers for these - but it would be the range of 1000 litres per minute.)
The overall numbers were a bit surprising. Roughly 100 lbs of the Virginia Rock ore were charged (about 45 KG). Because of the high ore additions, considerably less charcoal than normal was consumed, roughly 130 lbs total (58 kg). The smelt was also faster considering its volumes - about 4 1/2 hours altogether (plus an hour for pre-heat).
The end result of this smelt was a very nice solid bloom. Extraction was basically from the bottom. Unfortunately there was no large sized scale on hand to get a finished weight. The bloom was slightly consolidated, then sectioned in half, and one half into quarters.
Lee and Mike had been working in the forge most of the day on a sculptural piece created from the bloom they had made on Saturday. Normally I'm pretty beat after a day long smelt, but they were keen to compress my quarter section to see what the quality was. Under Lee as forge master, with most of the striking labour supplied by Mike, and some contribution of myself as second striker, the section was forged to a very faithful replica of a Viking Age anvil.
The finished object is rough cube 3 inches (7.5 cm) on a side. Finished weight is almost exactly 2 kg (roughly 4 1/2 lbs). It tapers slightly to the base (to permit solid mounting in a wooden stub latter). One of the sides shows fracturing, but it was decided to leave this crack as is rather than weld it shut. This was done to accent the nature and origin of the source material. At this point the surface is just hammer flattened. I have not decided if I will actually further smooth or polish the face. As it is the anvil will certainly serve its function. Right now the remaining three faces have two differing rough radius curves and one section that is relatively sharp. Again these edges could be dressed to even them up, but they will certainly prove functional. Lee's estimate of the relative carbon content (based on his extensive experience forging out blooms) is that this iron is some place between a 'pure' wrought iron and a modern mild steel in carbon (say equivalent to a 1010 material).
We all were extremely happy with the result. Although there are no measurements of the starting weight of the bloom before forging, the comparison of the ore weight to finished object is of note. Although not an exact ratio, the finished production yield is roughly 18% - considerably better than has been suggested by some other researchers
Darrell
Saturday, October 28, 2006
Blower Rates
Since I started my series of experimental iron smelts - AIR RATES have been a constant concern and problem.
With many of the smelts undertaken with DARC, the intent was to work back from predictable modern equipment towards a possible all Viking Age smelt. We have had some good experimental results, but more work remains in this endevor.
Since October of 2004, most of the smelts listed as using an electric blower have used the same vacumn cleaner blower. Although the blower was scrounged at my local dump, the unit is a very good quality OLDER machine - from the early 1960's. Despite some early problems, once the original wireing was replaced the blower has proven dependable. The output is adjusted through a control box that uses an electric outlet that is modified by a standard light dimmer switch.
Some researchers are quite dismissive of 'vacumn smelting'. I personally find this attitude snobbish and unrealistic. Teams keeping careful records and producing duplicatible results should be commended - reguardless of the personal resources they bring to the activity of re-learning lost ancient techniques.
Please follow this link to see the charts (on the Wareham Forge / Iron Smelting series).
(Sorry if you suffered through the badly formatted version of this posting. This was my first attempt to transpose data from the evil MiCROSOFT through to a web posting...)
Darrell
Friday, October 20, 2006
'Loki' Smelter - part 2
Early Iron 3 Symposium
October 7, 2006.
If you are wondering where the name 'Loki' comes in....
At SmeltFest in March, Dick Sargent and I build and twice fired a larger
modified version of the basic clay cobb furnace. Reaching the point in
my smelting experience where I'm less frantic over the process, I
decided to play a little with the clay - and sculpted the base of that
furnace. I shaped the jaws of a serpent or dragon, which in effect spat
out the flame at the mouth of the smelter. Vandy christen this furnace
'Jormungand' - named for the World Serpent of Norse mythology.
(If you are interested, see the report on that smelt - over on the Iron
Smelting part of the main Wareham Forge web site.)
The image above shows the smelter under construction. My standard method
has been to use a form, usually sheet metal, to create the interior
spacing of the smelter. As was done with Jormungand, the form in this
case was a length of stove pipe. I had found an ideal 8' (20 cm)
diameter piece in the barn. This was covered with a layer of paper to
keep the clay from sticking to it. (An important step!). The three half
bricks that formed the tap arch are also covered this way before the
clay work starts. Note also the shallow pit dug in front of the smelter
(which rests on the ground) to ease the tapping of slag.
The first batch of clay cobb I mixed up was a bit on the sloppy side.
Skip Williams had suggested the addition of charcoal fines to the
chopped straw and powdered clay mix that I have used in the past. He had
good results with the charcoal mix in smelts he had recently undertaken
in Holland at a European gathering of iron makers. So I altered the mix
to roughly 50 % clay, 25 % chopped straw and 25 % charcoal fines. These
all by rough volume. I have found in the past that the type and
condition of the straw actually makes a big difference in how much water
needs to be added to the mix. The straw we scrounged up from the old
barn at Peter's Valley was not ideal - either in terms of plant matter
or dryness. With the use of the charcoal addition as well, I just plain
got my proportions wrong.
The overall shape, with the slightly expanded base, was not entirely
intentional. I had built up the first lower section to about The long
and short of all that was that the first layer of clay was too damp,
and started to slump under the weight of the second lot that composed
the upper half of the smelter. This layer had started at roughly 7 - 8
cm thick - but was slowly expanding to closer to 10 cm. To stop further
slagging, I found some piece of scrap lumber and tied them in a rough
circle around the base. These pieces would remain in place through the
initial drying fire step. The end result was the rather elegant
shouldering of the bottom part of the finished smelter - just about at
tuyere level.
As with most of my recent smelts, I used a ceramic tube for the tuyere.
I have been getting these from a local potter's supply house. The
original function of these tubes are as shelf supports for porcelain
kilns. They are rated not to slump until about 1200 C - about the
operating temperature of the smelter. The tubes come 30 cm long and have
a 2.5 cm interior diameter. For those who have looked at the
archaeological evidence for early smelters in northern Europe -this 2.5
cm interior diameter is relatively consistent. The cost of each of these
tubes is about $10 delivered to my workshop. They have been used for
most of our smelts for the last year (about 10 so far) with good results.
With the tuyere tube in place - I was struck right away with the
shoulder, well, being a shoulder. The tuyere forming a mouth or tongue.
It proved fairly easy to add two eyes, projecting eye brows and a
drooping moustache. A final touch was to cut two shallow holes into the
body of the smelter to create the pupils. When the smelter was at full
heat, the result was two orange glowing eyes!
There are a number of bellows stones with simple line carvings of faces.
usually interpreted as being the god Loki. Generally the Norse had a
very arms length relationship with the divine Powers. Since Loki is the
trickster, depicting him blowing on the forge may have been an attempt
to harness his aspect in an attempt to control the fire. Any smith (much
less a smelter) knows how easily things can go wrong in forge or furnace!
more to come....
Thursday, October 19, 2006
'Loki' Smelter at Early Iron
Early Iron 3 Symposium
Peter's Valley Craft Centre
October 7, 2006.
This is just a fast note on one of the many smelts undertaken at Early Iron this year.
On Saturday, Early Iron overlapped with an annual public event the 'Pig Iron Roast' at Peter's Valley. The organizers asked if the team leaders could provide a public demonstration smelt. To that end, TWO furnaces were built on Friday and fired the next day. Lee Sauder and Mike McCarthy constructed one of the same 'Flue Tyle' test furnaces that the participants would themselves build Saturday and fire in three person teams on Sunday. (With excellent results I should say!). Mike would be primarily responsible for conducting the smelt in this furnace - and produced a large bloom of nicely workable iron from it.
I took the opportunity to test two variables which I was interested in. First, I wanted to test a slightly smaller sized furnace based on the standard North European model. Normally the interior diameters we have built in the past were on the range of 25 - 30 cm (10 - 12 inches). This text furnace was only 20 cm interior.
(loki exterior)
The second variable was to try using a potential 'Bog Ore' type. I had gathered about 10 kg of a pudding like red oxide out of standing water in a drainage ditch near Minden Ontario the summer of 2005. Although I was certain the material contained iron oxide, I had no good way of knowing if the concentration was high enough to make for a viable ore.


I have posted up the raw data of this smelt on the main Wareham Forge - Experimental Iron Smelting area.
more to come....
Peter's Valley Craft Centre
October 7, 2006.
This is just a fast note on one of the many smelts undertaken at Early Iron this year.
On Saturday, Early Iron overlapped with an annual public event the 'Pig Iron Roast' at Peter's Valley. The organizers asked if the team leaders could provide a public demonstration smelt. To that end, TWO furnaces were built on Friday and fired the next day. Lee Sauder and Mike McCarthy constructed one of the same 'Flue Tyle' test furnaces that the participants would themselves build Saturday and fire in three person teams on Sunday. (With excellent results I should say!). Mike would be primarily responsible for conducting the smelt in this furnace - and produced a large bloom of nicely workable iron from it.
I took the opportunity to test two variables which I was interested in. First, I wanted to test a slightly smaller sized furnace based on the standard North European model. Normally the interior diameters we have built in the past were on the range of 25 - 30 cm (10 - 12 inches). This text furnace was only 20 cm interior.
(loki exterior)
The second variable was to try using a potential 'Bog Ore' type. I had gathered about 10 kg of a pudding like red oxide out of standing water in a drainage ditch near Minden Ontario the summer of 2005. Although I was certain the material contained iron oxide, I had no good way of knowing if the concentration was high enough to make for a viable ore.
I have posted up the raw data of this smelt on the main Wareham Forge - Experimental Iron Smelting area.
more to come....
Monday, October 16, 2006
Viking Age Cauldron Hanger
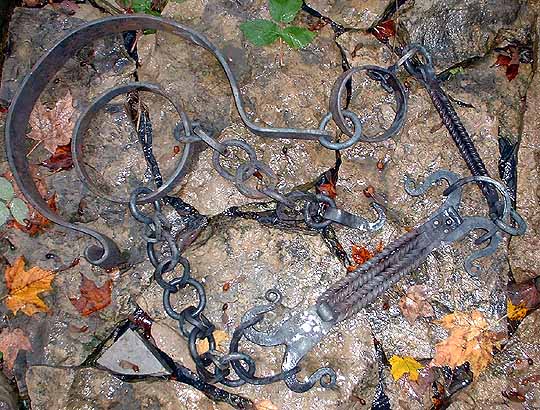
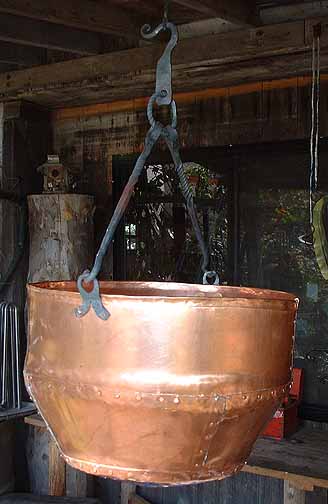
This is the largest of the pieces I have made for the Outlander production.
In use it is intended to hang off a main house beam roughly 8 inches in width, at a height of 8 1/2 feet above the floor. The most likely pot it will be used in combination with is the large copper cauldron also shown above. I have made a number of different pots for the production, and designed the hanger to allow for use of any of the various different sizes. Quite intentionally, I made limited use of round profile stock, sticking instead to square or flat as would be more likely for a smith during the Viking Age.
The overall inspiration for the hanger is the artifact found in the Sutton Hoo ship burial, which dates to 625 AD. This is a saxon royal burial, but decorative chain hangers have been found in a number of Viking Age burials as well. Although the Outlander hanger is shorter than Sutton Hoo, I used a number of the same chain elements in its construction. I wanted to take special care in the detailing on this specific object, as I suspect it may end up featured in some of the filming. Historically, these highly elaborate forgings were status symbols and presentation pieces, hanging in the central focal point of the hall over the fire.
In the overall photograph, you can see the flow of the elements. The hanger has been designed with a large hook at the top to allow for easy installation and removal from the beam. Bellow this is a roughly 4" diameter ring with a swivel mounted in it that allows the lower chain to rotate.
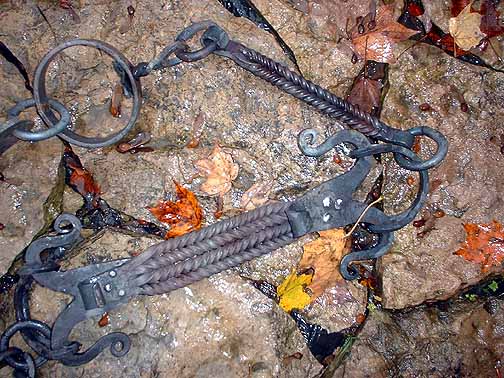
Below the swivel, there is a straight bar unit. This element is made of two bars, each of 3/8" square stock which have been twisted in alternate rotations. The ends of the bars are then forge welded, and the block flattened and folded to a small hook. Rings made of 3/8" round join the completed element to the chain.
The most elabaorate elements of the series are next. In use, this large bar and hook piece will hang at roughly eye height of the standing viewer. The form of this element is a bundle of four alternately twisted rods, forged to shape much the same as the single bar element described above. This unit is attached to a pair of spiral hooks at each end by means of three rivets. The individual hooks are formed from a piece of 1 1/2 x 3/16 " flat bar which was slit at one end and then drawn out. The two points were then formed to the reversal curve hooks. The opposite end was then drawn down to a taper, and this also formed into a curve. On the lower unit, that terminal curve is large enough to hook up the lower chain.
On both ends of the bar and hook element are a matching pair of 'flat 8' rings. These are formed of 1/4" square. First a large circle is formed and welded. This is then folded in half. The two folded ends are opened up to a small circle, and the balance of the curved half circle is tapped tightly closed. Again this is an element taken from the Sutton Hoo prototype.
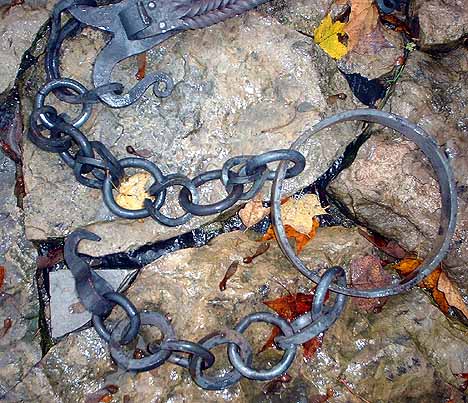
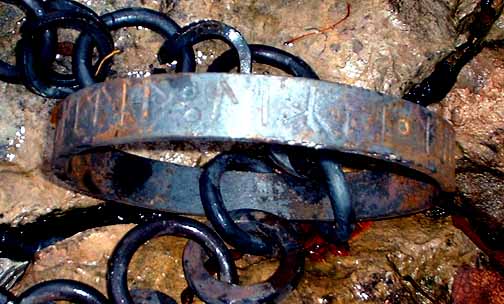
Just below the bar and hook element is a short length of chain made from a set of 'flat 8' style links joined by simple circles. The decorative links are similar to those described above, but in this case the finished link is a roughly 3 inch circle.
The lowest part of the chain is the working end, and is a simpler set of alternating round and square stock rings. It ends in a hook, formed from folding and welding a length of 3/4 x 3/16" flat stock.
In the centre is a large ring made of flat bar. I decided to sneak something in there for the Viking Age enthusiasts and die hard fans. The exterior of this ring is punched with a short text in runes. The text is in actual Old Norse, and reads:
KITIL • KIRthI • MIK / Ketil • Gerthi • Mik / 'Kettil Made This'. To those who have read much of the Wareham Forge or DARC web sites, you will recognize 'Kettil' as the characterization I use in museum presentations.
Wednesday, October 04, 2006
Outlander - Chain with Shackles
One of the projects for 'Outlander' is the creation of twenty feet of chain ending in wrist shackles.
First off, I am not aware of an artifact sample from the Viking Age that could be specifically identified as a prisoner or slave chain. There are a number of lengths of chain - but most commonly these are related to the cooking fire. Cauldron hangers and chain trammels of several types are found from the Viking Age. These range from simple circular or 'figure 8' shaped loops (just pinch the middle of a circle) to extremely elaborate elements found in royal quality burials.
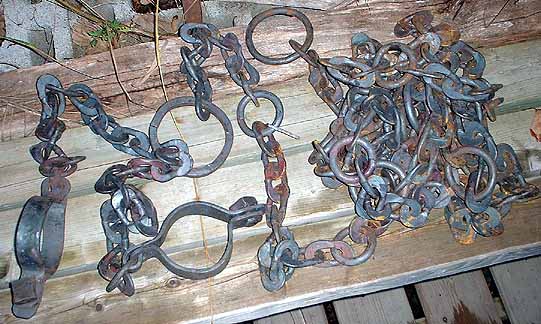
For this project, the twin factors of design and cost would work directly against each other. The ideal approach would be to hand form and then forge weld each individual link. I would normally charge $5 per link for this work. You can see that the cost of 20 feet (roughly 200 links) would be very high! On top of that there was a time constraint to consider - ALL the work for this project was to be delivered for Oct 1.
In the end I proposed taking a heavy weight commercial chain and re-forging all the links to dress them to a hand worked look. This was considerably less labour than creating each link from scratch. I cut the chain into short one foot lengths, allowing for considerably easier handling of the hot and flexible chain. The end of each link was flattened - specifically in a random and irregular fashion. The short lengths were then joined back together using a roughly 3 inch diameter round link of 3/8 round.
One extra thing I did was quench the completed chain from a bright orange heat. Although basically a mild steel material, this quenching served to slightly harden the metal. The reason for this was sound. The completed chain makes a wonderful tinkling noise as it is dragged around!
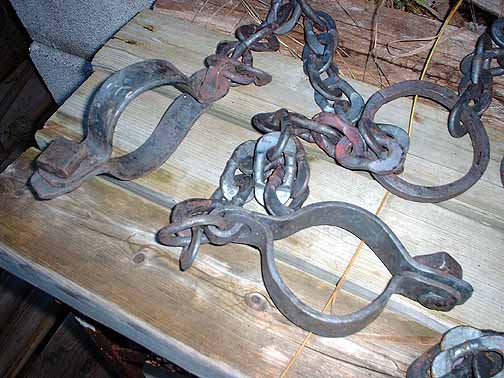
The two terminal ends finished up in a much larger (roughly 4 inch) ring. At one end this was made from 3/8 square stock - this was the end the shackles were attached to.
The two shackles were attached to a separate two foot length that fitted through the terminal ring, allowing for free motion. The shackles themselves are formed of two pieces of heavy flat stock. Each pair of U shaped pieces ends in the same kind of loop and tab arrangement seen on sea chest hinges. Here the tab of the loop is made over long to allow for a small ring that attaches the chain. The end of the tab is welded back down to the cuff.
On the other end are punched a pair of matching holes. Through these is the locking pin. Historically this would be done by inserting and hammering over a rivet. Actors however, and not likely to submit to imprisonment (as much as the director might want to nail them down!) I had to design some system that would maintain the visual feel of the Viking Age - but also allow for quick application and removal. In the end I found a type of blind fastener the ideal size - thats a tube shaped bolt with the threads on the INSIDE. To each of these was welded a roughly square chunk of metal hot cut from heavy stock to give the appearance of a square head rivet. I created two different types of matching bolts. - one round headed and one square headed. These take about 30 seconds to screw in place to secure each shackle.
First off, I am not aware of an artifact sample from the Viking Age that could be specifically identified as a prisoner or slave chain. There are a number of lengths of chain - but most commonly these are related to the cooking fire. Cauldron hangers and chain trammels of several types are found from the Viking Age. These range from simple circular or 'figure 8' shaped loops (just pinch the middle of a circle) to extremely elaborate elements found in royal quality burials.
For this project, the twin factors of design and cost would work directly against each other. The ideal approach would be to hand form and then forge weld each individual link. I would normally charge $5 per link for this work. You can see that the cost of 20 feet (roughly 200 links) would be very high! On top of that there was a time constraint to consider - ALL the work for this project was to be delivered for Oct 1.
In the end I proposed taking a heavy weight commercial chain and re-forging all the links to dress them to a hand worked look. This was considerably less labour than creating each link from scratch. I cut the chain into short one foot lengths, allowing for considerably easier handling of the hot and flexible chain. The end of each link was flattened - specifically in a random and irregular fashion. The short lengths were then joined back together using a roughly 3 inch diameter round link of 3/8 round.
One extra thing I did was quench the completed chain from a bright orange heat. Although basically a mild steel material, this quenching served to slightly harden the metal. The reason for this was sound. The completed chain makes a wonderful tinkling noise as it is dragged around!
The two terminal ends finished up in a much larger (roughly 4 inch) ring. At one end this was made from 3/8 square stock - this was the end the shackles were attached to.
The two shackles were attached to a separate two foot length that fitted through the terminal ring, allowing for free motion. The shackles themselves are formed of two pieces of heavy flat stock. Each pair of U shaped pieces ends in the same kind of loop and tab arrangement seen on sea chest hinges. Here the tab of the loop is made over long to allow for a small ring that attaches the chain. The end of the tab is welded back down to the cuff.
On the other end are punched a pair of matching holes. Through these is the locking pin. Historically this would be done by inserting and hammering over a rivet. Actors however, and not likely to submit to imprisonment (as much as the director might want to nail them down!) I had to design some system that would maintain the visual feel of the Viking Age - but also allow for quick application and removal. In the end I found a type of blind fastener the ideal size - thats a tube shaped bolt with the threads on the INSIDE. To each of these was welded a roughly square chunk of metal hot cut from heavy stock to give the appearance of a square head rivet. I created two different types of matching bolts. - one round headed and one square headed. These take about 30 seconds to screw in place to secure each shackle.
Early Iron 3 - this Weekend!
EARLY IRON THREE
Early Iron is the annual symposium that explores the direct physical
process of turning ore into workable iron - using variations on historic
method - held in the NE of the USA.
Go On for details here
PLAN TO ATTEND!
Next Weekend - Oct 7 - 8
We have kept Early Iron set on the weekend that combines US Columbus Day
and CDN Thanksgiving to give you all an extra day to travel.
This year the event is located at the Peters Valley Craft School, under
the direction of Dick Sargent. This is located at the top NW corner of
New Jersey, putting the event a bit more central to everyone.
Don't let the tie in to 'Pig Iron Fest' fool you - its going to be
another busy weekend of HANDS ON iron smelting! As with the very
successful schedule used last year, participants will be grouped in to
small teams and each will prepare materials and construct a smelter the
first day - then undertake a full smelt the second. Last year EVERY TEAM
successfully produced a workable iron bloom to share between them!
Participants will work under the supervision of :
Mike McCarthy - has been teaching a number of hands on workshops in iron
smelting over the last year, and is sure to have good instructions to
pass along.
Dick Sargent - attended a week long intensive at Rockbridge Bloomery
this year, and has been organizing some of those same workshops with Mike.
Darrell Markewitz - has continued experimenting with Viking Age methods
- and finally got all the historic equipment to produce workable iron.
Skip Williams - will be flying in from Europe the day before he leaves
for EI3 - and is absolutely sure to have fresh insights to share.
Lee Sauder - has been experimenting with clay construction methods -
and well, its just the great resource he always is.
ATTENDANCE IS LIMITED
To only * 30 * for the full workshop participants.
If you have never smelted before, this is an ideal chance to learn from
those have a combined experience of well over 150 experimental iron smelts.
If you have smelted a couple of times, this is the perfect chance to get
some of those problems sorted out in an active workshop.
If you are in a related field of study - we'd love your input! Come
along and see how the theory applies to direct practical methods. Even
if you don't want to get right in there and smelt yourself, there are
single day 'observer' passes available.
Hope to see you there!
Darrell
(for the 'Gangue aux Fer')
Wednesday, September 27, 2006
Oseberg Tripod Replica
This is the next in the series of Viking Age cookware I am working on for 'that film'.
This, strictly speaking, is a replica rather than a reproduction. The measurements are within about 10 - 15 % of the original artifact, but I worked with a bit less attention to fine details (exact construction of the basket hook and twisting) than I would have for a detailed reproduction. I have made versions of this object a number of times in the past. It is not shown as standard item on the Wareham Forge 'Norse Replicas - Cookware' sheet, but can be custom ordered.

The source artifact here is the tripod found in the Oseberg ship burial - Norway circa 825. This is a royal quality object, and I believe the only metal tripod known from the Viking Age. Both of these facts should be considered when anyone is considering using this object as the prototype for a re-creation. It is far more likely that a traveler's camp in the Viking Age would use three cut saplings and a simple rope and chain trammel combination. (With the living history presentations DARC mounts, we have changed to reflect this use.)
There is another 'problem' with this object - mainly that it is barely functional in a practical sense. There are two aspects to this.
First, the size of the tripod and its integral hook are such that even with a small sized Norse cookpot - there is hardly any space below the hanging pot to allow for the fire itself. In the overall image, the pot seen is a reproduction (in copper) of one of the pots found in the Mastermyr find. The piece of wood seen is roughly 10 cm in diameter. Although it does not show as clearly as I had hoped, there is actually only about 15 cm clearance between the bottom of this pot and ground level. Certainly not enough to construct a camp fire. It should be noted that the cauldron actually found in the Oseberg burial was considerably LARGER than this, and when hung on the tripod barely clears the ground at all. You would have to dig your fire into a pit in the ground to use that combination,
This lack of clearance relates to the second problem. Not only does the size of the tripod cause any cooking pot to hang right on top of the fire wood - the integral hook does not allow for any adjustment to the height of the pot. As any skilled camp cook knows, you adjust for cooking temperature by raising or lowering the pot over the fire.
The overall impression all these factors give is that this tripod was intended as the * symbol * of a cooking tool, rather than a * working * cooking tool. For a more detailed commentary on artifacts that may not be quite what they first appear, see my article 'Aunt Martha's and Damnthings'.

A detailed image of the top of the tripod - folded for carry.
The three legs are joined by a short loop that has been peened over to fix them in place. Note the use of a square cut spacer (not found on the artifact - but this gives better action to the hot peening step). The integral hook is formed of a pinched basket, made up of three individual rods. These are first twisted, and the longest is folded in half. The ends are then forge welded and drawn to the terminal hook. The last step is to open up the basket shape and fit a collar of flat stock at the middle.

A closeup of one of the clawed feet.
Here I have set the foot over a gap in a stone floor to show how the pointed feet would be pressed into the ground. Two shorter pointed pieces are forge welded to the main bar, then spread and curved. Note how the base of the foot is flattened and set at an angle to that of the leg. In use, this tripod has a fixed configuration, as determined by the angle of the feet and a curve at the top of each leg (see image above). This means that the tripod also has a fixed height when correctly mounted (refer to cooking use discussed earlier).
I am quite happy with how this piece turned out. I hope it can be seen in the finished film.
This, strictly speaking, is a replica rather than a reproduction. The measurements are within about 10 - 15 % of the original artifact, but I worked with a bit less attention to fine details (exact construction of the basket hook and twisting) than I would have for a detailed reproduction. I have made versions of this object a number of times in the past. It is not shown as standard item on the Wareham Forge 'Norse Replicas - Cookware' sheet, but can be custom ordered.
The source artifact here is the tripod found in the Oseberg ship burial - Norway circa 825. This is a royal quality object, and I believe the only metal tripod known from the Viking Age. Both of these facts should be considered when anyone is considering using this object as the prototype for a re-creation. It is far more likely that a traveler's camp in the Viking Age would use three cut saplings and a simple rope and chain trammel combination. (With the living history presentations DARC mounts, we have changed to reflect this use.)
There is another 'problem' with this object - mainly that it is barely functional in a practical sense. There are two aspects to this.
First, the size of the tripod and its integral hook are such that even with a small sized Norse cookpot - there is hardly any space below the hanging pot to allow for the fire itself. In the overall image, the pot seen is a reproduction (in copper) of one of the pots found in the Mastermyr find. The piece of wood seen is roughly 10 cm in diameter. Although it does not show as clearly as I had hoped, there is actually only about 15 cm clearance between the bottom of this pot and ground level. Certainly not enough to construct a camp fire. It should be noted that the cauldron actually found in the Oseberg burial was considerably LARGER than this, and when hung on the tripod barely clears the ground at all. You would have to dig your fire into a pit in the ground to use that combination,
This lack of clearance relates to the second problem. Not only does the size of the tripod cause any cooking pot to hang right on top of the fire wood - the integral hook does not allow for any adjustment to the height of the pot. As any skilled camp cook knows, you adjust for cooking temperature by raising or lowering the pot over the fire.
The overall impression all these factors give is that this tripod was intended as the * symbol * of a cooking tool, rather than a * working * cooking tool. For a more detailed commentary on artifacts that may not be quite what they first appear, see my article 'Aunt Martha's and Damnthings'.
A detailed image of the top of the tripod - folded for carry.
The three legs are joined by a short loop that has been peened over to fix them in place. Note the use of a square cut spacer (not found on the artifact - but this gives better action to the hot peening step). The integral hook is formed of a pinched basket, made up of three individual rods. These are first twisted, and the longest is folded in half. The ends are then forge welded and drawn to the terminal hook. The last step is to open up the basket shape and fit a collar of flat stock at the middle.
A closeup of one of the clawed feet.
Here I have set the foot over a gap in a stone floor to show how the pointed feet would be pressed into the ground. Two shorter pointed pieces are forge welded to the main bar, then spread and curved. Note how the base of the foot is flattened and set at an angle to that of the leg. In use, this tripod has a fixed configuration, as determined by the angle of the feet and a curve at the top of each leg (see image above). This means that the tripod also has a fixed height when correctly mounted (refer to cooking use discussed earlier).
I am quite happy with how this piece turned out. I hope it can be seen in the finished film.
Tuesday, September 26, 2006
Just WHO spilt the beans? (Outlander)
A Clarification:
I have been asked by the Art Department of OUTLANDER PRODUCTIONS to remove the concept drawing I posted up as part of an earlier posting (Aug 28) that described work that I am currently undertaking. I had found the information I used on that earlier post by using a standard GOOGLE search using the key word 'Outlander'.
Now - I want to make extremely clear that the small image I used was taken from a fan type information and gossip web site : www.twitchfilm.net
There has been absolutely NO VISUAL INFORMATION transfered to me from my contacts at OUTLANDER what so ever.
OUTLANDER PRODUCTIONS has ordered a number of objects from me intended for set dressing on their current effort. Almost all of these pieces have been ordered from the normal standard objects offered on the 'Norse Replicas' section of the main Wareham Forge web site. As well, these pieces are almost without exception based on well known artifact samples. There is no way that these can be considered in any way 'original' or 'proprietary' designs - the source objects exist as part of the open historic record.
Of the large number of cookware and tool replicas ordered by the team at Outlander, only the cauldron hanger is not a close approximation of an existing artifact. The hanger is based on elements directly taken from that found at Sutton Hoo (Saxon - c. 600). Strictly speaking, even this piece should be considered a modification and interpretation of the historic artifact, rather than an original design.
If you look over the content of past contributions to 'Hammered Out Bits', you will find that the majority of the postings relate to technical aspects of blacksmithing or metalworking, plus discussion of historic materials - both with a strong leaning to the Viking Age.
Those commentaries that relate to the ongoing Outlander project primarily confine themselves to technical aspects of the metalwork, and discussions of the source objects as they apply to the material culture of the Norse.
I actually have no knowledge of how any of the pieces will be utilized by Outlander Productions. I have not been given any information about the film, its production, or any aspects of its visual designs by anyone at Outlander Productions.
Saturday, September 23, 2006
'Outlander' - Viking Age Cookware
What I have been doing # 5
If you have been following the blog for a while, you have seen the piece about my current project - an assortment of Viking Age replica cookware for the feature film 'Outlander. Todays entry will also refer back to an earlier commentary on historic welding fluxes - and the Lund meat spit...
This image shows a number of the cookware pieces for the Outlander project:

Spiral Iron - Here a pretty standard interpretation of the few existing artifact samples. All are very small, in the range of 10 - 15 cm diameter. Intended for use in the 'Chieftain' house, mainly due to the large amount of metal required to form the piece.
Dish Iron - There are two of these, each with a dish about 25 cm diameter. One virtually identical to the artifact samples, and intended for a 'Bondi' house. The second has been upscaled to suit the 'Chieftain'. On this piece there is line and dot punch work along the handle. The hanging loop has been created by punching and drifting. It is then detailed with punch work to resemble a human face. Quite intentionally, the handle is forked and the dish is attached to it using TWO rivets. There is at least one artifact sample that uses this method. (Which puts an end to the idea that the dish was rotated during cooking.)
Meat Fork - This is replica of a large meat cooking fork, used with a joint of meat which would be supported on a forked stick over the fire. This type is an alternative to a meat spit. The fork is made from a large piece of flat bar, split back and then drawn to points. The remaining bar is then shouldered and pulled to a cylinder. The socket was made separately (from heavy pipe in this case) and then the two pieces welded together. Set on a length of sapling.
Meat Spit - This is based on the Lund sword spit discussed in that earlier posting. Again a heavy piece of flat stock is the starting point for the working end. First the long tapered point was drawn out. I decided that this shape would taper in width and thickness, so keeping a rectangular cross section down the length. (Other interpretations often create a diamond cross section, but I can't see this on the artifact images and descriptions.) The base is then split and drawn to cylindrical points, which are then curled forward. The long shaft is made of a piece of square stock - with the two pieces welded together as the last step.
Next set of objects is a collection of woodworking and blacksmithing tools, followed by a cauldron hanger and several larger pots and cauldrons.
If you have been following the blog for a while, you have seen the piece about my current project - an assortment of Viking Age replica cookware for the feature film 'Outlander. Todays entry will also refer back to an earlier commentary on historic welding fluxes - and the Lund meat spit...
This image shows a number of the cookware pieces for the Outlander project:
Spiral Iron - Here a pretty standard interpretation of the few existing artifact samples. All are very small, in the range of 10 - 15 cm diameter. Intended for use in the 'Chieftain' house, mainly due to the large amount of metal required to form the piece.
Dish Iron - There are two of these, each with a dish about 25 cm diameter. One virtually identical to the artifact samples, and intended for a 'Bondi' house. The second has been upscaled to suit the 'Chieftain'. On this piece there is line and dot punch work along the handle. The hanging loop has been created by punching and drifting. It is then detailed with punch work to resemble a human face. Quite intentionally, the handle is forked and the dish is attached to it using TWO rivets. There is at least one artifact sample that uses this method. (Which puts an end to the idea that the dish was rotated during cooking.)
Meat Fork - This is replica of a large meat cooking fork, used with a joint of meat which would be supported on a forked stick over the fire. This type is an alternative to a meat spit. The fork is made from a large piece of flat bar, split back and then drawn to points. The remaining bar is then shouldered and pulled to a cylinder. The socket was made separately (from heavy pipe in this case) and then the two pieces welded together. Set on a length of sapling.
Meat Spit - This is based on the Lund sword spit discussed in that earlier posting. Again a heavy piece of flat stock is the starting point for the working end. First the long tapered point was drawn out. I decided that this shape would taper in width and thickness, so keeping a rectangular cross section down the length. (Other interpretations often create a diamond cross section, but I can't see this on the artifact images and descriptions.) The base is then split and drawn to cylindrical points, which are then curled forward. The long shaft is made of a piece of square stock - with the two pieces welded together as the last step.
Next set of objects is a collection of woodworking and blacksmithing tools, followed by a cauldron hanger and several larger pots and cauldrons.
Wednesday, September 13, 2006
the Vikings Return!
Step back in time with the Haffenreffer Museum to experience daily life
in the Dark Ages! The Haffenreffer is attached to Brown University and
is located in Bristol Rode Island (just east of Providence).
http://www.brown.edu/Facilities/Haffenreffer/vikings/vikings.html
Sat & Sun, Sep 16 & 17,
11 a.m. to 5 p.m.
The Haffenreffer Museum of Anthropology invites you to spend a weekend
exploring the Viking World! The Dark Ages Re-creation Company from
Ontario, Canada, brings the Viking Age to life on the grounds of the
museum while top scholars share their knowledge of the Viking world.
Enjoy public lectures, re-enactments, combat demonstrations, Iceland
animals, artisan displays, and hands-on activities for the whole family.
Saturday Lecture by Darrell Markewitz - the Dark Ages Re-creation Company
Adventures in Iron Smelting
Wrought iron was a fundamental raw material to the Norse, who used
it to make everything from ship's rivets to swords. The exact methods
used in the Viking Age to change bog ore into useful metal are unknown
however. Since 2000, members of DARC have been involved in a series of
experimental iron smelts. The results are a blend of archaeology,
metallurgy, practical experience - and wild-ass guesses. Join us for an
overview of successes and failures, and what may have been discovered
about the Viking Age
Intro Bio:
Darrell traces his interest in Living History, metalwork, and the Viking
Age back to his student days at Ontario College of Art in the late
1970's. After college, he worked as a historic interpreter at Black
Creek Village in Toronto, eventually becoming the artisan blacksmith
there. His personal studies into the artifacts and culture of the Norse
continued, leading to the 'Norse Encampment series of living history
programs in the 1990's. This included creation of the interpretive
program at L'Anse aux Meadows National Historic Site of Canada for Parks
Canada, the only presentation of its kind in North America. Other
significant museum work has included consulting on the Smithsonian's
'Vikings - North Atlantic Saga' and the Newfoundland Museum's 'Full
Circle - First Contact. He created the stand alone exhibit 'The World of
the Norse' for the Cranbrooke Institute of Science. He has delivered a
number of published papers related to historic interpretation methods
and experimental iron smelting.
Darrell was instrumental in the formation of the Dark Ages Re-creation
Company, a group of dedicated amateur historic interpreters who
specialize in daily life in the Viking Age. The Company was started in
2000 to work on events surrounding the Viking Millennium, and has
undertaken presentations in conjunction with a number of major traveling
exhibits.
One of the signature features of the Norse outpost at L'Anse aux Meadows
was the first processing of iron ore into metal in North America.
Darrell was part of a special team assembled by Parks Canada in 2001 to
investigate the archaeology. This sparked his direct involvement in a
continuing series of experimental iron smelts, eighteen to date. Darrell
and the DARC smelt team are slowly working towards an understanding of
the practical methods used by Norse iron masters 1000 years ago.
Wednesday, September 06, 2006
Viking Age Smelt - September 2
Just a fast overview. The smelt was undertaken at 'Baron's Howe' - an SCA event hosted by Steve Muhlberger at Bonfield ON, just outside of North Bay. There was no power available on site, so all human powered equipment was required. The smelt was a continuation of the Dark Ages Re-creation Company's work into Viking Age smelting methods.
Team was composed of the primary DARC smelt group (Markewitz, Jarbeau, Peterson, Cook, Burnham) with assistance from various event participants for material preparation and bellows pumping (notably Russ Sheldon and Nick West).
The smelter was clay cobb, in this case roughly 100 lbs of commercial ball clay mixed with chopped hay and some local rough sand. A bundle of sticks was used as a form for the central shaft. Due to time constraints and fatigue, the cobb was mixed up considerably too loose, and significant sagging of the smelter was the result. The stones seen in the photograph were not originally intended, but were required to prop up the slumping base. The initial tuyere used was the standard high temperature ceramic with 2.5 cm ID.
Rough measurements of the smelter : 60 cm tall total
20 cm internal dia. at mouth
25 cm internal dia. at base
15 cm from tuyere to base
Air was supplied by the experimental 'Ubber Bellows' seen in the image. This is roughly based on possible Norse types - but enlarged to generate air volumes as suggested by early experiments (primarily Sauder and Williams). No definate measurements of the air delivery have been made to this point. Rough estimates are 90 l per stroke, with an average pump rate of 8 - 10 strokes per minute. With losses and the actual action of the system taken to account, a more realistic estimate is for a range about 500 - 600 litres per minute. (Peak delivery speed was measured at 70 kph.)
Ore was the Virginia Rock Ore, with about 12 kg of ore used. This was roasted and crushed to 'pea to rice with fines' as been done in past experiments. This amount is considered to be on the low end of what is required for a complete smelt reaction.
About 75 kg of charcoal was burned, the entire smelt running over about 7 hours including preheat.
There was a major failure in the air system at about six hours. This primarily due to exhaustion in the part of some of the bellows workers. The air was reduced, temperatures dropped and the slag froze inside the tuyere. Fast work with a slag tap, a replacement tuyere and switching to stronger bellows operators managed to get the smelt under control, but physical damage to the bellows itself occured. For these reasons, the 'shock charge' was omitted entirely and the smelt sequence cut short.
The end result was a roughly 1.5 kg bloom. Its appearance suggests it may be a higher carbon material. As with past smelts, the bloom was extracted through the top of the smelter.
The intent of this experiment was three fold:
First, the whole process was intended as a educational demonstration.
Second, some improvements had been made to the Ubber Bellows, and it was hoped that more experience would be gained related to this unit,
Third (and perhaps most significantly), the entire smelt was laid out to duplicate known features from 'House J / the Smithy' at L'Anse aux Meadows.

The smelt area was inside a rough approximation of the floor plan found at LAM. Our site was just slightly smaller, roughly 3.2 meters wide by 2.8 deep. As at LAM, the area was dug back into the side of a small hill. The size and placement of the smelter, stone anvil, and slack tube are roughly the same as indicated by the archaeology.
Of note is the debris field. First, there is a very distinctive void caused by the position of the smelt master,. For a right hander this is to the left side of the smelter (looking into the dugout mouth) There is also a lack of materials underneath the bellows, which must be placed to the right and forward of the smelter in this arrangement - to allow for room for the bellows operator.
1) This area shows larger pieces of unburned charcoal, perhaps with some unprocessed ore pieces. This represents spillage from additions to the smelter.
2) This area will have some of the above material, which then is covered with a quantity of partially burned charcoal and partially reduced and sintered ore fragments. This material is deposited when the balance of burning material is scooped from the smelter to extract the bloom. Material that was nearest to tuyere level will be to the top of this layer (smallest charcoal with the most ash, larger sintered ore pieces, closest to fully reduced).
3) This area will have considerable tap slag, ash and consumed charcoal fragments. This was just in front of the tap arch, and slag was pulled out here. Many of the pieces were pulled away while hot - creating tendrils of slag. Larger masses were tossed away from the work area entirely. (At LAM this would have been into the nearby creek.) In this experiment, this slag was dark greenish black, spongy in texture with gas bubbles making it quite low in density.
4) This area around the stone anvil contained fragments of the slag mass. The extracted bloom has considerable slag material attached, and light consolladation broke of egg to fist sized pieces of this material from the metal underneath. This slag (as in the past) is a medium gray in colour and relatively solid. Some smaller fragments of bloom metal would also be found here (any large enough to gather by eye were retained however).
Expect a more detailed field report to come, with additional photographs.
Neil and Karen have already posted up a number of their images from the weekend including the smelt at:
www.treheima.ca/temp/bonfield/
Team was composed of the primary DARC smelt group (Markewitz, Jarbeau, Peterson, Cook, Burnham) with assistance from various event participants for material preparation and bellows pumping (notably Russ Sheldon and Nick West).
The smelter was clay cobb, in this case roughly 100 lbs of commercial ball clay mixed with chopped hay and some local rough sand. A bundle of sticks was used as a form for the central shaft. Due to time constraints and fatigue, the cobb was mixed up considerably too loose, and significant sagging of the smelter was the result. The stones seen in the photograph were not originally intended, but were required to prop up the slumping base. The initial tuyere used was the standard high temperature ceramic with 2.5 cm ID.
Rough measurements of the smelter : 60 cm tall total
20 cm internal dia. at mouth
25 cm internal dia. at base
15 cm from tuyere to base
Air was supplied by the experimental 'Ubber Bellows' seen in the image. This is roughly based on possible Norse types - but enlarged to generate air volumes as suggested by early experiments (primarily Sauder and Williams). No definate measurements of the air delivery have been made to this point. Rough estimates are 90 l per stroke, with an average pump rate of 8 - 10 strokes per minute. With losses and the actual action of the system taken to account, a more realistic estimate is for a range about 500 - 600 litres per minute. (Peak delivery speed was measured at 70 kph.)
Ore was the Virginia Rock Ore, with about 12 kg of ore used. This was roasted and crushed to 'pea to rice with fines' as been done in past experiments. This amount is considered to be on the low end of what is required for a complete smelt reaction.
About 75 kg of charcoal was burned, the entire smelt running over about 7 hours including preheat.
There was a major failure in the air system at about six hours. This primarily due to exhaustion in the part of some of the bellows workers. The air was reduced, temperatures dropped and the slag froze inside the tuyere. Fast work with a slag tap, a replacement tuyere and switching to stronger bellows operators managed to get the smelt under control, but physical damage to the bellows itself occured. For these reasons, the 'shock charge' was omitted entirely and the smelt sequence cut short.
The end result was a roughly 1.5 kg bloom. Its appearance suggests it may be a higher carbon material. As with past smelts, the bloom was extracted through the top of the smelter.
The intent of this experiment was three fold:
First, the whole process was intended as a educational demonstration.
Second, some improvements had been made to the Ubber Bellows, and it was hoped that more experience would be gained related to this unit,
Third (and perhaps most significantly), the entire smelt was laid out to duplicate known features from 'House J / the Smithy' at L'Anse aux Meadows.
The smelt area was inside a rough approximation of the floor plan found at LAM. Our site was just slightly smaller, roughly 3.2 meters wide by 2.8 deep. As at LAM, the area was dug back into the side of a small hill. The size and placement of the smelter, stone anvil, and slack tube are roughly the same as indicated by the archaeology.
Of note is the debris field. First, there is a very distinctive void caused by the position of the smelt master,. For a right hander this is to the left side of the smelter (looking into the dugout mouth) There is also a lack of materials underneath the bellows, which must be placed to the right and forward of the smelter in this arrangement - to allow for room for the bellows operator.
1) This area shows larger pieces of unburned charcoal, perhaps with some unprocessed ore pieces. This represents spillage from additions to the smelter.
2) This area will have some of the above material, which then is covered with a quantity of partially burned charcoal and partially reduced and sintered ore fragments. This material is deposited when the balance of burning material is scooped from the smelter to extract the bloom. Material that was nearest to tuyere level will be to the top of this layer (smallest charcoal with the most ash, larger sintered ore pieces, closest to fully reduced).
3) This area will have considerable tap slag, ash and consumed charcoal fragments. This was just in front of the tap arch, and slag was pulled out here. Many of the pieces were pulled away while hot - creating tendrils of slag. Larger masses were tossed away from the work area entirely. (At LAM this would have been into the nearby creek.) In this experiment, this slag was dark greenish black, spongy in texture with gas bubbles making it quite low in density.
4) This area around the stone anvil contained fragments of the slag mass. The extracted bloom has considerable slag material attached, and light consolladation broke of egg to fist sized pieces of this material from the metal underneath. This slag (as in the past) is a medium gray in colour and relatively solid. Some smaller fragments of bloom metal would also be found here (any large enough to gather by eye were retained however).
Expect a more detailed field report to come, with additional photographs.
Neil and Karen have already posted up a number of their images from the weekend including the smelt at:
www.treheima.ca/temp/bonfield/
Wednesday, August 30, 2006
On Viking Age KNIVES
The following from a (long winded) post related to an ongoing discussion on the Dark Ages Re-creation Company list on suitable knives for the Viking Age...
> All the ON knives I've seen or seen pictures of have been single edge -
> Romans had double edged daggers and there is a Merovingian short sword /
> fighting knife that I think is double edged, and some very short double
> edged swords / long daggers from immediately post-Roman Briton. This
> doesn't seem to have carried over into the Scandinavian world / Viking age.
> I haven't seen any good sites discussing ON period fighting knives, but
> there is some interesting martial arts work being done in the US these days
> on Bowie knife techniques which could be very similar due to similar blade
> size & clip point shape....
>
> (Steve)
Just from a technical standpoint - and based on real sloppy memory. Much to my embarrassment, I find I have NO reference images on my own web sites! You should also check the earlier blog entry discussing general knife construction.
Most of the VA knives are short - in the 4 - 6 inch range. They almost all without exception have no cross guards. As I may have mentioned, these are grouped in two types:
Woman's knives are long thin triangles, tend to be relatively thin - maybe 3/4 of an inch or so at the handle. Think of a kitchen paring knife. As might be expected, these blades are lighter and more suited to food preparation and textile working. Expect the 'hanging pouch' type of scabbard.
As a base blade for these, the Russel 'Ripper' blades are about perfect. These as finished blade blanks (no handles) can be had from Atlanta Cutlery or Log Cabin Sport Shop http://www.logcabinshop.com (my past supplier). Cost is about $8 US plus the shipping. The Russels will have to get their full tang ground down to a thinner width. The best version of this I've made up is Bera's knife (ask to see it this weekend).
I've got one of these two - but its from the pre DARC days and has an etched blade and the full width tang with riveted slabs. (Those with long memories will remember the days when I had sold hundreds of these in Ealdormere!) Not suitable on four counts...
Mens knives tend to be the seax shape. Basically a straight edge, with a diagonal line down from the back that creates the point. The back may slope slightly upwards from the handle to the start of that diagonal. There are some that have the back parallel to the edge, or even sloping down slightly from the handle (more on this).
Now, within the seax type - there would appear to be 'kind of' three general size and shape ranges:
Small Tool - these tend to the four inch range. Generally the blades have the parallel back and edge, although there may be some widening to the tip. As might be expected, these are by far the most common. They represent the basic tool type - a more robust knife than the classic womans blade , as suits heavier general working tasks. Again expect the hanging pouch scabbard.
Heavy Hacking - There are a range of samples that run from the top end of the small tool range (about 6 inches) up to maybe 12 inches plus. These blades are wider and thicker, and generally tend to the shape that is tapers wider from the handle to the start of the diagonal line. Again generally the straight edge, but more likely to have a slight upwards curve near the point. (This is a function of the forging process by the way.) This style of blade is most likely to be worn across the back - with two suspension loops holding the blade parallel to the ground.
The construction with the width just back of the point places the greatest mass forward - such blades would hit heavy, but not move fast. Note again the lack of any guard for the hand. These blades are great for splitting kindling, but basically too awkward for any other purpose that that - or fighting. Steve's comment about parallels with the American version of the ancient 'clip point' shape are well taken.
'Knife / Sword' - The last class is much longer - with samples ranging closer to 18 to 24 inches (there is one in the British Museum that is closer to 30 plus inches!) These are more likely to have a slight taper from the handle to the start of the diagonal - and are relatively narrow in proportion to the great length. Although the length puts them into the range of short swords, they remain single edged and without guards. (I actually can't think of any artifact samples that we would consider a 'short sword' from the Viking Age.) I have seen one artifact sample that was locked inside a sheet bronze scabbard. (My own 'Serpent's Tongue' is based on that artifact.) The scabbard had two suspension loops, but the length was such that it would have been only practical to wear the blade on a baldric. The blade hangs edge UP - as seen with Oriental short swords.
Taken altogether, this suggests a light, fast moving and extremely sharp cutting blade. Likely useless against armour, but quite effective against 'street clothes'. I'd suggest looking to Japanese technique as a model.
So the long and short (da!) of it is that we should be looking to smaller knives in the two distinctive sex linked blade shapes, ideally with pouch scabbards. Good references are the 'Knives and Scabbards' book in the London Museum series and the "Ferrous Metalwork' book in the York series. There are supposed to have been something like 500 knives uncovered in Dublin at Woods Quay - but that has not been published yet.
Darrell
Subscribe to:
Posts (Atom)


