Thursday, July 31, 2008

What Happened to OUTLANDER...


Since its now on YouTube, I guess I can post the trailer here without fear of production staff anger (who knows???)


Thanks to Vandy for finding this - and to the Outlander fan site
at http://outlander.solsector.net
Reading the various snippets, it looks like the film is finally seeing limited release in Europe at various film festivals and test markets. Direct to DVD for North America??

Dave Cox and I did a number of pieces that will be seen in deep background in the Viking Village. (search for some of the earliest blog entries). I have hopes my cauldron hanger may at least show clearly...

Tuesday, July 29, 2008

Iron Smelting with Jake Keen


This is an excellent video segment (posted on YouTube) featuring Jake Keen. Jake is from the UK, but I have been able to work alongside him on three occasions: Early Iron 2 (2005), Smeltfest 2008, and the recent Heltborg symposium. At that event Jake and his friend Michael built and fired a huge early Iron Age beehive furnace. (check the report HERE. )

Tuesday, July 22, 2008

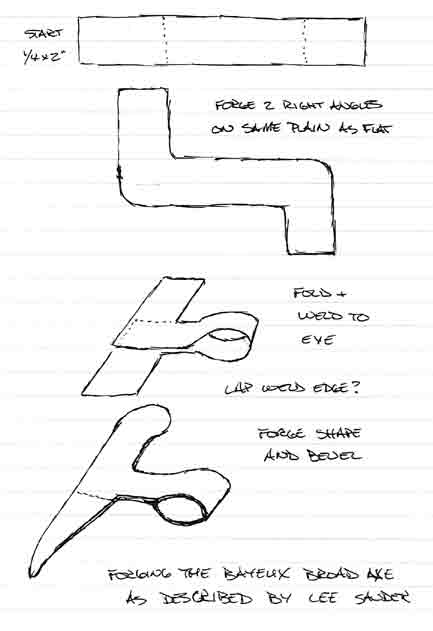
'T' Shaped Broadaxe - New details

The following came in yesterday from my good friend Lee Sauder. Lee is a very experienced blacksmith who runs Wood's Creek Forge in Lexington Virigina. ( He is also without a doubt the most experienced iron smelter in North America. Go to the Rockbridge Bloomery - this is where you have seen his name before on Hammered Out Bits.)


" I was looking at your blog, checking out the axes etc. When I was at the British museum last summer, I saw a well- corroded broadaxe very similar to the bayuex broadaxe, and it looked like they had forged it in a quite slick way. ...

This is a little hard to describe without sketching, but here goes. The body and wings were all forged of a single piece, I don't remember whether there was a separate steel edge, I don't think so though. It looks like they took a sinlge long piece of stout flat bar. Mark into quarters. Make a right angle edge bend, at the first quarter mark. Turn it over, make another rt angle edge bend at the opposite end, going the oyther direction. So now you have a kind of straight N shaped piece, or two L's joined in trhe middle. Then bend one the flat in the center, which forms the eye, the remainder of the flat- to flat center section is welded together for the shaft, and you have the two edge bends lined up to form the wings of the axe, just like that! You can see how this solves several problems- the grain of the iron is continuous, there's no single weld across the stress point of the T, you get a nice generous fillet at that T since there's double the metal there.

Clear as mud, I know. So basically, your set up is the shape of two L's joined at the top- the short leg of the L's point in opposite directions. When you fold it in the center, it's now a T.

I thought this was pretty sexy, and a great example of how our contemporary thinking is confused from working steel, without the habit of considering the diection of the slag stringers.

I've attached a picture. It doesn't show up that well here, but I'm pretty convinced this is how they did both of these ... "


One of the books I came home from Denmark with was 'Roar Edge - Skuldelev 3 skibet som arkaeologisk eksperiment' by Anderson / Crumlin-Pedersen / Vadstup / Vinner (Vinkingeskibshallen i Roaskilde - 1997). The volume is unfortunately in Danish, but details the reconstruction project of the Skuldelev 3 ship, the Roar Ege. The book is crammed with very clear line drawings of all the timbers, plus the construction methods that were used.
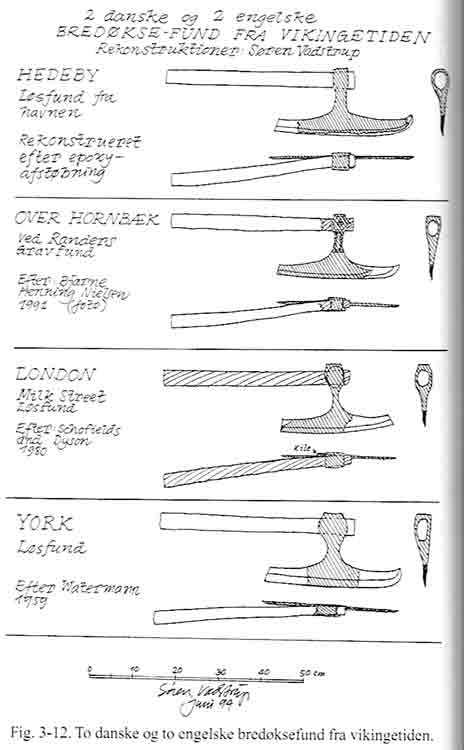
I was visiting with a bunch of friends over the weekend. One of the guys is very into small boats (Scott - he has a small lapstrake sailboat), so I had hauled along a couple of the books I had bought in Denmark. I was up before everyone else Sunday morning, so started looking through that volume. ( I have hardly cracked any of the books I brought back!) There was a whole chapter on tools, including a number of drawings of this specific T broad axe. They reference four samples, including the one from London that Lee had also provided the excellent image of. You can clearly see the weld line in that image too!
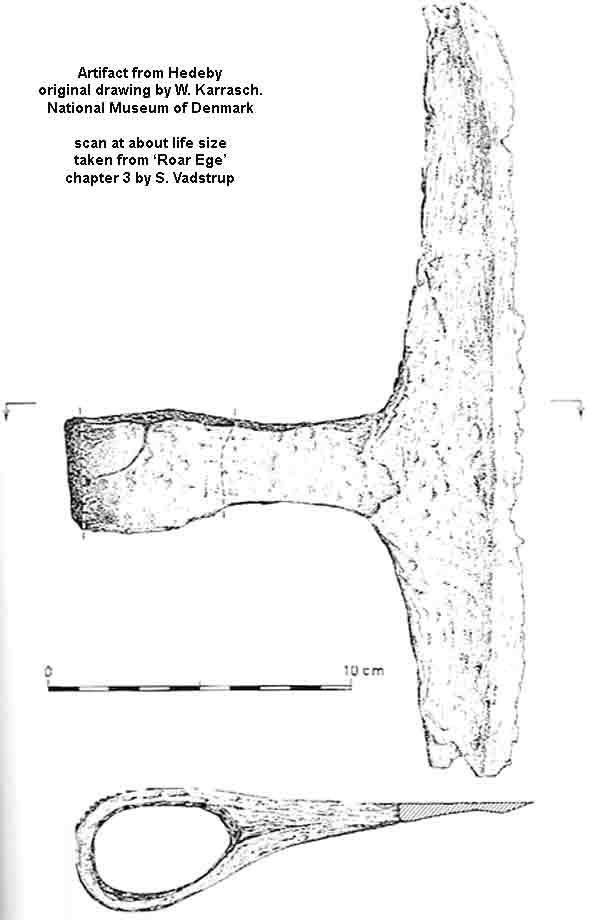
In the book there was this detail drawning of a broad axe from Hedeby in Sweden. The construction there appears to show a third method of constuction. One folded strip for the eye has been wrapped and then welded to the centre of a longer piece set at right angles (if I'm reading the drawing correctly).
The cross sections shown for the remaining two artifacts make them look like punched eyes like the method I had used. (Almost all the axes I saw in Denmark were punched eyes.)

Of course all this excellent reference material did not show itself until AFTER I had finished my reconstruction. I was happy to see that the artifact broad axes all show a cant to the handle that moves the hands out of the plane of the cutting edge. I had done this on my own version without a specific reference.

The method observed by Lee is certainly an elegant solution to the metal forming problem posed by the shape of the T broadaxe, most especially as it takes into account the grain strength requirements imposed by the historic use of bloomery wrought iron by the Norse.

I wish I could say that my solution was borne of knowledge, even though it appears to mimic that used on some of the artifact samples. The truth is that this was just the only way I could come up with of combining a thick block required to punch out an eye with the overall shape of the finished tool. I suspect that my method of using a complete centre layer of carbon steel would NOT have been the one used in the Viking Age. Most typical (if a hard cutting edge was used at all) would be a simple lap weld. This uses less of the hard steel.

'Life imitates Art'

Friday, July 18, 2008

Forging Broadaxe Video


This is my first experiment using YouTube...

This link is a short segment filmed at the Gransfors factory. It shows how THEY do this. A line shaft driven set of shapped dies set in a close line allows the worker to shape the block through multiple forming steps - all in a single heat!
GO HERE

Ship Tools - Adze / Broadaxe

The two most challenging tools for the LAM ship building tools set were replicas of the Mastermyr adze and the Bayeux broadaxe.

In an earlier post I had shown the source for the the Mastermyr tools ( HERE ) - my copy of (the quite excellent) 'The Mastermyr Find' by Arwidsson & Berg. This is an essential source for anyone interested in tools, blacksmithing or work working in the Viking Age. (Check a google search for 'Norm Larsson Books' to get a copy.)

The Mastermyr adze is a bit of a problematic tool - for the Viking Age proper. It was on the strength of this object that the find was later re-evaluated and the deposit date changed to closer to 1150 AD. This is a light single hand tool. It is described as having an edge width of 17 cm, the total weight of the head is only 700 grams (as found). The eye is roughly 3 cm long which would not allow for a very robust fitting at the handle, especially considering the blade width.

The tool may have actually been used as a kind of large 'slick for smoothing already axe shaped timbers. This also helps explain the overall light construction (weight and especially lack of strength at the eye). The tool may actually be intended to be used more like a big wide chisel. You would place the blade on the surface to cut, then strike the peen end with a mallet or hammer, driving the cutting edge along the surface of the wood. Depth of cut would be controlled by levering the handle. The extensive mushing over of the peens on both the Mastermyr adzes certainly suggests this use.

My reconstruction is pretty close to the 'new' weight of the original, working out to a total of 800 gm. The blade length is pretty close, at 19 cm, with the total length at 18 cm. It was formed from two pieces forged welded together. The block of the eye is lap welded to strip for the blade. This strip was itself created from a piece of spring steel lap welded first to a mild steel body.

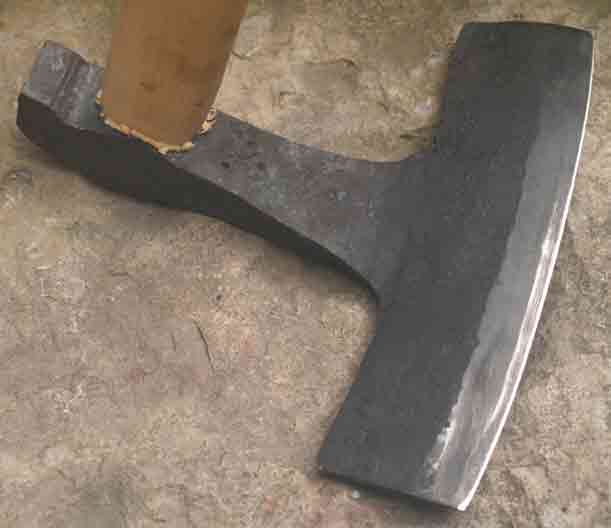
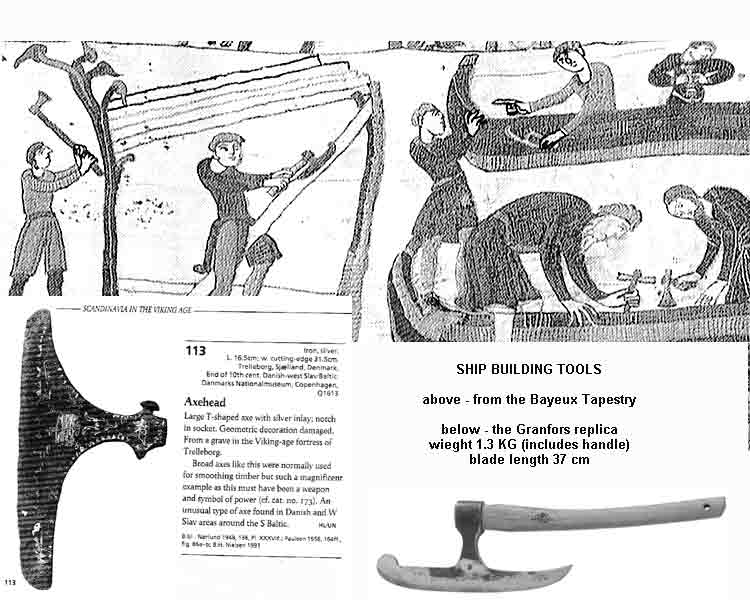
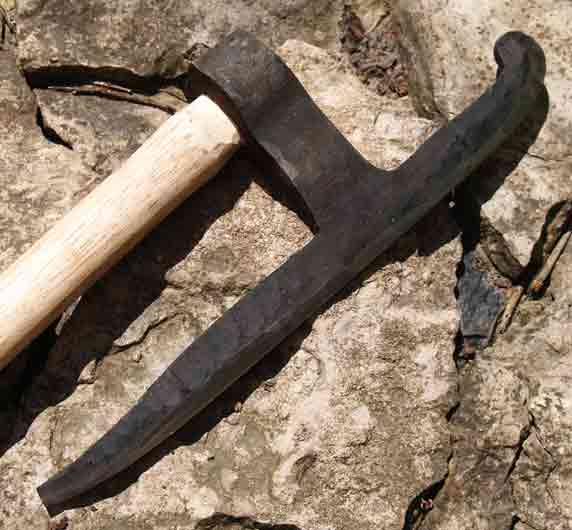
One of the most problematic tools in the entire set is this one - the large T shaped broad axe from the Bayeux Tapestry. As far as I have been able to tell, there is on a surviving example of this exact tool. My reference sheet (above) shows the two images from the Tapestry, which of course lack little detail, and don't even agree to size or use. I was able to find one related artifact, but only as a very small image. The (quite excellent!) Gransfors - Bruks company makes a replica of this tool. I did also lean on this reconstruction for my own version. The resulting tool is heavy, at 2.25 KG. The blade is 45 cm in length and 18 cm total width. Based on my experience with Settlement Era broadaxes, it is fitted with a 3/4 length handle (55 cm long). Unlike later broadaxes, this one has its edge with a central V bevel (not flat to one side). I did leave the eye slightly canted off the centre line of the blade, so the hands would clear the timber on right hand use. (I don't know if this was a feature of the original tools.) Like the adze above, the tool is made from two pieces. In this case the blade is made from three bars, with two pieces of mild steel encasing a full spring steel core. The eye block was here slit back to open a V shaped slot into which the blade was forge welded.This all was extremely hot and heavy work!

Wednesday, July 16, 2008

Norse Woodworking Axes

As I have mentioned, the main project I am involved in right now is producing a full set of Viking Age ship building tools for L'Anse aux Meadows NHSC (Parks Canada). In the last post I had talked a bit about the various source materials I have been using for the project. (You might want to refer back to the drawings).

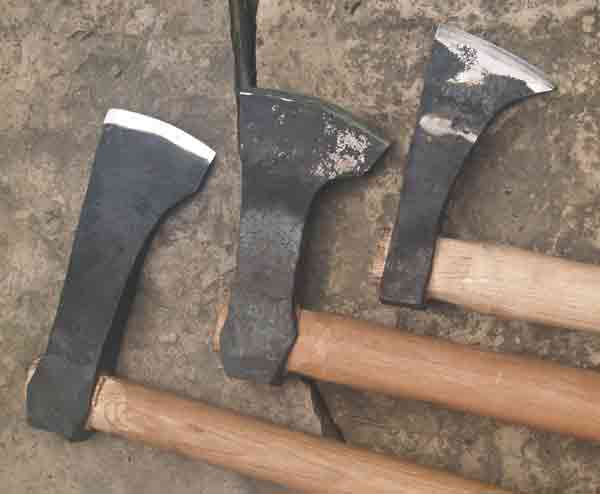
These are the various axes as they were completed. Through my own research, valuable insight from the Viking Ship Museum at Roskilde (detailed HERE), plus conversations with the staff at LAM, the following tools were agreed upon:

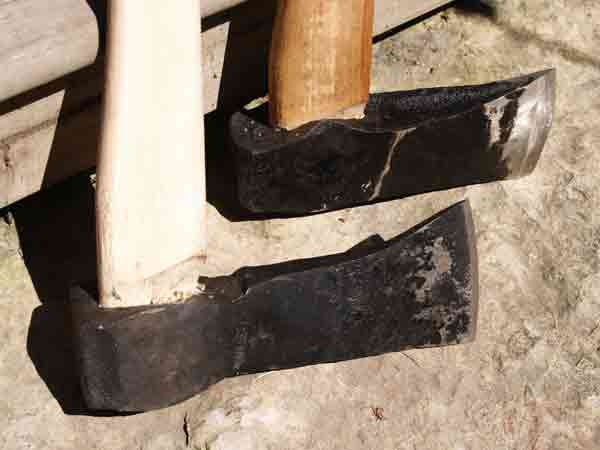
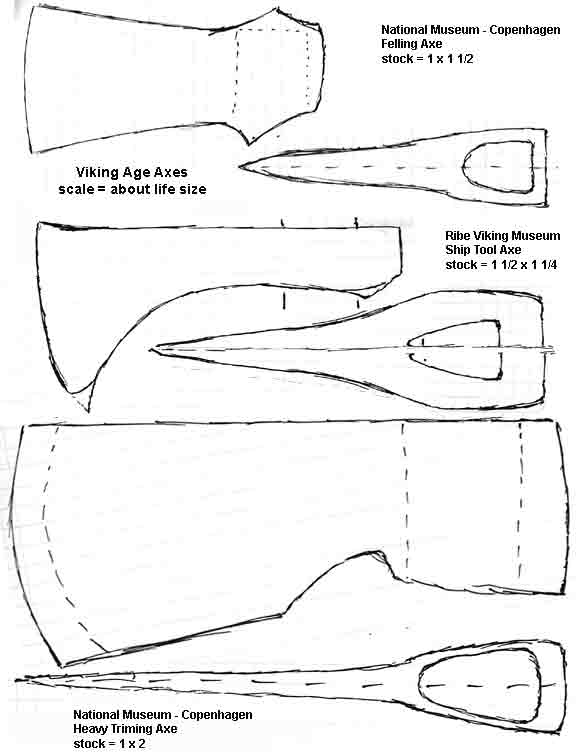
First it was determined there should be two heavier axes intended for raw timber processing. One is a felling axe with a long slender cross section (for better penetration). This head is 22 cm long with a 9 cm blade and weighs 2.25 KG. The second is a splitting axe, with a much wider wedge shape. This head is 19 cm long with a 8 cm blade and weighs 2.5 KG. The splitting axe was the first one I made up, and unlike the others is forged from a single piece of mid carbon spring steel (I had the material on hand). The starting stock for both of these axes was 1 1/2 x 2 inch bar.

The next set of axes are for shaping of the cut timbers. They are all lighter and have much longer tapers to the cross section. The image shows (L - R) the 'fine axe' based on one from the Mastermyr tool box. The head is 20.5 cm long and 8 cm wide and weighs 1.45 KG. (The original axe is somewhat lighter in construction - at 22 x 7 cm / 750 gm.) Next is based on a find from Dejbejerg Denmark (see below). Last is a 'light hatchet' based on an artifact at the Ribe Viking Museum. The head here is 17 cm long with an 8 cm blade and weight of 900 gm and is mounted on a shorter handle.

The Dejbejerg axe is branded 'Tom's Favorite' - a personal recommendation of one of the master shipbuilders at Roskilde. In this case the measurements are based on a modern replica, rather than an original artifact. My reference here was an excellent quality working tool produced by Danish blacksmith Aage Frederiksen (who has made most of the tools used at the Viking Ship Museum). My version is 18 cm long with a 10 cm blade at a weight of 920 gm.

All of the axes are forged using solid mild steel bars with punched eyes, the method used for all Viking Age artifacts. For some of the heads, a slit was made first, on the lighter tools a small oval punch was used initially. A combination of various tapered drifts were then used to create the final shape of the eye. (Settlement era axes are made of folded and welded flat stock, which gives a distinctive tear drop shape to the eye.) In most cases the sides of the eyes have been drawn out to produce the distinctive 'ears' common to many VA axes. Save for the splitting axe, all the tools have lap welded (one side) carbon steel cutting edges. The result is a tool that is both tough but will maintain a good working sharpness.

It was decided to use standard (and easily available) commercial handles for the axes to permit easy replacement as required. The two timber cutting axes use a 'straight axe handle', the shaping axes all use a more oval '32 inch sledge' handle. (Both purchased at your local Home Hardware.)

I have also been shooting a photo essay series for the creation of the two most complex of the forgings : the Mastermyr adze and the Bayeux broadaxe. I also hope to produce a short video segment on the Bayeux broadaxe - stay tuned!

Friday, July 11, 2008

Using Source - Norse Ship Tools

For L'Anse aux Meadows NHSC

My number of postings has dropped off (sorry) over the last couple of weeks. I have one major physical project underway, plus one 'paper' project I'm working on. The paperwork is related to the upcoming exhibit of contemporary artists - GRAVE GOODS. If you have not taken a look at this gallery style presentation starting on September 5, 2008 at the Woodstock Museum - go on HERE.

The physical project is to research and produce a complete working set of Viking Age ship building tools for the 'Norse Encampment' living history program at L'Anse aux Meadows NHSC.

Originally I had been contacted by my friends at the site in late winter. It took a bit of wrangling to come up with a working list of tools. I then asked them to put off the finial selection until after my trip to Denmark. I had fully intended to visit the Viking Ship Museum in Roskilde, and knew I would gain valuable insights. I also would have a chance to actually view a large number of artifact tools at the various other museums I was planning to visit.

I have commented earlier on what tools were suggested by the folks at the VSM. As I have been working up the tools, primarily the axes, I have been keeping a photo record. At this point I have finished six of the total of seven, with only the large broad axe from the Bayeaux Tapestry remaining. All are forged from mild steel with lap welded spring steel cutting edges. One important feature to the construction is that Viking Age axes have punched, not folded, eyes.

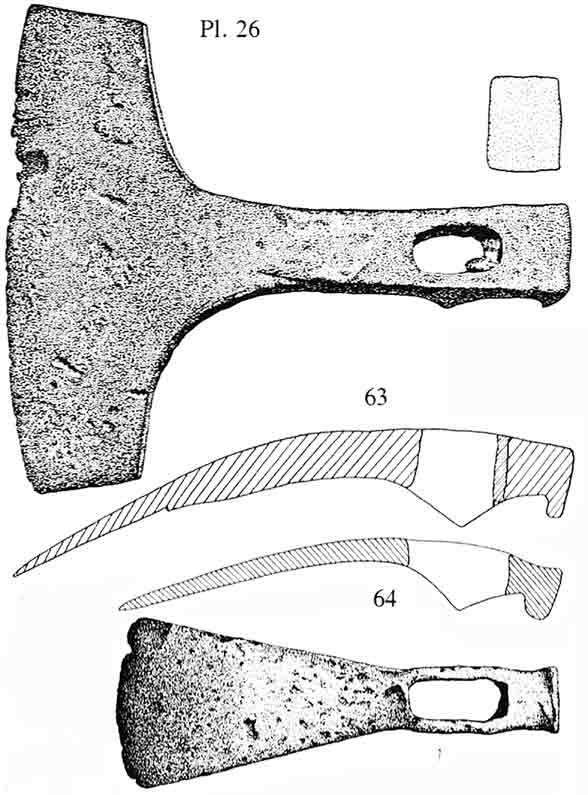
Bellow are some of my production drawings. I have used mainly illustrations from various primary artifact reports, or my own field drawings from artifact. Through the magic of Photoshop, I then scaled the drawings to correct life size to help me get the shapes and proportions correct as I forged the pieces. Printed copies of the drawings are used in the workshop to guide the work.

This first shows a set of my own field drawings from Denmark - timber cutting and shaping axes.

The second are modified from a primary report - the Mastermyr tool find in this case. Only the top adze is being replicated (finished yesterday).

The third shows using primary materials, but researched from books. The artifact axe is held in the National Museum in Copenhagen, but unfortunately this gallery was closed for renovations when I visited.

I expect the Bayeaux axe to be the most difficult to make. The eye and body will be forged from one block, with the cutting blade and its welded steel edge from another. I made up the smaller Mastermyr adze first to get some idea of the process. Given the large size of the broad axe, I expect the welding to be difficult.

Monday, July 07, 2008

Carbon and the Forge

I was prodded to write this summary after Sunday's edition of 'Cross Country Check Up' on our CBC radio. The topic was the current discussion in this country of Carbon Tax. As someone who requires burning fuel for the working process, I thought I would try to get some idea just what my consumption means. I have always been concerned for human impact on the natural world, while reserving my place inside it.

First thing you will find if you attempt this - the units of measurement underlaying these discussions are inconsistent, obscure, non-sensical, or just plain wrong. It makes any rational application of numbers to understanding almost impossible. What I expected to be a fast 10 minute search has so far turned into 2 hours of shifting through conflicting information (and plain garbage).

As a blacksmith, you have three workable options for fuel in the forge: Coal, propane, or charcoal. I am considering metallurgical coke as a derivative of coal (mostly) and other gases (natural gas or methane) as derivative of propane. For the purposes of this overview, all tree species are grouped together for charcoal.

I (fortunately) have an old article from ABANA's 'Anvils Ring', 'Some Comparisons of Coal, Coke and Propane Forges' by Dick Blomberg (volume 18, number 2, Fall 1990). Believe it or not, while many people quack on and on about the comparisons of coal and propane fuels, hard numbers are almost impossible to find:

Fuel ** Density ** Heat Value ** Top Temperature
** lbs / cubic ft ** BTU / lb ** F

Bituminous Coal ** 50 ** 14,550 ** 3550

Metallurgical Coke ** 30 ** 14,000 ** 3550

Propane ** 45 ** 21,560 ** 3600

Charcoal ** 13 ** 14,500

Note that these numbers include averages and calculated amounts.
(If anyone knows how to get a chart or table to work properly on Blogger - let me know!)

The peak flame temperature is an absolute that does not take into account the effectiveness of a given forge construction. The actual working temperature is not going to reach this peak. The important thing is that ALL these fuels inside the correct forge should give welding temperatures (about 2000 - 2100 F)

So what I get from this is the following:

To get the same heat energy into the forge, I can consume :

Propane 20 lbs @ $ 15

Coal 30 lbs @ $ 9

Coke 31 lbs @ $ 23

Charcoal 30 lbs @ $ 30

I have set this up using a standard 20 lb propane tank as the base measure.
Now this does not take account in any way of the relative efficiency of the individual forge systems. It is true that a propane forge does not have a starting coking cycle, and typically does not take as long to come up to proper working temperature. Against this is the sad truth that a gas forge is always running at full blast, consuming fuel whether metal is being heated or not. In my own experience, I certainly consume at least double the weight of fuel as propane as I would for the same working period if I was using the coal forge. With a coal forge, fuel is basically only consumed when the air blast is applied - so only when metal is being heated. Over a work period there is normally considerable variation in temperature as controlled by air volume, thus differing burning rates.
The prices quoted are for rough current prices (July 1, 2008) around Central Ontario (in Canadian Dollars). They do not take into account related transport costs or taxes.


If you are in the eastern half of North America, most likely your smithing coal is coming from the 'Pocahontas 3' source. This accounts for something like 75% of the bituminous coal mined in this part of the continent. The component numbers for any individual shipment can vary, so this represents an average:

Carbon 92 %
Sulphur .7 %
Ash 7.5 %
Moisture 1.8 %

Volatiles 18 %

I know that does not add up to 100 % - but blame inconsistent samples (data from a university web site that I can no longer find!) The Volatiles will include things like the trapped water, most importantly the methane. I mention this because although these gases are driven off in the 'coking' phase of a normal blacksmith's fire, they would not contribute to the BTU numbers above.

They do however count for the total carbon foot print.
Methane is listed as '21 times worse' in terms as is effect as a greenhouse gas. I mention this primarily related to natural gas. Natural gas is roughly 80% methane. (Note that the peak flame temperature of methane is only 2300 F)

Now we have to switch gears and units a bit. I wanted to keep to pounds for the first segment, as both coal and propane are sold in those units.

Now Carbon Footprint numbers are based around CO2 - and typically quoted in metric numbers. Metric tonne is the standard unit (1000 kg). So I have had to play some games to get the numbers in line with our measurements above:

Coal 30 lbs = 74 lbs CO2

Propane 20 lbs = 88 lbs CO2

Remember our cost differences - plus the considerably larger raw consumption of propane per working hour (at least in my gas forges here). Ecologically (as well as financially) it is clear that using coal is actually BETTER than operations using propane.

Now bear in mind that on a normal operation year here at the Wareham Forge, I will consume about 1000 - 1200 lbs of coal. I do use a quantity of propane as well, but can't give a hard number, but its certainly no more than 480 lbs (thats one 40 lb fill per month). I get a total carbon footprint of:

Coal 0.5 tonnes = 1.3 tonnes CO2

Propane 370 litres = .6 tonnes CO2

That puts the forge operations at the Wareham Forge at a total carbon load of roughly 1.9 tonnes of CO2.

A general set of tables on energy from various fuel types / Wisconsin Energy Education Program :
HERE


A carbon footprint (C02) calculator (which lets you put in volumes of various fuels as well as activities to get total amounts produced) :
www.carbonfootprint.com/calculator.aspx


Just for comparison, I ran the calculations on my driving. I recently kept the numbers for a medium distance trip with my 1992 Chev Astro fully loaded. I got something like 8.5 km to the litre (!!) Last year I recorded a total of about 15,000 km. This gives me a carbon load from gasoline alone at 4.1 tonnes.

Thursday, July 03, 2008

the Aristotle Furnace Demonstration

At the SCA event Trillium Wars over June 28-29, the 'Aristotle Furnace' was demonstrated by members of DARC.
The furnace design is the work of Skip Williams, who researched the concept and had built a number of working prototypes to establish a method.(some details HERE) I was taught the basics of its construction and operation at Smeltfest 08 back in March. In earlier posts there is a fuller description of the design and workings of this small furnace. It functions by melting scrap iron into a fresh 'puck' of mid to high carbon steel over a relatively short operating cycle.

The two images here are the only ones captured from the recent demonstration. Both images are by Karen Peterson (of course I was engrossed in actually running the furnace.) My primary assistant for the entire process was Meghan Roberts, who both helped with the messy work of building the furnace and breaking charcoal, but also proved to be a good bellows operator.
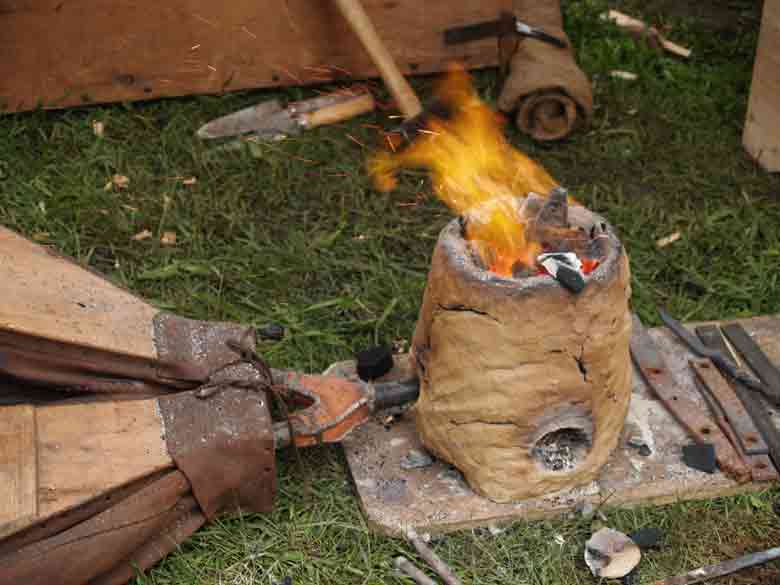
The first is a close up of the furnace itself in action. The body is made up of a mix of horse manure and powdered clay. I had the manure from my farm neighbour, and tried to gather older and drier material. About a half of a standard five gallon pail was first shredded by hand. (Fresh manure does not work up as well, being too moist to easily mix with the clay). To this was added about an equal volume of dry powdered ball clay (from our local pottery supply). Water was then slowly included, to create a mix roughly the consistency of bread dough. Each double hand full was worked to an even texture before it was applied to the furnace. Roughly a half bag of clay was required , a rough cost of about $10 (we had some unused cobb material left over).

The furnace was roughly 15 cm on the internal diameter, standing about 30 cm tall. (This was maybe a bit on the short side.) The base was a slab about 3 - 4 cm thick, the walls roughly the same. Initially there was a air hole cut into the side to fit the bellows tube. This was located about 5 cm up from the floor of the interior, and about 1 cm in diameter into the furnace. The outer side of this hole was roughly conical, to hold the 2 cm diameter bellows tube.

The furnace was constructed on the Saturday, then left overnight to allow the clay to stabilize and partially dry. (We had originally intended to fire on Saturday as well, but there was a lot of activity in the small work space, so we waited to reduce the confusion.)
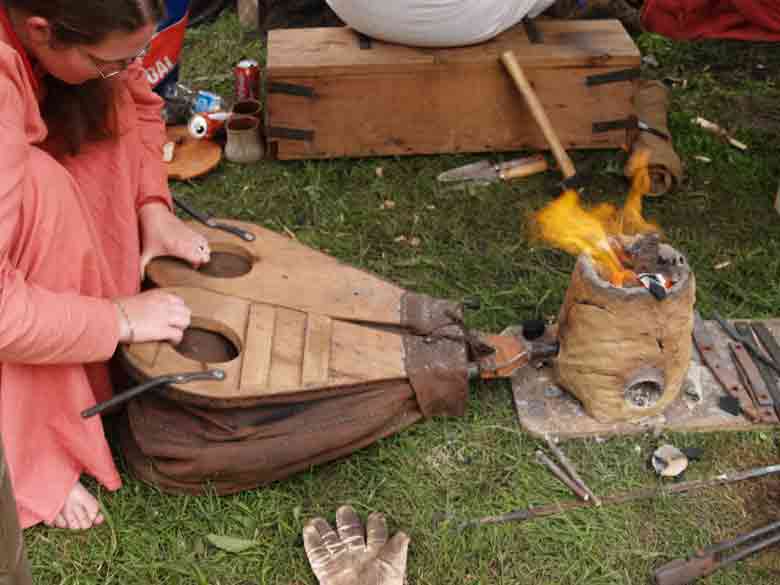
At the start of the pre-heat phase on Sunday, it quickly became apparent that the single air port would only allow for combustion with the use of forced air from the bellows. As it is always important to provide a gentle heating until all the water is baked out of the clay structure, a second hole was cut into the base. This hole had tapered sides, about 5 cm in diameter on the inside surface. Taking a lesson from Jake Keen, there were two angled holes made to hold a pair of twig sticks. This allowed for manipulation of the plug later when it was hot. The shape caused the plug to be christened 'the pig nose'. The larger air intake allowed the wood splints of the pre-heat to burn correctly. This gentle heating would continue for about an hour and a half. Pre-heat was judged to be complete when there was no longer any white steam visible off the furnace's sides.This shows the furnace and bellows combination, along with one of our many volunteer bellows operators. The bellows used is a Viking Age blacksmith's bellows, based closely on the two artifact sources (see earlier posts for a long discussion of this equipment). In total we ran the furnace through three cycles, with quite differing results from each. The primary reason for this inconsistency was the variation in air volumes created by the efforts of the various operators. Almost all of them had no experience with hand bellows, much less this specific Norse type. Not too surprisingly, those who had previous experience with the bellows type produced the most suitable air deliveries for the process at hand.

For the first cycle, the metal used was a short length (about 25 cm) of standard 1/2 inch round mild steel rod. The air delivery was by far the most suitable and consistent, as I undertook the bellows operation for this cycle. (I certainly was the only one who had ever seen the furnace in operation, plus had considerably more experience working hand powered bellows.) Mehgan also assisted on the bellows, but had paid close attention and pretty much duplicated my method and rates. The fuel was also smaller particles, as most of it had been gathered from what remained of the forging operation from earlier in the day. Most of the pieces were still ignited, lightly ash coated, and roughly 'walnut' sized. The end product of this cycle was the desired lump of higher carbon metal 'bloom', in this case with a short stub of the parent rod (about 3 cm worth) still attached.
Some problems with equipment placement caused a mad scramble getting this piece from the furnace to the anvil, so by the time the hammer was striking the metal had dropped to the low oranges. Even still the material proved to be forgable metal, at a guess a mid carbon steel (no grinder was available for spark testing).

For the second cycle, the metal used was a piece about 30 cm long of recycled wagon part, flat bar about 1/4 x 1 inch stock. The material had earlier been tested an appeared to be a lower carbon steel (not actual wrought iron) and was heavily surface pitted. The bellows operation for this sequence was far less consistent, with a lower air volume on average and thus both lower temperatures and longer consumption rate of fuel. This created both a slower conversion of the bar and also suggested more possible soak time to absorb carbon from the interior. In actual fact the end result proved to be a high carbon cast iron. The puck of material produced was not forgable, fragmenting under the hammer.

On the last cycle, the metal used was a piece of 3/8 square mild steel bar, again about 30 cm long, recovered from a damaged fire tool. A number of people took turns on the bellows, most significantly Sam, who had his blacksmithing experience from his Ango-Saxon forge to guide him. The air rates fluctuated most widely over this cycle. This again could be seen in the results. The metal fragmented under the hammer, with the bottom half splitting off clearly as brittle cast iron. The upper portion of the puck appeared to be useable metal, but was certainly tougher to shape that the metal from cycle one. On a guess this material should test out to a higher carbon tool steel.

Although the furnace did come through its repeated uses in reasonably good shape, it did not survive being dropped out of the truck while being unloaded the next day.

The method of manufacturing the furnace was well demonstrated, and the horse manure / clay mix seems idea for the construction. The general principle of this small steel furnace was again proven. It remains clear that bellows operation is the largest variable, with experienced operators being critical to the function of the furnace. The great advantages of this furnace, ease of construction and speed of a single use cycle was again demonstrated. More work needs to be done to fine tool the correct sequence, which repeated uses to accumulate experience will provide.
 

February 15 - May 15, 2012 : Supported by a Crafts Projects - Creation and Development Grant

COPYRIGHT NOTICE - All posted text and images @ Darrell Markewitz.
No duplication, in whole or in part, is permitted without the author's expressed written permission.
For a detailed copyright statement : go HERE