Thursday, June 25, 2009

Cold Forming Reversal Curves - on YouTube


Work on the Reade / Maxwell project continues...

This sequence was shot as I made up the last of the 'undertow' elements.

Each of the curves is formed of a length of 1 1/2 x 3/16 inch flat bar. Depending on the element, the starting pieces range from 5 1/2 to as much as 15 feet long! For that reason alone, the sweeping curves are shaped COLD, using a metal bending machine (purchased specifically for this project).

The total elapsed time to form just the main body of one of the larger elements ranged from 45 to 30 minutes. For this video segment, I filmed the process as I worked, and then did some edit magic to speed up the film to about 2 x speed for the bulk of the process.

Saturday, June 20, 2009

Free Guide : 'The Art of Managing Your Career'

June 19, 2009
CHRC releases the second edition of
The Art of Managing Your Career

" The Art of Managing Your Career is a resource guide for self-employed artists and cultural workers in live performing arts; writing and publishing; visual arts and craft; film, television and broadcasting; digital media; music and sound recording, and heritage."

"The Art of Managing Your Career and its discipline enhancements were developed by artists and cultural workers to provide emerging self-employed artists and cultural workers with pertinent and practical information to better manage their careers."


http://www.culturalhrc.ca/amyc/index-e.asp

Cultural Human Resources Council (CHRC)
201-17 York Street, Ottawa, ON K1N 9J6
Tel. 613-562-1535 Fax 613-562-2982

The complete guide is available as six individual PDF files which can be downloaded from the web site above. (Each segment roughly 150 k, so a fast download even on rural dial up.) Individual chapter sections:
Chapter 1: The Culture Biz
Chapter 2: The Art of Self-Promotion
Chapter 3: The A to Z of Project Management
Chapter 4: Money – Keeping Track
Chapter 5: You and the Law
Discipline Enhancement: Crafts

The guide is free (for once an positive example of tax dollars at work). It will be especially useful for those considering developing a 'career' as an Artisan Blacksmith.
(This information passed along via the Metal Arts Guild)

Friday, June 19, 2009

"If only I could BOTTLE it..."

I love my friends (really). But sometimes they are so smart they are dumb. Clearing up after the iron smelt on May 30, one of the things left behind was a 4 litre container of 'bottled' water.


So look - we are on a well here in Wareham. Its a deep drilled well, something like 150 feet. This is important, as there is 30 - 40 foot thick clay layer down about 30 - 50 feet below ground level. A lot of older houses around Wareham use shallow dug or 'sand point' wells, which means they pull water off the top layer. This is of course most likely to also include agricultural by-products. Not to mention often means water is plentiful in spring, when the water table has risen as high as 6 inches below our ground level (!). Come August however, these shallow wells run dry.
Our well is down well beneath all that, into the limestone of the Niagara Escarpment. As far as I know, that water has been down there since the last ice age.

Now take a close look at that label. It says "Natural Spring Water", which I can tell you is a bald faced lie. That water is pumped out of a deep drilled well, not collected from a 'natural spring'. Look at the middle bottom - it says "Source at Feversham, Grey County, Ontario". The extraction and bottling plant is exactly 12 kilometers from my own well.

Get it? Its exactly the same water that comes out of my home taps. I guess it has been 'Ozonated' (what ever the hell that means). My home well water is not.

What did that bottle cost? Next time, just bring an empty container, fill it from my kitchen tap, and leave the two bucks on the counter....

Tuesday, June 16, 2009

What Six Hours gets you...


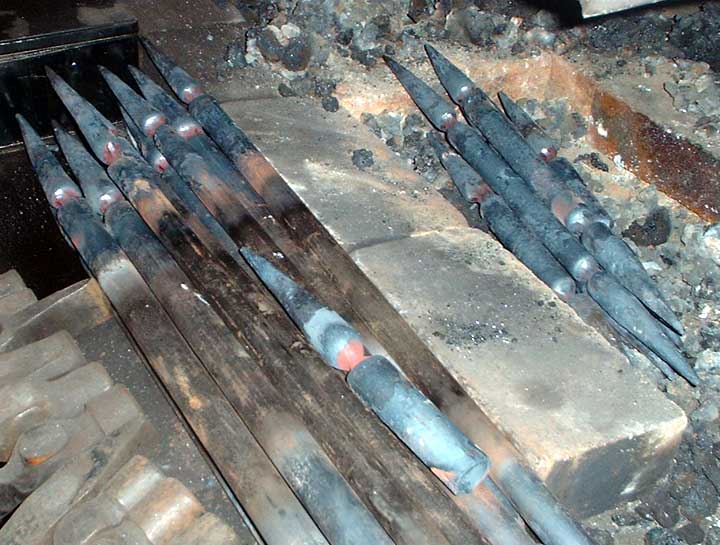
This is what I got done today in six hours of shop work.

The actual forged rush tips were completed late last week (as described in a couple of recent posts here). The steel stock for the first half of the project arrived mid Friday. So what I did today:

1) The shafts for the uprights were cut from 20 foot lengths of 3/8 and 1/2 round stock, to 48 inches. I could cut four pieces at a time, but with round stock I have to take care with the action of the band saw (can't leave it to cut on its own).

2) With the MIG welder, attached the prepared rush tips to their respective rods.

3) On the smaller tips (3/4 diameter on 3/8 rods), each piece was then ground to remove any large lumps or beads of weld.

4) Next these pieces were heated in the gas forge, and the area between rod and tip was forged to even out the shape. As well the tips were adjusted to that they were in a straight line with the shafts.

5) While still hot, most pieces got a second grinding to smooth off any bumps or uneven spaces.

In total, about 60 pieces were cut and welded. A little less than half that number undertook the full work up. (the bundle of smaller sized rushes to the left in the image).

So - what do you get paid for a full working day?

Monday, June 15, 2009

Forging Elements - Tools for Rushes

Readers who are following the development of the Reade / Maxwell railings project may find this of interest.
In the last post (Forging Elements - 'Rush Tip') the YouTube segment shows the creation of a single element - working entirely by hand. From start to finish, producing a single of the smaller pieces (from 1/2 inch ID pipe) takes about 10 minutes. The railing segments using these elements require a total of 100 such rush tips, half the larger 3/4 OD size. (Which take at least 50 % longer worked by hand!)

I actually invested a fair amount of up front time in making new tools for my air hammer. This both sped up the work, but also needed a lot less physical effort on my part.
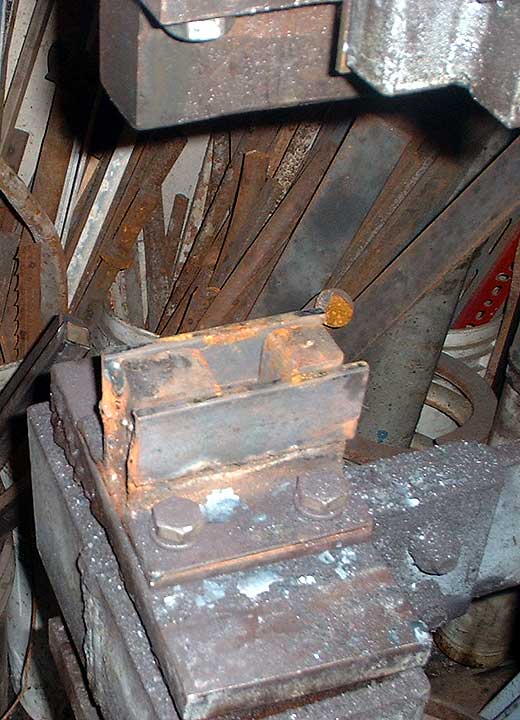
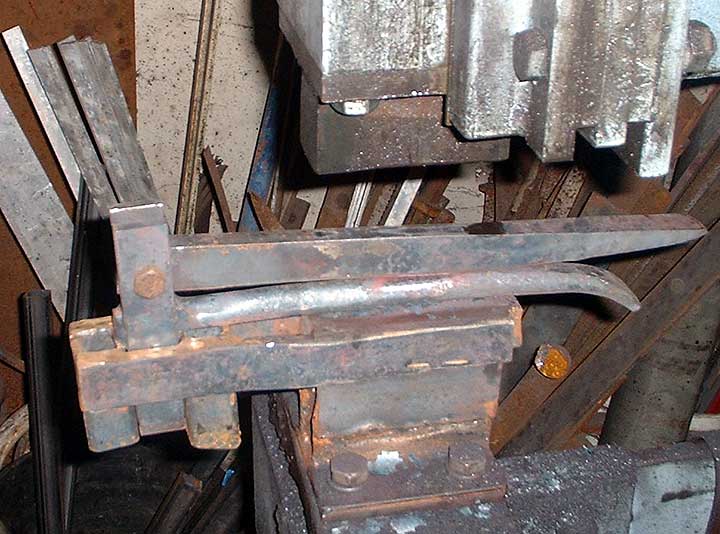
First, I made a replacement for the normal solid bottom die on the hammer, which as you can see, bolts in place to the frame. The new die is basically a square hardie hole, at 1 x 1 inch square. The solid pieces of 1 x 1 and 1 x 1 1/2 make the body of the replacement die the same size as the matching upper die. This new die base now lets me swap over the hardie tools from my anvil on to the air hammer.
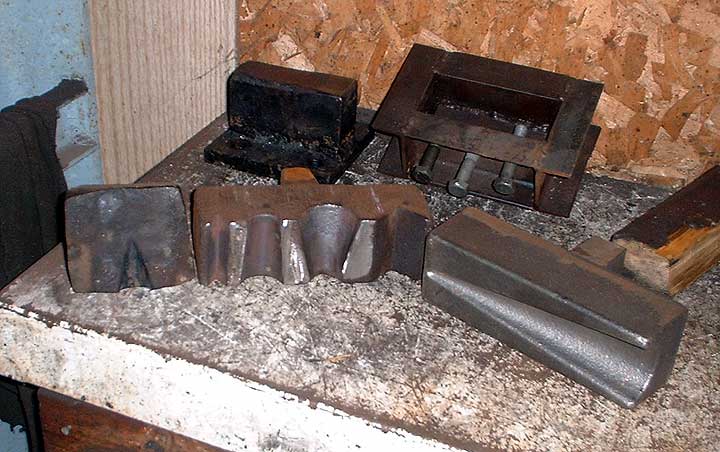
In addition to the two bottom dies seen in the video segment, I also recently purchased the long conical die see here at the right. (Made by John Newman) This die is slightly longer than the top die on my hammer, so I could not even use it to its fullest advantage. Even still, it did completely replace the smaller two stage die seen in use in the video. The welding of the rush tips still required the use of the small cone die from the film.
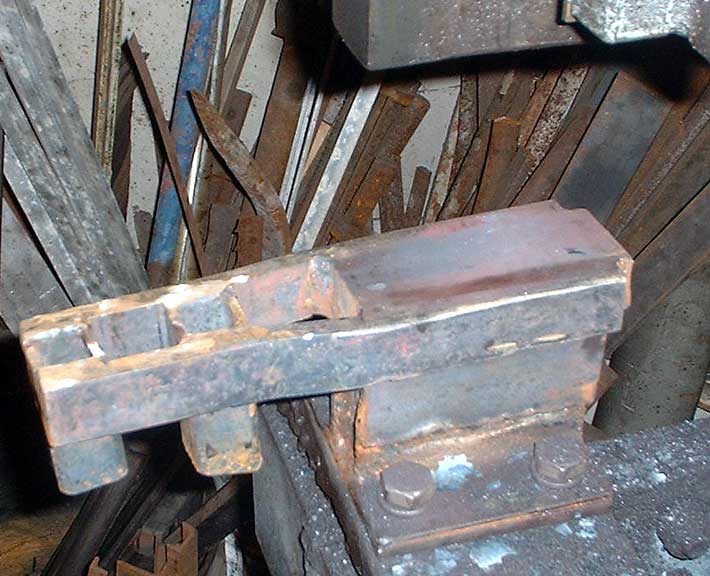
As seen, the last step of the forging is to shoulder in the pipe. To do this on the air hammer requires an 'anvil' segment to the die, with a mounting hole set off to one side. This is the bottom mounting die I made for this purpose. As you can see, it also slides straight into the new hardie hole bottom. The flat area is roughly the same length as the hammer top die, but extends about 3/8 inch wider on each side. This allows the base to be used for normal flattening as well. The mounting hole is again 1 x 1 inch.
This is the second shouldering tool I made up to use with the base above. (The first tool was a classic spring shoulder tool, which proved too awkward to use with the increased force of the air hammer.) The wide flair on the open end allows me to quickly position each of the pipe segments. Note that despite the length of the tool, the effective working area is limited to under the top die.


With thanks to my friend David Robertson (builder of the air hammer) - who is always nagging me to make more specialized tools.

Thursday, June 11, 2009

Forging Elements - 'Rush Tip'


Another 'work in progress' video from the current Reade / Maxwell project.

Here is the method I use to forge out a long tapering rush tip, using schedule 40 mild steel pipe. I like the look of this element much more than the 'hot dog on a stick' style bull rush most other blacksmith's use. This method takes considerably longer to forge to shape, but I think the results speak for themselves...


This design, proposed for this project, also uses my 'Rush' element. Although both the customers and myself much preferred this layout, it could not be used due to Ontario Building Code restrictions.

Tuesday, June 09, 2009

Boats, Bilges - and Blisters

25 Years Abaft the Mast
In Which Our Fearsome Mariner Reviews the Lessons Learned on the Sae Earn, Fyrdraca and Gyrfalcon; with Observations on Replicas and Epic Voyages in General

Bruce Edward Blackistone
the Longship Company


(Sae Hrafn under sail heading into Chesapeake Bay at Drum Point, 2008)
Image ported over from the Longship Company web site.


... Sailing in these vessels is, by the twentieth century standards of comfort and efficiency, somewhat like swimming in chainmail. It's an admirable feat, you dispel certain myths ... and it gives you a whole new appreciation for early medieval naval warfare and merchant ventures. On the other hand, it takes a certain mindset to consider this a fun and educational activity, and you also run the risk of drowning. ...


Go to the full article

A good piece by my friend 'Cap'n Atli'...

Sunday, June 07, 2009

65 Years On...

I watched at least part of Saving Private Ryan last night, nursing a beer.
It struck me that "...one day, no one will march there at all". The youngest of those who were actually there must be at least, what, 80 years old now. Not long now, and all of them will finally be together, one way or another.
I guess with D-Day such a large part of the myth of America, it may take another while for the memories to completely fail. Guys like me will stop on the memorial days to pause, and work that strange blend of memory and imagination. And the 'young people will wonder why'.

I was deeply struck by my past visits to Gettysburg, walking the ground and imagining the lines of fire. I'd like to go to Normandy some day. To stand on that beach and play out the hours of blood where it all happened. Like a bizarre pilgrimage. I was once much like those young men on Juno Beach, but I guess have never had my idealism ripped from me by the horrible reality that they faced.

Gather the ghosts close my friends...

Saturday, June 06, 2009

Cutting the Bloom

A short clip showing the final stages of hot cutting the bloom created by the May 30, 2009 experimental iron smelt by Ken Cook and myself (DARC team assisting).
A look at the quality of the 4.9 kg bloom that was produced, including spark testing the metal for rough carbon content.

Friday, June 05, 2009

Input - Output : LAM One Smelt

A closer look at some of the raw data from LAM 1 smelt (May 30, 2009)
(Note that all these pieces are going to be worked up into a formal paper at some point, readers are advised to refer back to the earlier related postings and excuse a certain lack of integration between the segments!)

The furnace wall fragments recovered in the archaeology were described as 'kaloin'. There is a natural clay source in the general region of LAM, which has been used by the re-enactors at Norstead for their own ceramic production. I have no idea if that source matches the materials recovered at LAM. The modern potter's clay available to us has the following components:
nameSiO2Al2O3Fe2O3Firing
EPK Kaloin46370.82450 F
Bell Dark59271.12400 F
Old Mine 458271.3?

The furnace used was built of primarily Old Mine 4 on the lower half, though this included some previously mixed clays of unknown origin. The upper half of the structure was built of freshly mixed Bell Dark. I had contacted Pottery Supply House (our supplier) and had been advised that all this clays had a 'slumping temperature' in excess of 3000 F.

The bloom had been originally weighed on a spring type fish scale (always inaccurate!) Now putting it on the accurate scale, the total bloom weight is in fact 4.89 kg!

I also took some of the LAM analog and heated it on the top of the hot
gas forge to remove the water. We normally compute our yields as bloom against dry (roasted) ore.

sample start (as used in smelt) = 87 gm
sample dry (remove H20) = 80 gm / 8 % water
Applied to the smelt, that means the 18 kg of ore used actually
contained only 92 % 'solids' ingredients = 16.6 KG
TOTAL YIELD (4.9 / 16.6) = 33 %
Outstanding!
(Our normal expected yields for a smelt of this size range 25 - 30%)

I had always felt the originally suggested yield estimate for LAM of 20% was far too low, especially in light of the high iron content of the ore also recovered from the site.

When the analog was mixed, it would have been 85 % oxide / 5 % silica /
10 % flour. In the smelter, that organic 10 % just burns off and does
not add to the chemistry. (For Arne, the 'oxide' listed is potter's 'black iron oxide', which chemically is 93 % Fe3O4 / 3.5 % SiO2 / 3.5 Al2O3) Applied to the smelt, that means the 16.6 kg dry weight used actually contained only 90% 'active' ingredients = 14.9 KG

When we collected up all the fragments of slag, and furnace wall, I got a
very rough weight of 54.1 kg recovered. (Note that Neil Peterson made a complete photographic record of the entire working area to pin point the debris pattern. ) I am not easily able to directly weigh the slag separately as it is almost impossible to separate the attached slag from the fused furnace wall. We did work on a fresh sand layer, and were able to hand sort slag fragments down to about 'peanut' size and gather all these.
So this makes our OUTPUT weights at 54.1 + 4.9 = 60 KG

Input is a bit less accurate. We do have the 14.9 'active' from the ore.
I used 'very roughly' 45.5 KG (dry weight) of clay in the furnace
construction. This was one full bag (at 50 lbs) dry, and 'about' a half
bag of dry, plus about a further half bag worth of clay previously mixed to wet. (Admittedly that 45.5 kg is pretty shaky!) Still - that gives us a rough INPUT of 45.5 + 14.9 = 60.4 KG

Total INPUT at 60.4 against OUTPUT at 60 KG

Those are real rough, especially since the amount of clay used is a loose estimate! But it is close enough to input = output to at least show a quantitative result.

Also of note: Slag amount (debris at 54.1 - clay at 45.5 ) = 8.6 kg
So working ore input against slag + bloom output:

Smelt INPUT at 14.9 against OUTPUT at 13.5 KG

Given the estimate for the slag weight, again the numbers are close enough to balance. It should be noted that the actual amount of slag gathered at LAM was 10 kg. Perhaps that number is closer to reality than was thought?


We had specifically designed this experiment so that :
- the ore analog matched the available Fe content in the LAM sample
- the smelter size matched that suggested by the archaeology
- the amount of ore used was equal to the estimated slag plus calculated bloom (15 + 3 kg)

Our test proves:
- the function of the 20 cm furnace diameter
- the suitability of the ore analog
- agrees with slag amounts from LAM
- improves on production estimate from LAM

The primary differences in this test from the Viking Age at LAM:
- use of an Fe3O4 oxide, rather than Fe2O3 (although the raw Fe amounts
match)
- use of electric blower, rather than human powered bellows (although
delivery volumes match).

I am am EXTREMELY pleased with these results!

I am in the process of slicing off roughly a 1/3 segment of the bloom. The metal inside the cuts also appears quite dense. A close approximation of carbon content can be made by an experienced eye looking at the nature of the sparks generated. The lower side of the bloom looks to be a nice soft low carbon iron, with the upper surface containing significantly more carbon, perhaps as much as .3 % (Ideal for heavy tools like axes!).

Tuesday, June 02, 2009

Meltalworking Safety for the Viking Age?

From a posting prepared for NORSEFOLK. References had been made to metal casting, ore smelting and hammer forging. There is a general set of problems with any hot work, and then specifics related to each of those activities.

There are a number of quite important and extremely serious safety problems to be considered when working hot metals. There is further a huge ramification into the Viking Age - and further how re-enactors chose to emulate history.

Some general safety:

Eyes:
The single most disastrous event. All of the processes can (and do!) result in pieces of hot materials flying around, often significant distances. A single drop of water inside a casting crucible converts it into a cannon firing molten metal. Modern safety glasses, with side shields , are absolutely required - period. For casting and aspects of smelting, a full face shield WORN IN ADDITION is necessary. (Even then I have gotten fragments under a face shield, and past safety glasses and into my eyes!) This is my one hard and absolute rule in all metalworking.
In addition, when working with incandescent materials (all three) I seriously recommend the use of didydium lenses. I personally also use a welders lens ON TOP for forge welding and smelt extraction. My rule of thumb is 'if I look away and see spots - its time for a darker lens'
* There is no such thing as a blind blacksmith! *

Clothing:
Everything said earlier applies. One large gap - ALL NATURAL FIBRES. For modern use, cotton is fine. Avoid things like polar fleece, all those poly-cotton blends (they melt). There are arguments to be made about tight or loose clothing. Loose clothing does keep debris further from the body. At the same time it can leave folds and pockets, plus gathers of fabric to catch up tools during fast actions. Tight clothing means anything striking is right close to the skin. Personally, I tend to favour tight under loose (see the next addition).
A full bib leather apron solves many problems, it shields from heat radiation (huge problem with casting and smelt extraction), and most hot debris do not stick to it.
Although not mentioned, footwear should ALWAYS be heavy soled boots. These need to come up under the pants, and be secured tight at the tops. So above the ankle work boots, laced all the way up, with the pants pulled down over the tops.
Gloves present a special problem. Although certainly required for the hands, open cuffs tend to collect and hold flying pieces. (I've gotten some of my worst burns from material bouncing off my chest, then into the open cuff, which then holds the material on to my skin.) Professional fireman's gloves have tight cuffs to prevent this. This creates a second problem - the gloves themselves so over heat that they themselves can burn the skin. Its hard to get a tight cuff glove off when you are in a hurry, a problem often seen in casting and smelting. So my solution to this is to wear a large gauntlet type welder's glove, over a tight knitted Kevlar glove liner. (Kevlar does not burn.) The combination solves both problems.
Some kind of cap is certainly suggested. If nothing else because there is going to be ash and fine dust everywhere. Hair can also trap flying hot particles. A lot of people favour a slouch or bush hat style, which keeps stuff from falling down their necklines.

So now consider applying that to a Viking Age world.

In DARC (and all my own museum programing work) the standard is:
'History STOPS when safety STARTS'.
I insist that modern safety equipment be used, and authenticity be dammed. It is also historically accurate to be blinded by a working accident...

Clothing does not generally present a major problem. Wool is hot for the wearer, but is actually the ideal fabric to wear around hot metals. Pick a relatively tight weave, and the stuff is actually very difficult to burn. Viking Age male styles actually provide a very good coverage, a fairly close fitting linen over a loose wool with a small neck, worn belted over loose pants - provides good protection. (My wife even made me up some special 'smelting pants' which have a double layer of fabric on the front surface.)
Gloves are gloves. The true authenticity focused can sew up their own, but a modern welding glove in grey or natural is not that different than a historic one.
A leather apron is a leather apron, again no historical problem.

My team (as you have seen) is working towards a full Viking Age iron smelt - a presentation actually at L'Anse aux Meadows NHSC (for August 2010). We have been considering how the remaining two required safety equipments, boots and eye protection, can fit inside a Viking Age framework.

We have been discussing making up some additional leather protection. Perhaps a set of leather 'sleeves' (we currently use a pair made from fire suit materials). Longer aprons that hang to at least the knees a good idea as well.

For boots, we figure we will make up modified versions of the high boot found at York England. This fits to maybe 6 inches above the ankle, with long straps that wrap the upper tight to the leg. Most likely we will fit double thick leather soles (which does not show in wearing). We can cut thin aluminum or steel 'insoles' to be placed under a standard thick felt insole. That arrangement is again invisible, but provides both comfort and and extra measure of safety. There is no easy way to provide for top of the foot protection that I can see.

On eye protection - I just refuse to work WITHOUT proper modern safety glasses (and forbid anyone involved to work without it as well). In my 30 years of demonstrating before the public in historical contexts, I have never had anyone from the public 'complain' about my use of proper modern eye protection. So the first level of eye protection is established.
Normally we only wear the full face shields for the short extraction and primary consolidation phase of the smelting operation. (And during any metal casting pours, even in historic demo.) For the LAM presentation, I may just use the modern shields for the brief period of frantic activity that marks the extraction. Our audience is certainly going to be too focused on that process to note historical modifications!

This does however bring up the problem of 'what did they do'?
The evidence I have looked at for Viking Age iron furnaces suggests most were designed for top (as opposed to bottom side) extraction. In top extraction, the last charge of charcoal is allowed to burn down till it is almost to the level of the bloom and its enclosing slag bowl. There still will be some burning material remaining (you do not want to uncover the bloom completely), and the interior temperatures of the furnace are in the range of 2400 F plus at that point. Someone has to reach down and work over the top of this! First the remaining charcoal is scooped out. Then the bloom is hammered in place to compact and loosen it. Next the iron mass needs to be pried loose (sometimes a difficult task) and then snatched out with large tongs. All this is done standing over and looking down into that hot furnace.
Top Extraction - November 2005

Frankly, you just can NOT do any of this without something shielding your face. (In fact, I have melted two standard clear plastic shields right off my head in past efforts!). The radiant heat would physically burn your eye balls without some kind of protection.
What has been suggested is a leather mask with long slits cut into it. The shape would mimic a modern face shield, so protection of the face is ensured. The slits would function the same way a pair of snow goggles do, limiting the amount of both light and heat passing through the shield. Light is not a problem, if anything, this arrangement would reduce the too bright interior of the furnace. It may prove necessary to fit the slits with a thin film of mica to block 100 % of the heat.

There would be some kind of balance historically between skilled and unskilled, amateur and professional - all balanced against potential risk. I doubt a blacksmith or a bronze caster working in Jorvik would do much more than squint. The mechanics of iron bloom extraction suggest the requirement for some, if limited, protective gear. What it may have been, we are very likely to never be able to know. As re-enactors, some balance must be struck between modern realities (don't maim your friends!) and historic possibilities. Those who have decided to maintain authenticity standards so tight as to permit only proven artifacts in use may be best advised to avoid such high risk demonstrations as smelting and casting altogether.

Monday, June 01, 2009

Vinland Iron Smelt (on YouTube)


Based on the archaeology of L'Anse aux Meadows, the Vinland of the Sagas,an experiment by members of the Dark Ages Re-creation Company. This iron smelt uses an analog for the bog ore used in 1000 AD by the Norse to produce a 4 kg bloom.


(see yesterdays blog posting for more details)
 

February 15 - May 15, 2012 : Supported by a Crafts Projects - Creation and Development Grant

COPYRIGHT NOTICE - All posted text and images @ Darrell Markewitz.
No duplication, in whole or in part, is permitted without the author's expressed written permission.
For a detailed copyright statement : go HERE