Friday, October 29, 2010

Buildings are Mega - Projects...

... even in the Viking Age.

This commentary is written by my old friend (and fellow cynic) Bruce Blackistone. Bruce is one of the pillars of the Longship Company, and a long experienced (and excellent) historic re-enactor. I always find his comments insightful and backed up by both practical work and solid research.

Early Medieval Structures; Four Rules:

First Rule: The larger the structure, the more important are organizational and people skills.

Sometimes, getting something built is the easy part; forming the organization to build, maintain and use the structure is the hard part. The world is littered with grand projects that are just started, or half built; and then money, or enthusiasm, or time allowances wane; and it stalls, and it stops, and it never happens. Certain other projects are breathtakingly successful, especially those sponsored by governments or museums. The one universal is organizational and people skills, either self-imposed or external. You need a framework to handle dissent, and to adapt to mission change, and a clear vision of what you hope to accomplish and where you want to go from there. Is the project for you, or the community? Is it for teaching and learning? Is it just a "cool place" for your friends to hang out? (In the later case, how dedicated are your friends to creating this place?) How much time, treasure and labor do you plan to put into it, and where is it coming from? Are you willing to employ (small "p") politics to marshal the resources to accomplish the project, and to keep it going once completed?

Second Rule: Smaller is better.

Do your research, and look for the smallest historic example that will accomplish your mission. If you outgrow that (a common settlement pattern), then move up to something grander. If you're doing this solo, a snug shepherd's sheiling of very modest size is far better than a one-eighth-completed longhall with no roof.

Two people can accomplish far more than one; and three or more is good if they don't spend all their time talking to each other about how cool it is going to be. But will you get six friends for the first weekend, and two for the second, and fly solo for the rest of the project? Reducing the scale gives you a fighting chance of completing the process unless you are prepared to throw buckets of money at it and treat is as a modern construction projects with modern equipment and techniques and hired labor. In that case, you should still study all of the considerations, above, to outline your scope and plans; even a large budget is still a budget, and needs to allow for contingencies.


Third Rule: We are the infrastructure; everything else is just entropy in action.

About 25 years ago I started on a small sheiling as an experiment, a simple A-frame grubenhaus, known to friends and family as "the hovel". It was about 10' X 15' and had post and beam construction, wattle and daub walls (I saved hair from haircuts, and burned oyster shell for lime for plastering) and a thatched roof. It was on our farm within half a mile of the house and between the house and the landing. The day it was finished, it was fun. I made repairs about a season later, then more repairs and changes, and enlisted friends and Boy Scouts for the thatching parties. I didn't live there, and my friends camped out from time to time, and my free time went more and more to the longship and the forge and the farm. Today, it is an "authentic" study in archeological decay, a large cavity imposed upon by groundhogs, with a few weathered beams hither and thither. If you lived in the structure, maintenance would be a constant necessity; but it's is constant whether you live there or not.


Fourth Rule: No roof, no house.

When the Virginia and Maryland tidewater was first settled by the English, they built traditional English structures: post and beam, wattle and daub, thatched roofs. Within a generation they had switched to all wooden structures; both because of the abundance of forest in the New World, and because the traditional building techniques were unsuited to our warm, high-humidity, semi-tropical alternating with sub-arctic climate. My thatching "went away" in record good time. Daub eroded rapidly without a roof. Even a small structure takes a lot of thatch to get it thick enough to provide actual shelter; and, depending upon climate and other local conditions, it rots or bugs eat it or it weathers rapidly and you need to renew it. It may last for 40 years in England, but it doesn't hold up in the tidewater. (Thatch replacement is a regular budget item for Jamestown Settlement in Virginia.)

Whatever roof you choose, thatch or shingle or shiplap (one example known from the Viking Age, although still debated as to whether it's part of a ship, or just built by a shipwright), you need to think it out and balance authenticity and maintenance needs. A roof without walls is of some use, but walls without a roof are nearly useless for a dwelling.
Content in quote copyright Bruce Blackistone © 2010

If regular readers are wondering why I have been poaching pieces by other people of late?
I'm trying to get a new metal roof over the residence here at Wareham, working through fall rains and winds (and hoping to beat the first snow, due in a week or two).

Monday, October 25, 2010

Sexing Skeletons

This is a short overview of the problems related to telling the sex of skeletons, written by Christie Ward and posted originally to Norsefolk. (This relates back to the last posting here.)

Christie has a well earned reputation for clear analysis and careful referencing of her articles and comments. Any question she fields most usually is backed up with an extensive set of links and book references. She has gathered together years of short articles related to the Viking Age on her web site 'The Viking Answer Lady'. A highly recommended resource for my readers!

Sexing a skeleton is not simple, even if you have a pretty intact example. the pelvis, based on the need for women to have babies, gives the best sexing information. However, on skulls, it really comes down to "how butch does this skull look to me?"

If you have the whole pelvis, then visual inspection can determine the sex about 90% of the time. But when you have less than a whole pelvis, the identification can be a
lot more difficult. It's almost impossible to determine the sex from the bones of a prepubertal child.

http://tinyurl.com/PelvisByGender
A pelvis is determined to be male if: the subpubic angle is less than 90°; the pubic shape is triangular; the shape of the subpubic angle is convex; the greater sciatic notch is less than 68°, and the sacrum is small and more curved.
A pelvis is determined to be female if: the subpubic angle is greater than 90°; the pubic shape is rectangular; the shape of the subpubic angle is concave; the greater sciatic notch is greater than 68°, and the sacrum is larger and straighter.
Forensic anthropologists can accurately identify sex from a complete skull between 85% and 90% of the time. The success rate goes down if you are missing pieces. As I mentioned above, skull sexing is really more subjective than pelvic sexing, because it assumes that men are square-jawed, beetle-browed, and muscular -- and that women aren't -- which is not always the case. Notice too that the pelvic criteria have some firm mathematical tests, while the skull criteria are more subjective.

A skull is determined to be male if: the chin is square; the angle of the ascending ramus is close to 90°; the root of the zygomatic arch is likely to extend beyond the auditory meatus; the mastoid process is large; the external occipital protuberance is prominent; there is a rough, robust skull; there are marked muscle lines; the forehead is receding; the brow ridges are prominent; there are rounded orbital margins.
A skull is determined to be female if: the chin is rounded; the angle of the ascending ramus is obtuse; the root of the zygomatic arch is not likely to extend beyond the auditory meatus; the mastoid process is small; the occipital protuberances are poorly developed; there is a smooth, gracile skull; the muscle lines are not prominent; there is a vertical forehead; the 'brow ridges' are absent or are poorly developed; The orbital margins are sharp.
Also note that in older archaeological reports no skeletal sexing may have been done -- they likely attributed sex based on grave goods.
Content in quotes copyright Christie Ward © 2010. Used with permission.

Saturday, October 23, 2010

Female Smiths in the Viking Age?

From a recent topic on Norsefolk
" A lady being a blacksmith, or a metal caster ... anything is possible,
however it isn't documented in the written or pictorial record."
Something that came up sideways a good while back (Tell us a story, Uncle Ketil...)

I got a chance to work a good bit beyond my depth as part of the original concept/design team on 'Vikings - North Atlantic Saga' in 1999. The initial week long session was held in Washington, split into theme workshops during the day. Evenings the group got wined and dined by various Embasies. For a guy living in rural Ontario with coal dust under his finger nails it was all a bit surreal!
Anyway, at those evening cocktail parties, I found myself in the room with a good number of the heavy weights on the Viking Age. Eventually I worked up the nerve to ask a couple of selected questions - things that had been troubling me.
One of these questions was about blacksmithing work in the VA. I have always been troubled by the depictions of smiths working from ground pit forges, with anvils set on extremely short stumps. Without getting into all the technical details, my question was simply this:
Graves of blacksmiths are known from collections of tools in the burials. Have the bones been analysed to determine the working stances of those smiths?

The long and short is - NO.
This likely even extends to clear sexing of the skeletons. (Admittedly not always the easiest task). There is a good chance for anything but the most recent finds, the 'Victorian' model would have been used : Blacksmiths are male, grave has tools, therefore body is male.

So I have to agree 100 % with the original comment. There is no specific information known. There *is* possibly some information available, but it has not been studied.

(I will NOT be drawn into some pissing match with feminists reading this.)
The historical truth is that blacksmithing is almost universally a MALE occupation in all human cultures. Until the most modern times (read post 1970), the documented exceptions are just that - *exceptions*, not *proofs*.
I would fully expect that in Norse culture, blacksmithing would be considered primarily a male occupation.
It is of course perfectly possible that there would be rare females either with some level of skill, even perhaps with smith as occupation. Consider however the very clear enforcement of gender roles in other aspects of Norse culture. (Example : One of the recorded reasons for divorce is 'A woman wearing man's clothes', which can be taken to mean 'assuming a male role'.) My *opinion* is that this might be one of those places where the lines were fairly clearly drawn. A woman might get away with assisting male family members, or even primary work within the confines of an isolated farmstead. As a proclaimed blacksmith setting up shop in a public setting, I'd think this very unlikely. A father with no sons might teach his daughter, but I doubt anyone would actually pay for the services of a female in a man's occupation.

Having said that, this should NEVER preclude a modern re-enactor acquiring skills, even working in public demonstration. I would however highly recommend that this be presented as an example of the *difference* between the past and the modern day. "I can do any damn thing a mere man can do!" is an attitude from the 1900's at least, the post 1960's more definately. The fact that popular films still (and endlessly) use this situation as a plot element suggests this STILL is seen as role reversal!


PS - in case you don't know, I remain a HUGE supporter of women as modern artisan blacksmiths.

Friday, October 22, 2010

When is a coin - not a Viking coin from Rode Island!

On the piece from some time back 'A Furnace for Vinland' , this comment came in recently:
I have some very interesting viking coin finds from where I live in Merseyside UK. It is very inportent information i have ... relating coins i have found in merseyside with Newport and Newfoundland conections, i also have many more finds to link viking trade with North America and UK
(name removed to obscure the sender)
Ok - so I decided to bite. My bad. Admittedly, this was partially because the sender had asked me to be put in contact with my mentor and friend Dr Birgitta Wallace. I thought I should check out the request before considering that.
On the second go round, this is an image of one of the objects under consideration:


Everyone has taken a look. No cheating using three minutes on Google. No, wait, use three minutes, check on some core dates for 'Newport' in Wales and Rode Island. Ok?

This was my (measured?) reply to the inquiry:

I'm taking the time to write you, mainly to save you some problems as
you continue to investigate the objects you have found. Bear in mind
that coinage is an area that I have done little research, and I am not
professionally trained as an archaeologist.

On seeing the objects, there are a large number of reasons, even
casually, that I personally doubt would allow them to be Norse in origin:

1) Right off the start, one of the pieces contains the word 'Newport'.
Check the use date for the name. I suspect the name 'Newport' was not in
use till considerably into the Middle Ages, if not even more recent.
Certainly it would not be used during the Viking Age.

2) The letter forms are a modern 'Roman' style. This suggests a much
later creation date, maybe Victorian (?) Again, certainly not Viking
Age, were all Scandinavian text is in Runes. Circa 800 - 1000 in
England, text on coins is almost always in straight cut Latin font.

3) The figures on the objects are raised off the surface in quite high
relief, yet with very rounded edges. Taken together, this all suggests a
casting. Historic coins have their figures cut into dies with chisels,
then are struck to transfer these patterns. The net effect is entirely
different.

4) The base material of your objects is hard to tell from the images,
but appears to be a copper alloy (a bronze?) Coinage in the Viking Age
is almost exclusively silver. Coins at that time are valued for their
actual weight as precious metal, not the kind of 'representational'
value normal in later (modern) currency.

5) Coins in the Viking Age are all round - never rectangular. Use of
hacked up arm rings is seen, but again, this is 'spending by weight'.

I can not imagine any connection with these objects blending 'Newport
Rode Island' with 'Norse'. Remember Newport USA was founded in 1639.
That place did not bear the name till a good 600 years AFTER any
theoretical Norse voyages! Any connection with Newport is purely an
1800's invention, and is not backed by any archaeology. (Check the
section in the recent 'Vikings - North Atlantic Saga').

Taken altogether, I suspect what you have there are perhaps trade tokens
from the 1600 - 1700's from the Newport in Wales. Maybe even tourist
tokens from the 1800's. Some quick search on the internet got me both
possibilities.

Sorry, but although these ARE interesting historic items, I don't think
you really have anything linked to the Viking Age or the Norse - and
most certainly not to North America.

It also turns out that Newport in Wales is founded well after the Norman Conquest, and was even not called 'Newport' by the locals until the 1300's.


So - yes, I could have just not bothered to reply to the original comment. As a 'mere' (but serious) amateur myself, I do try to give people the benefit of the doubt. I have personally been the recipient of the brush off from academics, only to find on deeper research that the true answer to the (stupid?) question is in fact 'No one has ever studied that aspect'. (Consider iron smelting!!)

I do admit that 'Vikings in the USA' is one thing that really bugs me:
- Horses walking from Labrador across most of the Canadian Shield to get to the Great Plains
- Portaging a longship over Niagara Falls
- The Newport Tower
- 'Mooring' Holes
- Who made the Peterborough Petroglyphs
- 'Vikings' walking from James Bay to Wisconsin
- The Kensington Rune Stone

I despair over the failure of the most basic understanding of science / history...


WARNING : If you send me a general information request which could just as easily be accomplished by five minutes on Google (even with Wikapedia!) you might find the results turned into a commentary here.
I do try to post something to 'Hammered Out Bits' twice a week after all.

Monday, October 18, 2010

'Forest Floor' - Reade & Maxwell

Some images (and notes) on the final segment of the Reade/Maxwell railing project.

As those who have been following this project have seen, the project was to created a series of stair and balcony railings for a custom home on Manitoulin Island. The overall concept was 'Sea to Shore to Sky', incorporating stylized natural elements which changed as you climbed from basement up the open concept layout to the second floor.

The final piece was visually removed from the other segments of the railing, but also the first thing a visitor sees as they walk into the front door. For that reason, I wanted to create something even more eye catching, and even more organic than the other panels.


Original layout drawing

I took a departure from the method of designing I use normally. I had produced this very rough concept drawing, which really only intended to give an impression of what I was intending. You can see that there are no individual uprights indicated. I next produced a number of individual test elements:


Some, like the small copper 'bell flower' element, were rejected by the clients. Others, like the 'jack-in-the-pulpit' were then repeated several times as full sized structural uprights.
The unused elements are likely to surface into some future projects.

The end result was an assortment of individual elements, which then were laid out into the finished tubing frame. This combination of hand rail and end post were formed from 3/4 ID pipe. This work was done (very carefully!) by heating the individual pieces inch by inch with the torch to control the generation of the curves. The end post shapes were formed by spiralling them over a length of 4 inch diameter heavy pipe, which was later driven out to form the basket outline.
As each individual element was forged to place it next to those around it, the overall result is far more organic than would have been the case with a series of fairly identical uprights.

One added feature was the lower panel, based on the ferns that dot the house landscape. This is a lighter weight panel, which merely hooks over a pair of leaf shapes on the lower edge of the railing. The purpose was to provide casual security to the triangular space under the stair case.

The finished metalwork does draw in forging methods seen throughout the rest of the assemblage. Most notably, the use of structural angle, re-forged into various organic shapes.


As seen from the front door entrance


As seen from the upper landing

The base colour of this panel is the same dark green used for the 'Shore / Rushes' and the 'Undersea / Kelp' segments. For 'Forest Floor', there is use of a light green for highlights, plus mottled red and orange on the oak leaves. The interior of the flower shapes is a silver with a blush of red.

Wednesday, October 13, 2010

Realistic Yields for Bloomery Furnaces

50% yield is more in the ball park.
I have often been underwhelmed with the ore in vs bloom out...and then you forge it to bars and get less still.
The less "solid" blooms have charcoal and waste and unrefined ore so the final yield can be quite low.
(name withheld, as this comment is kind of out of context!)

There are no absolutes in the realm of iron smelting furnaces. So much depends on the nature of the ore employed. Air volumes are a huge modifier, even with identical furnaces. And of course the current Early Iron experimenters are using quite a number of different furnace designs, inspired from different national traditions. Most of us with depth of experience tend to stick to pretty much one pattern of materials, furnace and methods and through trial and error we get most (?) of the bugs worked out. (Not too surprisingly, this is exactly the same as what ancient iron masters did.)

That having been said, are are some observations:

As with any large equipment employing high temperatures, there is a very clear time + volume = efficiency element in any bloomery furnace. Regardless of size, it is going to take a certain amount of raw materials (thats charcoal and ore) to 'kick in' the interior environment before any significant bloom formation is possible. Increasing ore additions above this base amount just serves to add more mass to the developing bloom. Simply put, a larger ore volume smelt almost always results in a significantly higher per cent yield.
In my own work with Norse styled 'short shaft' furnaces, it normally takes about 8 kg of ore (see below) to effectively create the required internal conditions for bloom formation.

The iron content of the ore is extremely important. The thrust in recent North American iron smelting has been to *production*, so often high iron content ores (hematite grit, industrial taconite) are being employed. Natural ore bodies (primary bog ore, rock limonite ) can vary considerably, and rarely reach the same iron concentrations. You can only get out what you put in ! (all things being equal).

One last important consideration, as taught by Sauder and Williams, is air volume. Without large air volumes, effective yield will be directly impacted. This effect has been demonstrated consistently. A secondary impact of the air (both physical design of the system and volumes available) is on the density of the resulting iron mass. A lacy bloom may still have good yield numbers, but it will most certainly suffer significant losses in the bloom to bar phase of the overall process.

I have only observed traditional Japanese method (or modern adaptations of the basic method) a few times. All my own work has been with variations on Northern European systems. Over a good number of personal smelts and observation of other's work, I'd suggest the following:

Small volume smelts (20 - 30 kg) with 'good' ores (60% + Fe) : Yields in the range of 25 - 35 % are typical
Larger volume smelts (45 - 50 kg) with good ores : Yields as high as 45 - 50% are possible.

I'd suggest that for anything over 20% return (bloom from ore), of course 'depending', you should not be embarrassed by the result. Get 35 % and you have done a pretty good job. At 45 % you might be right to brag a bit.

Darrell

(Image is the 'Redemption' bloom - November 2006. 19 kg ore (mixed 'Lexington' rock with gangue from earlier smelt) to 6.8 kg very dense iron = 35% yield)
  • Attached Image

Sunday, October 10, 2010

Wednesday, October 06, 2010

Maybe its all in the Presentation?

Those who have been following my recent work have seen me start to shift from more practical to more sculptural pieces. Partially 'to blame' for this is my old friend and long time artisan maker Jim Macnamara. When I created the first of the 'Shades of Ancient Oceans' series (based on fossil fish), Jim encouraged me to continue with the series. There have been about a half dozen to date. A good number have been sold at Summer Folk, where I actually have someone who has started collecting the series.
The positive reception of the 'Shades' series encouraged me to continue with what I call 'Windbiles'. These are sculptural metalworks which are moving, powered by wind. They differ from weather vanes in that they don't necessarily give an indication of wind direction.

Now, the second of the 'Shades' series - 'Coelcanth' was a little less pre-meditated, although certainly quite whimisical. I had an off cut from making the heavy grid used for sizing charcoal used in iron smelting. The piece had a series of short flat bars joined by a long round rod. The overall effect was quite like a fish spine and ribs. I also had a heavy plate left over from an antique wagon kicking around the shop. Merely welding the two pieces together suggested a fish skeleton. I added a couple of forged 'fins' and ....
This piece, about two and half feet long and originally set up to be mounted flat against the wall, never attracted much interest.

So - its a sad truth that any work has a life span. There is a real limit to how many times you can exhibit the same pieces. I normally try for at least a one year rotation, with older piece held back at least over a second full year before being shown to the public again. Problem is that with time and hauling around comes damage, and usually after a second course of display the pieces are no longer really 'sellable'.
What to do with them? Sometimes they become gifts or donations. A few end up stuck in my own yard. Now I understand how people amass 'sculpture gardens'! Over the years my own collection of art pieces dotted around Vinderheim is certainly growing.

So, I figured time had come to move 'Coelcanth' from its storage, hung on the entry to my workshop, back into the yard some place. As it was a fish, I figured to place it in our pond. The pond level shifts dramatically over the course of a year. I mounted the sculpture on a metal rod, dilled out a large stone for a base, then placed the whole close to the low water line.


As you can see, the fall rains have already lifted the water depth to cover over the base stone. By spring high water, only the top couple of inches of the sculpture should be showing above water.

But wait a minute!
What had seemed to me a tired old piece now looks pretty darn good, if I have to say so myself.

Its still for sale...

Saturday, October 02, 2010

Ground Fires vs Containments - History vs Modern Realities

Since it has been coming up a lot in the last month, I thought I would expand a bit on 'fire boxes':
Lara left this comment on "Canada Post " Helps " Small Business ???":

" In many areas here in the states, there are rules where only off-the-ground fires are allowed, if they are allowed at all. I believe the brazier is a compromise to allow use of the tripods without having to result to a propane cook stove for a hot meal."
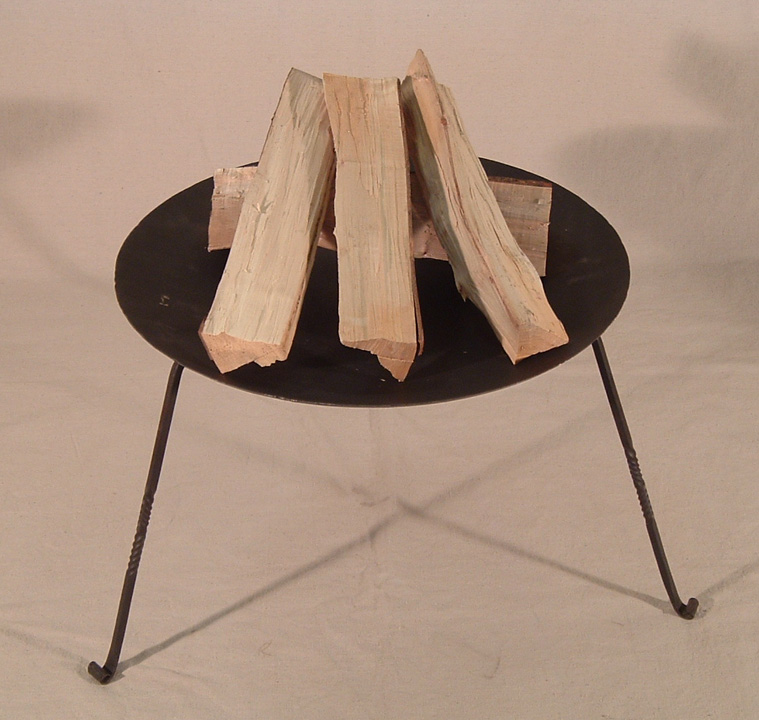
Lara is referring to this specific image:

Recently, I have also been asked to quote on making up the camp set below:


Now, both of these are very clearly MODERN attempts to address a MODERN problem - No ground fires allowed at a site.
There are two primary reasons that this modern day restriction is being more and more frequently imposed.
Here in North America, there is increasing problems with wild fires. Without droning on about climate change, lack of field skills in an urban population, rampant liability problems - lets just say the intent is to put any kind of solid fuel 'open' fire into a flame proof containment. Regardless of the 'real' reason, the basic principle is to increase safety.
More common to Europe is the second reason to restrict ground fires. This is to prevent damage to archaeological ground.

Now, for this discussion to proceed, we all have to admit that this restriction on ground fires, and any equipments produced to take the place of ground fires, is a completely modern concept and invention.
(I don't want to get into a pissing match where someone quotes some town ordinance from London in 1100 that states how many buckets of water you needed to keep on hand in your thatch house beside your cooking fire - ok?)

This discussion also serves as one of the standard illustrations I use in lecture when I'm talking about decision points made by modern living history groups.

Now, I'm going to be using the standard solution developed by the (excellent) English group Regia Anglorum. Their modern day problem was not disturbing archaeologically sensitive ground at those wonderful sites they commonly use for presentations.
To quote the Regia Living History Exhibit Regulations:
Many sites are archaeologically sensitive and firepits are not allowed.
In these cases fires must be in a container and raised above the
ground. Fireboxes and altar fires are both acceptable.
Members should check permissible constructional materials/techniques
with the LHEC before committing money to their fire containers.
To their credit, they cast around and tried to find some kind of historical reference to provide a solution. What they came up with is this:


This is one of the small side images contained within the Bayeaux Tapestry. Since the tapestry was itself created in the later part of the 1000's, its likely as close to a Viking Age reference as anyone could possibly come up with. Like many of the images from the Tapestry however, it is limited in detail, has huge problems with scale, and the 'cartoon' nature of the illustrations must always be taken into account.

Considering all the potential problems with the source material, this is an image of a standard Regia interpretation of that historic image turned into a modern working system:


This is basically a wooden box, the frame held together with slots and pegs so it packs flat to put in the car trunk. Inside the box either goes several pails of dirt / sand, or a layer of bricks then covered over with a thin layer of sand. In either case, the equipment is fairly heavy (unless you can gather local dirt), but certainly packs down very well. It is also completely fire proof, and does absolutely no damage to the ground it sits on. In this sample, the use of 2 x 8 planks for the side boards means a pair of holes can support the (again very modern) metal pot supports. (see way too much commentary on the use of metal tripods in Viking Age presentations)

Now this is a very good solution to the problem of restriction on ground fires. It does not jar the eye in a historic camp. Its easy to build, easy to transport. I have operated a iron smelting furnace with a similar kind of arrangement (at plus 2600 F) with NO damage to the underlaying ground.

But remember it still remains a MODERN solution to a MODERN problem.


At DARC, we were faced with a similar problem at our presentation at the Canadian Museum of Civilization in conjunction with 'Vikings - North Atlantic Saga'. Not only no ground fires, we were not allowed any use of solid fuels. We did still want to undertake food preparation demonstrations. This is what I came up with:
Admittedly, not a close up! The ring of stones surrounds a modern propane burner. The 'bucket' behind the two hanging pots is a fake, which enclosed a standard propane cylinder. From any distance from the 'fire' you could not see the enclosed burner. (Note the use of the more historically accurate WOODEN tripod.)

Living History is always 'The Art of the Possible'.
 

February 15 - May 15, 2012 : Supported by a Crafts Projects - Creation and Development Grant

COPYRIGHT NOTICE - All posted text and images @ Darrell Markewitz.
No duplication, in whole or in part, is permitted without the author's expressed written permission.
For a detailed copyright statement : go HERE