Darrell Markewitz is a professional blacksmith who specializes in the Viking Age. He designed the living History program for L'Anse aux Meadows NHSC (Parks Canada) and worked on a number of major international exhibits. A recent passion is experimental iron smelting.
'Hammered Out Bits' focuses primarily on IRON and the VIKING AGE
Third thing : Get your nose out of your bible, or stuck on Fox News, an look out your WINDOW
This is the situation at Wareham Ontario, Canada, North 44.5 degrees. (For the science challenged out there, that almost exactly half the way from the Equator to the North Pole.)
Current temperature (January 30, 2013 - 11:00 AM) is 9 Celsius (thats 48 Fahrenheit for the Tea Party)
And this is what it looks like:
The creek that runs behind my property, seen from across the road towards the west.( Corner of my yard is the trees on the upper left.)
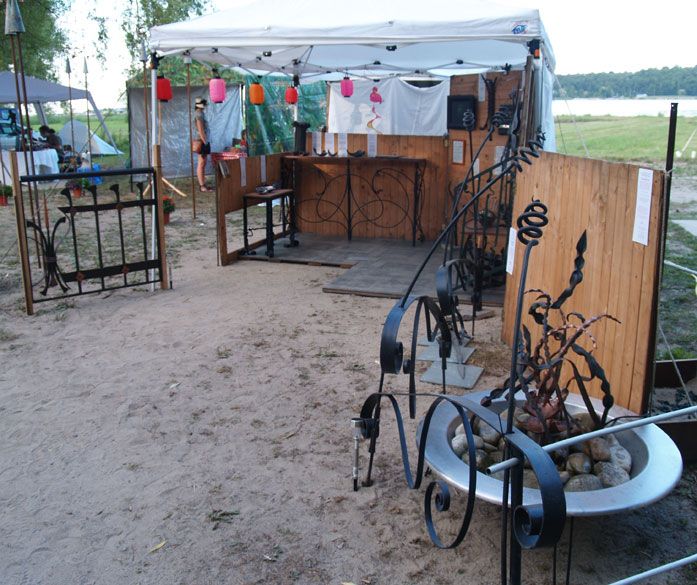
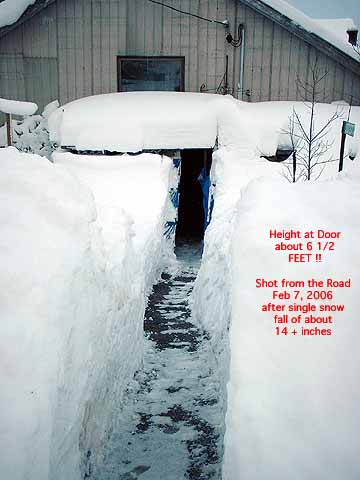
Almost exactly SIX YEARS ago - My front shop entrance from the road.
Now that I have pissed off the Fundimentalists.
For the rest of you
Close up of the Ice Dam
The pieces of ice that were covering the creek up till a couple of days back have created a damn against the mouth of the bridge (at the NE corner of my property). The individual pieces range from maybe the size of paving slabs up to as big as two sheets of plywood. These are mostly about three fingers thick. The water has risen about a hand span higher to the down stream side - and higher in that area across the road from us than it has ever been since the winter of 1990 (when I came here).
There is virtually no snow left most places around. I expect with the warm temperatures and the rain today it will most all be gone come nightfall.
Remains of the Boat - inside the Ship Shape
We celebrate the turn of the Sun by burning a model Viking Boat the last Saturday of January. Our version of (the Victorian) Up Helly Aa. So only 4 days ago - the ice covering what is open water above was more or less thick enough to stand on.
But you know - its all just Liberal Hysteria..
Readers : This piece was written for Monday January 30. It got trapped as a draft and missed its correct and timely publication. Over the 12 hours following, the temperatures at Wareham dropped over 15 C (!!) and back to the -5 to -10 C 'seasonal' range.
A recently recovered artifact is all the buzz in the Norse re-enactor's community.
It is a three dimensional depiction of a woman, cast in silver. The bottom of the figure has been broken off (thought to be plow damage from working the field it was discovered in).
The Harby 'Valkyre' - click to see the published image size (!)
(Metal) Detectorist Morten Skovsby found the ... figurine late last year at Hårby on Funen, (Central Denmark)
Pulling a couple of the starting comments from the Norsefolk2 discussion group:
On 09/01/2013 04:24, Hilde wrote:
Hopefully, a high quality scan will be available some time in the future.
On Tue Jan 8, 2013 6:15 Charles wrote:
This is where the fun starts, now begins the search for archaeology to back up the outfit worn by the figure.
The need is there to make this more than an artistic representation.
The first rush was divided into to main topics:
1) Depiction of female with sword and shield - 'proof' of women in combat.
2) Deciphering details of the clothing.
There is a gap between the falling hair and the back of the neck. Much was being made of this : A pendant? Hung as a ritual object* ?
( Of course
since the bottom of the dress line is broken, we can not tell if the
piece was flat based to sit on a table, or might have once had details of the
feet.)
But before we go too far - Look at another object from the Viking Age which has also been examined and argued about in minute detail:
'Odin fra Lejre '
by Tom Christensen
1,75 cm høj, 1,98 cm bred og 1,25 cm dyb,
(high / wide/ deep ?)
(images and quote from Christensen's report)
The recent 'discussion' has centred around the sex of the figure. One camp sees a female, based on the length of the garment and seeing the dotted bands on the chest as four rows of beads. The other camp sees the figure as male, based on the band around the mouth seen as a moustache, and the iconography of the thrown of O∂in.
Now - a reality check. Take a look at this image:
'Warrior' - click for detail
Look at all that detail on the figure's costume (or lack thereof)!
This is actually one of those 30 mm cast tin alloy miniatures so many of us used for war game / Dungeons & Dragons playing 'back in the day' (and still may do, for I know).
But before you start to attempt to determine all those fine details - Let's try something first:
All objects reduced to LIFE scale in these images.
It has been my overwelming experience that no matter how much you work with artifacts, you never really understand then until you see them in life, actually before you. Reading the measurements does not really impact you. Almost everything is either way SMALLER, or way LARGER in actual truth, than what you imagine it is.
This is absolutely critical.
I have gotten into the habit now, for any object I have never actually seen before me, to take the source image, scan / open it into Photoshop (or the like). Then convert the image best as I can to the *actual* size given for the object. I will often put a piece of blank graph paper into my printer and print the life sized image on to that. This makes for very easy conversions of details into physical measurements.
People have been going a bit overboard (in my opinion, not so humble), attempting to derive the finest detail from the published images of the objects. Yes, it can be a wonderful tool to take a very high resolution photograph, then look at that expanded version.
But what about the ancient artist who made the original object in the first place?
How small a thing was he really making?
What limits on detail were imposed by the medium he was working in?
Or by the tools he had available to work with?
Are you really looking at intended details of a reality?
Or is all this combined through an artistic style?
Let me tell you, as someone who has actually worked with lost wax casting techniques, there is very much a limit on just how much detail you can physically place on any object that is as small as these pieces are!
* "Ritual Object'
Archaeological short hand for : 'We don't know what the heck this is for'
Later Addition:
The following is a comment by Cathy Raymond. I have come to know Cathy as a measured and intelligent voice on the Norsefolk descussion :
I agree with your basic point that it's hard to derive such detail from these tiny figures.
However,
our other sources of information about Viking and Vendel era costume
are so limited that there's no option but to try. Surviving textiles
from graves and other sources are tiny and sparse, and surviving
garments almost vanishingly rare (I can think of only three or four that
are complete or close to it--a shirt, a sock, a cap, and a scarf with
human head hair found in it).
What Cathy says is in fact quite true. I did want to expand a bit, and mention the work of another friend, Dr. Michele Hayeur Smith :
An expert on Icelandic and Scandanavian textiles, Michele Hayeur Smith
will explore current research on archaeological textile collections from
ten Viking Age (AD 874-1100) mortuary sites and eleven settlements from
the medieval period (AD 1100-1600), as well as medieval records, to
shed new light on age-old associations between female embodiment and
power in Norse culture and their transformations through time. Her
interdisciplinary work integrates art, narrative, textile production,
gender, power, and fertility.
Co-sponsored by the Women's and Gender Studies Program
Anthropology Distinguished Lecture
Bridgewater State University
Michele has spent many trips over the last several years looking through what she jokingly describes as 'filthy brown rags' - pieces of Icelandic textiles. Largely not assessed, she has discovered a large number of these fragmentary textiles are much older than previously thought.
Eric Campbell wrote :
If you watch people with heavier hammer tend to grab the handle closer to the head of the hammer. Moving steel is all about the equation Kinetic energy = 1/2 mass times velocity squared what this boils down to is that if I double the mass I double the kinetic energy. If I double the velocity I can quadruple the kinetic energy. Many of the smiths that come from the Yellin line use lighter hammers that measure in length from the crook of their arm with the head of the hammer resting on the tips of their fingers. I've tried it and I can generate an astounding amount of kinetic energy that way however I like a bit more control so I tend to have my handles about 2-3 three inches shorter than that and I like having one of my faces being ground to be like a rounding hammer when I am doing long draws. (Brian) Brazeal tends towards a short handle and a rounding hammer this video is worth a watch if you do a lot of long tapers.
... I became aware that the hammer weight conversation is missing 4 variables. Face geometry, handle length. grip, and swing style.
1) Eric is echoing my own experience. Less mass, moved further and faster, equals more impact energy. I have seen Brian Brazeal working - massive hammer, moved very slow, short strokes. I suggest that a lighter hammer allows for more precise control, not only of target, but also of entry angle of the face, more importantly the edges.
2) Never forget the physical dynamics of body build! Personally, I have extremely long arms, and still after over 30 years of smithing, still only weigh 160 lbs over my 5 foot 11 frame. Brazeal is heavy through the chest, with much shorter arms and is very powerful in build. Not a surprise he would work in close, short, heavy, and pretty much punch - rather than swing the hammer as I do.
3) Something to direct this back to our topic of forging blooms: A lighter hammer, moving fast, does have more impact energy. But that energy will tend to be concentrated to the surface of the metal. For bloom welding (or thick bars) a heavier hammer moving slower will *penetrate* the force through the mass of the bloom. Remember that this is effect desired to compact or weld a bloom
Replica Viking Age hammers - Lower left based on Mastermyr at 800 gms
4) We all have to remember as well our bloom iron and antique wrought iron *does* move differently under the hammer stroke than modern steel alloys, often very differently. Those ancient smiths were not fools, and would be building hammers suited to their metal, anvils, and objects to be formed. It may suggest something that the kind of heavy sledges typical in contemporary blacksmith shops are absent from the early historical artifacts?
ON THE VIDEO:
Why Use a Rounding Hammer
Brian Brazeal demonstrates and explains why a rounding hammer is the most versatile hammer to forge with.
1) Note that this is work with COPPER - not STEEL.
Copper moves like butter when hot, and even cold, moves about the same as mild steel would if it was at forging temperature. This gives a false impression of the effectiveness of the hammer technique. Copper, unlike iron, can be effectively cold worked (for a good while before work hardening).
2) A short stroke with a heavy hammer?
Note that Brazeal is noticeably out of breath, even after the first hammer sequence. This despite how slow the pace of the individual strokes is (also an effect of the use of a very heavy hammer.) Perhaps not the ideal method if you intend on any actual production work? (Of course, you might be younger and more fit!) This method suits a physical build with a barrel chest and massive chest muscles, short arms with 'Popeye' chunky arm muscles - all suited for power.
Definately not a weight or style for those with lighter builds, longer arms, and more slender 'dancers' muscles - suited for speed.
Note also how he is choking up on the handle, gripping the hammer just barely back of the head. There is no swing involved here at all - he virtually is punching up and down in a straight line.
3) Entry Angle?
Note that Brazeal is working his strokes at 90 degrees to the length of the bar. This puts the line of force *across* the desired direction of the taper - not *down* it. Although care is being used to keep the hammer flat and straight, the natural dynamic of your body will cause some of the material being forged to be pushed sideways if you work as shown. If you are
3) Cheating on the Edges!
Note that the effects attributed to the rounding hammer are as much because of the use of both the curved base of the horn - and the use of the front and back edges. Although the slight curve of the rounding hammer *does* increase the speed, this is secondary to the much more aggressive pinching by curved horn and especially the edge radius.
4) Straightening with a Round face?
No, Use the FLAT side of the hammer for straightening! That *is* what the second face on the hammer is for after all.
Note he specifically says : "I think stems look a bit better rough than they would perfect." This then is a *design choice* not a technical method. Using the rounding face when finishing the taper into round will certainly leave the surface facetted.
Near the end of the video, he talks about 'not hitting square' with a flat face. Sorry, I see this as a flaw in basic technique. How could you be so aware of the entry angles available to the crowned surface, but at the same time so sloppy with the flat?
5) The true advantage of the Rounding Hammer?
Is seen over the second part of the forming - the pulling out of the tip into the leaf shape.
Again, this will *not* be so dramatic an effect if forging steel. In steel, as the material thins, it will loose heat faster and faster - to the point where it will prove almost impossible to work the material before it cools in contact with the anvil - and becomes brittle.
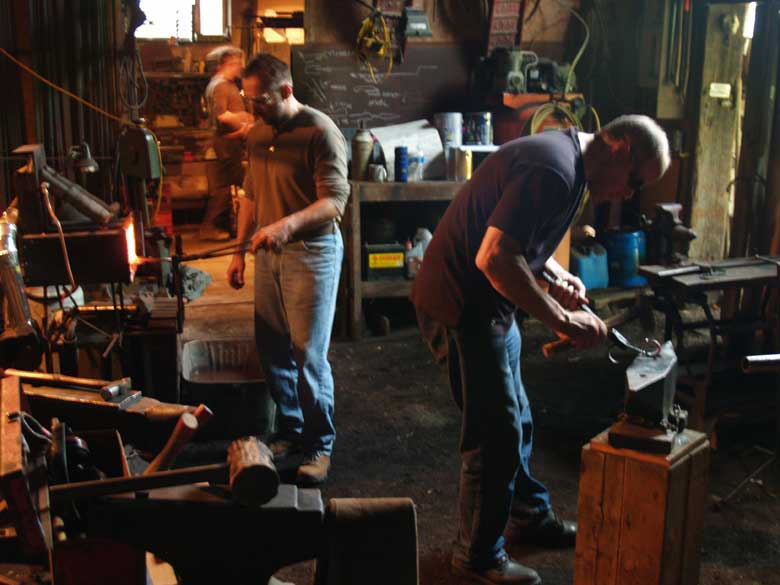
OABA had flown Brian Brazeal up at considerable expense for a two day workshop. There was an afternoon demonstration session, which I attended. My apprentice Kelly Probyn-Smith, who stands all of about 4 foot 8, found the methods demonstrated completely outside of her physical abilities. Despite my lifetime of blacksmithing, I also would not be able to utilize the physical methods illustrated.
Remember blacksmithing is a *physical* activity. The way any individual should chose to work should be first determined by the safest, most comfortable and most effective system as defined by their individual body dynamics.
When
you are working with the hand bellows there is another variable coming
into play and that is weight of ore charge. About 250-500 grams/charge
works about best. If you charge more/charge pumpinng will be ALOT
harder, because it chockes the column more. Just drop on the weight per
charge and after a while things start to work just fine again.
My usual is to distribute the ore as evenly as possible through each addition of a 'standard bucket' of charcoal.
DD 2 ore analog with the 'standard scoop' - Vinland 1, May 2009
The tool we use for the ore additions is shown in the image above. It
holds a bit more material than you could hold in a single cupped hand.
One of the problems we all face in these kind of conversations is
that I'm sure our experiences all roughly match - but we are all using
slightly different measurements. Both in terms of tools and how we keep
track / records. This goes back to the thing I mentioned about 'kg
charcoal per hour' being one thing most of us can record (or calculate
from our methods).
On charcoal, we have a 'standard galvenized bucket' sold through hardware stores all over N. America.
Dave Cox adding charcoal in our 'standard bucket' - June 2006
Now, the charcoal does vary in density based on wood species. The
most commonly used types here in N A are oak, hickory or maple (or some
combination). There is some research to be considered here (??)
The charcoal does also vary in weight per volume due to how dry it
is. When my team noticed this, we started trying to measure the weight
of our 'standard bucket' at each smelt. The variation is easily 10 -
15%.
Of course another wrinkle there is that we certainly do not weigh
each individual bucket, and there is certain to be variations in how
full any given bucket might be. On a guess - another 5 - 10 % at least.
On the ore, we originally just counted 'scoops'. We would measure and
weight three, take that average, then multiply number of scoops against
that calculated weight to get our ore total.
We again realized there was considerable variation there. Now we measure out the ore by full kg (or 500 gm multiples) into cans, then use the cans into the scoop to make it easier to add to the top of the furnace.
The density of the specific ore types we use can vary considerably. The same 'scoop ful' can vary from the DD analogs in the range of 275 - 300 gm - to as much as 600 + gm when
the ore type is taconite or hematite grit.
The stack height of the furnace will come into play here too. As the charcoal burns, individual pieces will turn, tumble, and change size. This all will result in the ore particles all falling at slightly different rates. In effect they should start to distribute themselves fairly evenly though the entire volume.
The size of the particles, and the relationship between ore size and charcoal size, will certainly effect this as well.
That being said - I think you may be on to something Jur!
We are always careful to spread the ore in a given charge as equally
as possible through an individual charcoal addition. So we never lay all
the ore as a single 'slug'. (And yes, many earlier published
illustrations suggest this as the method, which I do agree is NOT the
correct way to proceed!)
We very rarely charge more than 3 kg of ore into a single charcoal
measure (for us the average 'bucket' is about 1800 gm). In method, we
would be splitting that ore amount into four roughly equal applications,
covering each with a 1/4 bucket of the charcoal. More typical is
charging at 2 kg to one bucket (so roughly 1 to 1)
One consideration on that advise may be the surface area of the
furnace as well. I think we all can see that 500 gms ore over a 20 cm
diameter results in more of a 'plug' than with a 30 cm furnace. (Our
standard here is between 25 - 30 cm interior diameter at the top.)
I think this all just re-enforces what Mark said : Bloomery Smelting is an ART.
Something for those not familiar with historic artifacts:
It is common to find a number of slightly different furnace layouts at a larger 'industrial' ancient iron smelting sites.
Usually showing signs of a single firing only. Then there will be one
version built over and over again. Obviously the ancient masters would
take their generalized knowledge of the iron smelting process, then
tweak the furnace design to account for the local clay, ore type, maybe
even the charcoal available. Once an 'ideal' combination of design and
method was determined - they just repeated that combination over and
over.
We do all need to remember that this same problem of matching our furnace and method to our individual local ore does confront us all!
This follows from the Event Schedule mentioned yesterday...
Note that there are a number of new programs, and modification on dates from past years.
Start your 2013 forging experience on the right path with weekend
programs which will introduce you to the correct working methods, the
tools needed - and teach you a good selection of
basic techniques.
Basic BlacksmithingApril 20 / 21 / 22 June 14 / 15 / 16 July 13 / 14 / 15 September 13 / 14 / 15
Friday evening, all day Saturday & Sunday
This is an 18 hour program that stresses a hands on approach, with a Friday
evening lecture and two full working days in the forge. Only 4 students per
session, each with their own work station, means close personal attention. Projects
include poker, tongs, punches and one small decorative item. Course fee of
$325 (+HST) includes coffee and materials. For further details go to
Basic Blacksmithing
Intermediate Level Courses
Basic Bladesmithing June 1 & 2
All day Saturday & Sunday
This two day, 16 hour session will introduce the student to the basic techniques
required to produce simple hand forged knives. Covers: historic patterns, alloys,
heat treating, forging shapes, basic finishing & hilting. Each student will
forge and work to finish a small belt knife, plus rough forge a number of basic
blade shapes. Requires 'basic' level experience, please ask for details. Course
fee of $325 (+HST) includes coffee and materials. Session limited to four
students.
Intermediate Blacksmithing November 9 & 10
All day Saturday & Sunday.
This two day, 16 hour session will cover forge welding, punch work (flat and
sculptural), tool making, and design for the Smith. Requires basic level
experience, please ask for details. Course
of fee of $325 (+ HST) includes coffee and materials. Session limited
to four students.
Working
Structual Steels September 28 & 29
All day Saturday & Sunday
This two day, 16 hour session will cover the basics of working with structural
steels : PIPE / ANGLE / CHANNEL and more. The program will cover specialized
tools, basic work with the air hammer, as well as design considerations. Requires
a minimum of basic level experience, ideally intermediate level,
please ask for details. Course of fee of $350
(+ HST) includes coffee and materials. Session limited to four students.
Introduction to Layered Steels July 27 & 28
All day Saturday & Sunday
This two day, 16 hour session will introduce the student to the basic techniques
required in the creation of layered steels. Covers: alloy mixes, basic pattern
generation and history. Each student will create a layered billet, plus will
forge a small knife from a prepared block (provided). Requires intermediate
level experience (ability to forge weld), ideally with basic bladesmithing,
please ask for details. Course fee of $375 (+HST) includes coffee and
materials. Session limited to four students.
Introduction to Smelting IronMay 24 - 26, 2013 (Friday evening, all day Saturday & Sunday)
This course dependent on registrations (requires full class of 4 students
due to materials cost)
This two day, 18 (+) hour session will involve the student in the construction
and operation of the 'Econo Norse' small scale iron smelter. A Friday evening
lecture will cover the theoretical and historical background of smelting iron:
ores, furnaces, process, equipment. Saturday will start with the construction
of the furnace, plus preparation of charcoal and ore, ending with pre-heating
the furnace. The actual process of the smelt on Sunday takes roughly 8 hours.
After this, the resulting iron bloom will be extracted from the furnace, and
given a primary consolidation. The iron produced will be cut to sections and
shared between the participants. This program does not require any previous
metalworking experience, and is of interest to students of history
as well as blacksmiths. Course fee of $400 (+HST) includes coffee
and materials.
For more details on this special program - go to Smelting Course.
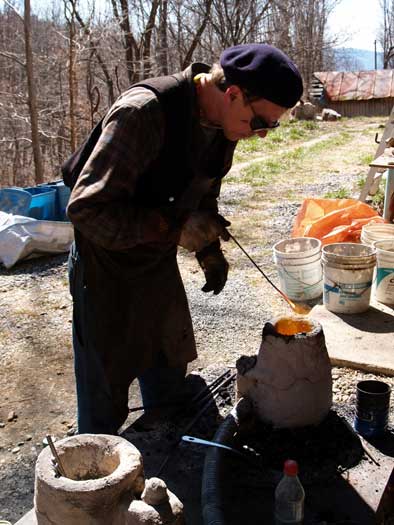
Basics of Metal Casting
February 9 & 10
November 16 & 17
All day Saturday & Sunday
This intensive hands on session will introduce the student to two methods
of creating small objects using the casting process:
SAND CASTING IN BRONZE : First a master pattern will be caved in wax, then each
student will learn how make molds using the green sand process. Several pours
will be made.
PEWTER CASTING IN STONE : Each student will carve out a re-usable soapstone
mold, then make a number of pours.
The two day, 16 hour course will include a look at historic cast metal objects,
plus an overview of the tools and equipment required to set up a small scale
workshop for cast metals. No skills requirements. Course fee of $325
(+ HST) includes coffee and all materials.
For more details on this special program - go to Casting
Course.
Public Event Schedule 2013 Latest Update : January 2013 - Dates are tentative NEW courses, demonstration events for 2013,
2013 is an 'Arts' year, many events reflect this.
For more details on the specific events, use the links provided.
(Note that most event links take you off the Wareham Forge series.)
Detailed Information on this year's courses at the Wareham
Forge can be found HERE
2013 Year at a glance
This table shows all of the year's (potential!) activities and will quickly
let you see everything on the timetable
In
my usual ore mix, the big pieces are bean size. From that, down to near
dust. I think the mix of sizes keeps the flow down healthy. Back when I used the Spanish red ore, it was very fine, but I'm not sure I knew enough then, to know if it mattered.
I've come to believe it all matters. The size of all the components, to
the stack size, to the airflow/volume. But, there are always so many
variables with any given smelt, that doing, what has worked well for you
in the past, seems to be my best plan these days. Unless I'm
experimenting, I stick with what has worked the best, for the ore I'm
using that day.
Blooming is an art. There is way to much science going on in the whole process to worry about it. ...>
Mark - I especially agree with your statement "Blooming is an Art".
Beware those that suggest there is a cookbook approach that can be
employed. The experienced know there are just way to many variables in
play!
Again with the patience of those with more experience reading here...
Lee Sauder has gently reminded me on a number of occasions not to stress
'stack height' too much, because the reality is that it is *hang time*
which is important. (Stack height here being the measurement from the top of the tuyere to the top of the furnace.)
As Jur de Stoute had correctly suggested, for an individual ore body, there is an
ideal relationship between particle size and hang time. The reduction
chemistry is a gas onto a surface reaction. If you make your ore
particles too large (or the ore is too dense and solid), there will be
more time required in the working column of the furnace for the desired
conversion of iron oxide to metallic iron to take place. The converse of
this is that if those particles of metallic iron remain in the carbon
rich column for too long, they will absorb excess carbon, and
un-desirable *cast iron* will be the product.
The historic purpose of direct bloomery furnaces was to produce an
extremely low carbon iron - an easily forgeable metal for general
purpose applications. Although many reading here are bladesmiths, you
never should forget that truth. As you have seen from the postings of
various smelt workers here, it is possible to create a higher carbon
metal, suitable for cutting tools. Looking at historic practice however,
it is extremely difficult to see if this was ever done intentionally.
The evidence appears to point to the use of re-melting hearths being
used for carbon/iron alloy production. (Check the other thread :
'Evenstad Experiments')
Back to particle size :
One very important limitation on what people may suggest here : Consider the ore type, quality and source.
We all are generally working with some locally available materials as
our ore. Hematite blasting grit (1 - 2 mm of 98% Fe2O3) is going to
require a much different furnace arrangement to that needed for working
with 'Spanish Red' potter's oxide (powder at 81 % Fe2O3) or ... (insert
your own ore type here).
I can tell you from my own experience. My early friendship with Lee and
Skip Williams resulted in me often hauling 500 lbs of their (excellent) Limonite
rock ore home from Lexington to my base in Central Ontario (roughly 85%
FeO). So my 'working' furnace system was designed around the use of a
rock based ore, roasted and crushed, with pieces ranging from 1 - 5 mm
(rice to pea). Most typically our furnaces had 40 - 45 cm stack height,
with air volumes adjusted for an optimal 8 - 10 minutes per 2 kg
charcoal **. This produced a 'hang time' of something about 30 minutes
*. The end result was typically a nice dense workable iron bloom (when I
managed not to screw something else up.) Using the hematite grit in the
same furnace set up, the end result was a very crumbly texture, but a
medium to high carbon metal. (And yes, small amounts of cast iron was
sometimes the result as well.)
Because both Jur and Mark have mentioned this - our standard here, with the more solid ore types
(various source limonite rock, industrial taconite) is to aim for 'pea
to rice' - and roasted. I have only had a couple of chances to work with
primary bog ore (both roasted and not), sizes there more pea to walnut
(5 - 25 mm). Although we are using slightly different ways to describe
this, I do see we are all working in the same ranges. The only
difference I see with what Jur has described is that I normally keep the
smaller 'dust' particles included (as normally does Lee, I believe
Jesus). I never worry about washing these ores, figuring what sand /
rock remains will just give me nice juicy slag, which I can just tap
off.
Jur has asked about using the various potter's oxides.
We have used both the 'Spanish Red' and the higher iron concentration
(93% Fe3O4) black. The problem with attempting to use these powders
'straight out of the bag' is that the particle size is so fine, the air
blast blows almost as much back out of the top of the furnace as you
manage to get into the furnace! The solution we developed (our 'DARC
Dirt' analogs) is to mix 10% whole wheat flour in with the oxide. Water
is added to create a dough, which is then spread on sheets to dry. The
resulting 'cookie' is broken up into pieces. The flour acts as a binder,
holding the oxide together until it falls into the top of the furnace.
This pretty much eliminates the problem of the oxide blowing out of the
furnace.
DARC Dirt 2 analog - from black potters oxide (scale inches / cm)
* That is *very* rough - based on estimating the volume of the furnace X ideal consumption rate.
** I'm gathering data for a paper to be delivered this spring. One of
the problems is trying to find some 'universal' measurement that can be
used that links back to air systems / volumes (where my interest lies
here). It does appear that 'consumption time against charcoal' may be
the most commonly recorded measurement.
One
of my best bloomery results was when I charged the ore straight from
the roasting pile into the furnace when it was still red hot. This could
explain some of the lower shaft furnaces. Anyone else tried this
before?
Some of us here have experimented with different furnace layouts and builds.
There is a relationship between your furnace design and the 'best
possible' air volume. Tuyere placement also comes into this, as it will
define the shape of the effective heat zone at the bottom of your
furnace. That air (oxygen) volume will both ignite a certain amount of
charcoal, and produce a certain volume of reactive gases. Both volume
and placement are important influences on the quality of the final iron
bloom.
If your furnace is BIGGER than the effective 'ball of chemistry' - then
there is no actual reduction of the iron oxide occurring at the very
upper part of your furnace stack.
What *is* happening is that the materials involved in the smelt (both
ore and charcoal) are 'pre-heating', so more or less flash straight into
reduction once they hit the heat zone and available reaction gasses.
(Clear as mud - right?)
So, Jur, your mention of lower shaft furnaces is the key to your suggestion.
I think those of us who have build 'medium shaft' furnaces have noticed
that there is a significant increase in efficiency. Adding even 10 cm
extra in stack height can really increase bloom yield measured against
charcoal consumption. The ore is being heated in this upper zone.
So, I think (as much as my brain works) you have hit on a possible way
to improve the workings of low shaft or bowl furnaces. (Those with heat
zones effectively *smaller* than what might be possible through
ignition.)
'Boxed Bowl' - L'Anse aux Meadows 2001 (first smelt)
There had been some related conversation of late - in reference to the
Evenstad system. This uses small pieces of raw wood as the fuel. The
waste heat then converts the wood into charcoal before it hits the
combustion zone.
One thing though does occur to me:
If you took your ore straight from a roasting fire into the smelting
furnace - does that not make breaking the ore for correct particle size
just a wee bit difficult?
The correct ore size (depending on type and furnace layout) is one of the major variables for a successful smelt.
This related to the descriptions of a wood fired bloomery furnace and a re-melting hearth, by Evenstad in the late 1700's:
Mark Green, on Don Fogg's Bladesmith Forum - 08 January 2013 - 11:47 AM, said:
Anyway, that looks like a very cool experiment to try.
I still have my doubts about the wood converting, as well as reducing
the ore, with one load. I would think, it would take some continuous
feeding of wood and ore. I don't like that there seems to be no slag
tap.
I was working within eyeshot of Ole Nielsen at the Heltborg Symposium (2008).
Unfortunately, I had shot video of his process, via a camera which
destructed and destroyed the footage. So I have only a few still
photographs of the build and more importantly of the furnace in action.
Those who have run a smelting furnace have certainly noticed that the
hot spot over the tuyere will consume the fuel on that side faster. This
can result in a slope to the charcoal at the top. (Why you end up
charging in a horseshoe around the far side of the furnace in the later
stages of a smelt.)
The version of the Evenstad that Ole constructed was something like 2/3
scale. It was roughly a meter wide and a meter deep. It did in fact
appear a bit wider than deep, so not quite the same proportions as the
manuscript illustration shows. There was also not as pronounced
difference between the top and bottom diameters - so in turn not that
more trumpet shape seen in the illustration.
I suspect both of those aspects are important.
What I observed was that the surface of the raw wood packing was making
the same slumping pattern over the tuyere side. So in effect, the raw
wood from the back was travelling along a diagonal line - which
certainly was giving it time to transform into charcoal. This in effect
utilizing the waste heat from the smelting process.
I agree with what Mark comments on the lack of slag taping. There may be
something going on with the size of the bellows system - related to
force of blast and volume of air. Most of us in North America, if
working with European types furnaces, are using the 'Sauder System' of
high volume air. This puts the bloom below the tuyere, towards that
side. The Europeans are often working with lower air volumes. This
appears to move the bloom higher in the furnace (and produces a more
lacy, smaller bloom as well.)
As you suggest, more direct experimentation with the Evenstad system is needed to really understand it.
We also need to remember that those illustrations are certainly 'ideal' -
and may not actually match the functioning furnaces in fine detail!
My understanding from the manuscript is that this system makes a series
of smaller blooms, in a continuous process running over several days
(!). It describes pulling away excess slag (the bowl) after each
extraction. Remember that this process is linked to use of a primary bog
iron ore as well, which depending on source, might contain a lot less
silica than the rock based ores that those of you from the eastern USA
are used to using.
Under 'Conclusions' Evenstad says : "Smelting 24 pars of ore gives 36
lbs of raw bloom. Output should be 150 lbs per day. ... Three men can do
five smelts a day."
Espelund notes that his own experimental trials suggest 4 hours per
cycle, so that is a 24 hour day. Running the math gives us roughly 30
lbs for each bloom / 15 kg. So large, but not immense. Espelund
describes a test he ran in 1991 had 15 kg of ore produce 6 kg of bloom.
(Thats a very respectable 40% yield, but of course the ore quality is
critical.)
Mark continued - Referring to 'Iron Production in Norway' - Arne Espelund
Is
there a full description of the operation of it in that book? Which is
no where to be had, at any price that I have found in the world.
Not overly surprising. I think the Espelund book was almost 'vanity
press', and I doubt all that many were printed. The publisher is
Arketype in Trondheim Norway. The frontpiece states "The printing has
been financed jointly by the Norwegian Metallurgical Society, INFACON,
and the Historical Metallurgy Society in England" . Maybe some leads
there?
I managed to score a photocopy directly from Arne when we first worked
together at a workshop for Parks Canada in 2001. (Which got me started
in this insanity.)
Iron in Norway devotes about 20 pages to the manuscript and Eslplund's
comments on it. There is another 10 pages of background material.
What might surprise you (??) and is most specific to our starting point here :
The actual reference to a re-melting hearth in the Evenstad is very
short and not overly descriptive. Its only a single paragraph!
I've scanned that specific section and attached it to the bottom of this.
The whole bladesmithing community owes a huge debt to
Skip Williams, for researching and prototyping the first 'Aristotle'
furnace. Then to Lee Sauder, for hosting the Early Iron group at
Smeltfest 08 where we were introduced to this prototype. Jesus Herandez,
Shelton Browder and Steve Mankowski, (and myself) for the week we spent
figuring out how to make the system work and control the variables.
A piece of trivia : I had originally entered art school with the full intention of becoming a high school teacher. Bill Davis and the education situation in the late 1970's in Ontario had other ideas.
The result was an intentional drift through a number of departments and mediums. You see, the very best art teachers I had ever had where not the masters, but those with the widest understanding. Those with enough background in an area to inspire students and show them the basics. Then the wisdom to turn us loose to explore, advising as was needed to prevent pitfalls and keep us inspired.
The only studio I took for each of my four years at Ontario College of Art - was Photography.
'Bridge' - 1975 (Trent University - Peterborough)
'Reflections' - 1975 (future Harbourfront site - Toronto)
These did not have titles originally. The images are scanned from the b & w prints. Out of thousands of negatives, I only ever printed and mounted a mere handful.
The
Evenstad hearth is a relatively shallow. With the 'high' tuyere level
being 3 in. above the floor, it doesn't need to be more then 5-6 in.
deep max.
...
The one depicted on Darrell's site is a smelting furnace. Much like a
Catalan smelter. It is MUCH bigger then a hearth smelter....
So, sorry if this seems way to elementary, but I'm bearing in mind my
own (lack of) experience in this specific area (re-melting hearths) - and the variation in
background of the various readers.
The Aristotle Re-melting Furnace:
This is Lee Sauder at 'Smeltfest 2009' (This is the invitational research week Lee has hosted for a small group for a number of years.) That year Skip Williams
introduced us to the 'Aristotle Furnace', which we worked with over
about 30 plus test firings, building maybe a half dozen different
layouts. (see a brief report : http://warehamforgeb...y-overview.html )
This is obviously a furnace - and a re-melting furnace (rather than an
ore to metal 'smelter'). What it produces is a small puck of mid to high
carbon metal, but with some of the slag inclusions and texture of a
bloomery produced material. As Jan so correctly states, the source metal
can be almost anything. We have tested this using pieces of mild steel
bar, bits of cast iron window sash weights, old corroded wrought iron
scrap, fragments of bloom - even nails and beer caps (!) The carbon
content of the end product depends on the set up of the interior bottom
of the furnace. You can both reduce *or* increase carbon content,
depending on the bottom depth below the tuyere and the angle of blast.
This system I have run maybe 50 plus times over the years. (Use the search function at the top for 'Aristotle Furnace') Although I
did put together a basic 'how do it' handout, I know there is good
information available from Lee and Skip:
Descriptions and further reading on the Web:
Because of the way this post works, I'm not sure how the order of the next images as attachments:
Re-Melting Hearth
The image is of Lee's experiments at Smeltfest 2012. The first I saw him
working with that system was at Smeltfest 2011, working with Tim Young from the UK.
Note that I personally have never built or worked with one of these. This is also the core of the discussion here (!)
For that reason I am not going to attempt to describe how it works or what is going on - or the quality of the product. Mark certainly is covering that information (and well!).
Just for interest - although it is sideways to the main thread (and people have mentioned it)
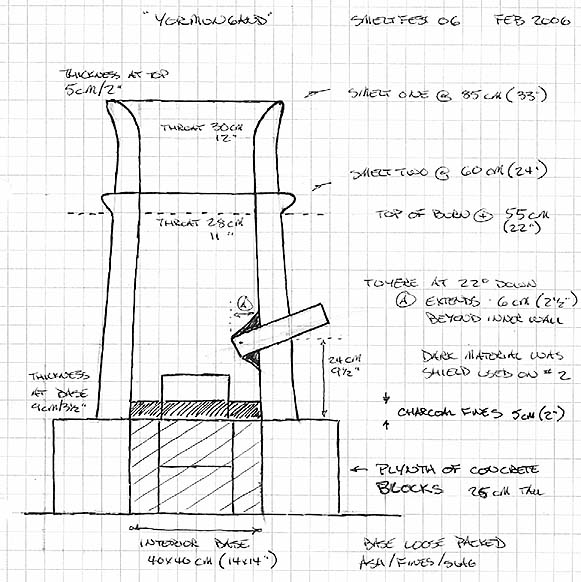
Evenstad Bloomery Iron Furnace
This image is from Espelund's 'Iron in Norway', but is a
reprint of the original 1782 manuscript illustrations by Evenstad.
One important note : The scale is in 'ells'. Think roughly the distance
from your elbow to your finger tips with fingers extended. Given other
places in the document as '60 cm'.
That makes the conical furnace roughly :
60 cm at the base
10 cm from base to tuyere
180 cm at the open top
120 cm deep
This is a wood fired furnace. The description states small pieces of
wood would fill the furnace before lighting. The heat of combustion
converts this to charcoal. Once this is accomplished, then the ore is
added.
The furnace is intended to be a continuous cycle of production. Ore is
added, reduced to a bloom. At that point the bloom is fished out from
the top. The excess slag mass is cleaned, then the still hot furnace is
filled with another charge of wood to repeat the process.
The bellows shown are two long narrow chambers, lifted with spring
poles. A worker stands on top of the plank extensions, shifting his
weight side to side to operate.
The source reference is:
Arne Eseplund : 'Iron Production in Norway During Two Millenia'
1995, ISBN 82-992430-3-3
At the 2008 Heltborg Symposium, I saw Ole Nielsen and his team build a
version of the Evenstad Furnace and operate it. Ole is to the left, blue shirt, gloves with long bar. (for more images see http://www.warehamfo...BORG/index.html
) This was still early in their experimental series, and although they
did manage the wood to charcoal element, and produce a large slag mass,
there was little iron produced. (Most of us had low or no yields, I
think the ore we were using was to blame.)
This all started with Mark Green describing some of his recent experiments / tests using a deep hearth to refine and change the carbon content of his blooms. The conversation drifted a little, towards defining terminology:
Jan Ysselstein, on 07 January 2013 - 12:32 PM, said:
I have begun to associate a hearth as a furnace where the bottom plays a significant role.
This is a very nice, clear definition.
As frequent readers know, the problem of use (and mis use!) of metal working terminology is a big concern for me.
August 29 - October 10, 2016 : 'Turf to Tools Two' Project Grant
Canada Council
August 2014 : 'Turf to Tools' Travel Grant
Ontario Arts Council
February - May 2012 : 'Bloom to Bar' Project Grant
February 15 - May 15, 2012 : Supported by a Crafts Projects - Creation and Development Grant
COPYRIGHT NOTICE -
All posted text and images @ Darrell Markewitz. No duplication, in whole
or in part, is permitted without the author's expressed written permission.
For a detailed copyright statement : go HERE


 Working
Structual Steels
Working
Structual Steels