Tuesday, February 26, 2013

Some notes on Charcoal:


(expanded from a post to 'Bloomers and Buttons' on Don Fog's Bladesmith Forum)

With travelling and working with others, plus managing a large number of smelts here in Wareham, I have had occasion to use a number of different charcoal types for iron smelting.
The size furnaces being used at Wareham typically run between 40 - 80 kg charcoal per smelt. This is usually purchased as 8 kg (20 lb) bags, usually 10 - 15 bags at one time. (A standard skid of that size runs about 16 bags.)

I have ranked the commercially available charcoals I have worked with in the past - from 'best to worst':

Black Diamond - Oak & Hickory

This material was prepared by a small scale private operation. The fellow had been experimenting with small charcoal retorts - on much the same level as our iron smelting. The source was deadfall off his own property. This lead to a mix of wood types, but a uniformity of starting material that yielded an extremely consistent charcoal. Bruce Cowan was also offering me an excellent price on bulk amounts.
This material was made to order, so extremely dry and effective in the furnace. He also was pre-sizing and pre screening the material, the fines packed separately. Certainly by far the best material in my experience.
Made outside Niagara Falls, I did have to pick it up at source. Unfortunately, the operation (even at such a small scale) was forced to close due to complaints from neighbours.

ROYAL OAK - Oak

This was the original standard here in Wareham. Our first retail purchases were made of this brand, based mainly on what was locally available. Later I would contact Royal Oak directly, on the hopes of getting wholesale pricing. It turned out my desired quantities were too small. In the end Royal Oak generously donated  charcoal to DARC. (Thank you Royal Oak!) This would total three skid loads, which supported our experiments here for several years.
I have found Royal Oak the best commercially available charcoal. It is extremely consistent on dryness, piece size and completeness of charring. The material breaks well with an average amount of fines produced.
The head office is in Georgia, the material is from that area of the United States.

MAPLE LEAF - Maple

This is our current standard at Wareham. My local supplier is McDonald's Home Hardware in Dundalk, who provide me bulk amounts at their own wholesale cost (a donation of roughly $4 per bag).
I have found the Maple Leaf to also be extremely consistent in quality. This material does tend to shatter more than the oak, resulting in a slightly higher amount as fines.
The head office in in Quebec, and the material is from that province (Trois Rivieres ?).

BASQUES CHARCOAL
- Maple

In an attempt to find a wholesale source for charcoal, I had contacted a supplier outside Barrie who handles this brand. Although the price per bag is reduced on large purchases, the cost of the hauling from the yard raises the cost to equivalent to what I get for the discounted Maple Leaf. The material is produced primarily for restaurants which grill on charcoal.
As another maple charcoal, the characteristics are similar to Maple Leaf, as is the quality of the processing.
The head office in in Quebec, and the material is from that province (Riviere du Loop).

DanCook - Beach (?)

This was the material supplied for the 2008 Heltborg symposium. My experience certainly only rests on two full smelts, although it was used in a number of other furnaces effectively over the event.
Generally I would put the quality and handling characteristics here about on level with the Maple charcoals.
Only available in Denmark (?)

Cowboy - Mixed, primarily Oak

This brand was purchased in bulk for Early Iron 1 and 2.
The overall quality of this charcoal varies considerably from bag to bag. The material I have seen is primarily made from old oak rail road ties. Bags have been found to contain fist sized rocks, rail spikes, even whole track plates. Often the material is not completely charred. 'Inconsistent' would be the best description. Generally the unevenness of the charring means more work during braking.
The material is not available in Canada. Descriptions from other experimenters suggests the actual source wood does vary, depending on what part of the USA you are purchasing (suggesting multiple processing locations).

'Unknown' - Tropical Hardwood

This brand was purchased in bulk for Early Iron 3. (I checked my records, and could not find the supplier - or a single image of a bag.) The material was created from clear cutting in the Amazon. The method was simple pile burning. In this the wood types were randomly mixed, and unknown. An attempt was made on the bags to justify this combination of methods 'it was going to be wasted otherwise'.
The material was very inconsistent in piece size, density and degree of charring. Generally it was fine to break, but the effects varied piece by piece. In use the charcoal seemed to generate more 'ugly slag' than typical from North American hardwoods.
This material not available in Canada. The price was reduced, despite shipping, because of the source materials.
Neil Peterson breaking Royal Oak, June 2003

About Charcoal - Theory:

A pound is a pound is a pound.
Any given wood, if fully converted to charcoal, should produce the same energy on burning. The theory here is that a pound of carbon creates the same BTU - regardless of the source.
Where the theory falls apart is on relative density. A pound of oak charcoal occupies less physical *volume* than a pound of pine charcoal. This will impact on the best possible design for a furnace, effected by the fuel type available.

First thing will be considering the stack height (distance from tuyere tip to top of furnace). Lee Sauder often (properly) corrects me when I dwell on 'stack height', because the real consideration is *hang time*. As with any chemical reaction, there is a variable of time of reaction in the reduction of iron inside the furnace. As a general consideration, a lighter, less dense charcoal will be consumed faster, a greater volume being required to produced the required energy. Because the fuel column is collapsing faster, there needs to be some increase in that stack height to ensure the individual particles of ore have enough time at temperature for the chemistry.

There is possibly a factor of 'fit and lift'. Charcoal burns off its surface, so it may be that with lower density types, the particle size should really be increased, both at the lower and upper size range. At a given air delivery pressure, certainly a lower density charcoal, of the same size particle, is more likely to experience more 'lift' force. This is unlikely to result in fuel being blown out of the tall stack, but might result in a void at the position in the bottom of the furnace of highest temperature. Is this just a theoretical, or actual physical consideration?

A third variable will be the content of other elements beside carbon between various wood types. Pine for example, is said to be very ash free. The tropical hardwood listed above certainly seemed to be contributing more silica to the furnace environment.

In all three factors, there is still much room for measured experimentation and research before the variables are completely understood.

Historically, there is every evidence that there was no attempt to select for specific wood species at smelting sites. The variation in species seen in the charcoal remains does appear to reflect the same balance as what ever types were growing nearby and available. Later records to often comment on the desirability of certain hardwoods - specifically oak, with European ash or North American hickory also mentioned.
It is clear however, that the exact design of an iron smelting furnace was always modified from an idealized system to reflect the best results for a local ore. This may also extend to modifications to deal with variations caused by differing available wood types.

This is something that as modern producers, experimenters and researchers, we should always keep in mind. There is absolutely *no* 'one size fits all' small scale bloomery design. It is more the case that our small furnaces suffer the *most* from variations of ore type most certainly, and perhaps charcoal type as well. The current descriptions available from early experimenters such as Sauder & Williams, McCarthy and myself (to mention the North American pioneers) certainly are a reflection of many trials and much error.

Thursday, February 21, 2013

Electric Motor for sale:


Lincoln Electric Motor
1 horsepower
3 phase
220 volt
1745 RPM


with attached power control

Cutler-Hammer
ECNO11C3A


wired with about 3 feet of heavy cable

'Like New' -
This motor came with an industrial high speed sander I purchased at Quad State. It had recently been installed new on the older machine. I don't have 3 phase in my work shop, so had to replace this motor.

Price : $150 - firm.


Should be possible to arrange to drop off at an OABA meeting. Will drop at purchaser - if along a normal travel route. Otherwise it is FOB Wareham (north of Orangeville)

Darrell Markewitz
the Wareham Forge
info@warehamforge.ca (e-mail ideal)
519-923-9219 (mornings best)

Wednesday, February 20, 2013

Feburary 23 Lectures :

'Practicum 2013' - SCA Caldrithig
Feburary 23
First Unitarian Congregation of Ottawa
30 Cleary Ave.
Ottawa, Ontario

web site
'Experimental Archaeology'
with Neil Peterson

This session will provide an overview of the formal process of experimental archaeology with examples. The final 20 minutes of this session is left open so that attendees may offer their own research ideas and receiveassistance from the presenters and other attendees on structuring their own experimental layout and questions.
'Beginning Blacksmithing : Considering Tools and Methods'

The idea of working with hot metal is fascinating. The process is both simple - but unknown. What tools do you *really* need? An illustrated discussion on forges, tools, materials, safety and basic techniques. Although this is a discussion rather than a hands on session, it is sure to save you countless hours stumbling - and put you on to the correct starting path into the 'Art and Mystery of the blacksmith'.
'Iron in the Middle Ages'

'Iron' said the Baron 'Cold Iron - It will rule them all'.
Iron is the fundamental metal of the Middle Ages. But historic iron is a material quite different from our modern steel alloys. Just what was this historic metal, and how was it made? What kind of purposes was it put to use? This will be a general overview, looking not only the material and common objects, but how those objects were formed - and what implications all this had for material culture.

Tuesday, February 19, 2013

'Digital Life'


Published on 18 Feb 2013
A parody of the first music video to appear on MTV : Buggles with "Video Killed the Radio Star". This is my first endeavor on my own (I miss Herb!) so I went completely low-key - all video shot on the iPhone 4 and edited in iMovie with no frills. Vocals were self produced in GarageBand with a Snowball mic. This project was created as my digital artifact submission to a Massive Open Online Course I'm taking through Coursera- "E-Learning and Digital Cultures" (#edcmooc). I plan to make an augmented "pop-up" version with Mozilla Popcorn Maker as well.
Special thanks to my daughter and husband, who helped with the artwork, sets, and performing.

Lyrics by Amy Burvall


I have been a big fan of 'History for Music Lovers' since I stumbled into them a couple of years back. The method of using pop music with revised lyric to add some fun for students is brilliant. The productions are quite impressive. (And Mrs B is so hot!)

Sunday, February 17, 2013

Early Bronze Casting...

from a private e-mail :
I was reading with interest Anders Soderberg Viking Bronze experimental bronze age casting, ... I see you had made a few pointers on the subject on one section so I was wondering if you could throw light on the subject, he says that he has 2 hearths one to melt the bronze and one to warm the moulds,  I want to know how the second hearth is heated to warm the moulds? is it connected to the first hearth with another pipe and just hot air passes through to warm them or is there a fire in the second hearth ? 

Aaron
I would never attempt to contradict anything Anders might say on this topic! He most certainly has far more experience, and has researched and done considerable practical work.

Drawing from my own (limited) experience with historic methods, but also relying on some years working in industrial casting... 
The pre-heat temperatures are significantly lower than what is required for melting the bronze itself. Both in terms of speed of heating, concentration of heat and total top end temperature.
So a simple charcoal fire - without air addition via bellows, is quite functional.
Thus the second hearth.

Concentrating heat, especially with the rapid consumption rates for charcoal, is why there needs to be a special set up to the fire on the melting crucible side.

Bronze Casting experiment - Kevin Jarbeau of DARC, 2001. Bellows nozzle at left. Open topped crucibles being slowly moved inwards to heat. One prepared mould seen to two the right.

There are three reasons you pre-heat your moulds:

1) In lost wax, to completely burn out the wax master pattern (or any other organic materials)
This requires at least 80 C or so

2) To completely remove any water remaining in your mould material.
Time can be a factor here, but again 80 C will certainly do this

3) To pre-heat the mould block so the molten metal does not cool faster than it can run into your pattern.
This element is a variable. The freezing point of your chosen metal is one consideration. How viscous your specific alloy might be when fluid. Just how much detail is in your pattern is another. What kind of temperatures your mould material can endure.

When I was working in fine detail castings (dental) the most typical pre-heat for the modern investment moulds (using lost wax) was roughly 2/3 of the melt point of the metal involved. The moulds were first heated slowly, then left for a while at a lower temperature (roughly 150 C) - the first to remove any water, the second to burn away the wax.

Since the clay itself Anders is using for a mould material could actually start to melt at temperatures close to the required melting point of his bronze alloy (likely about 1000 C), it is obvious he is using the lower temperatures of a 'plain' charcoal fire for pre-heating his moulds. (The composition of the crucibles is usually different than that used for the moulds themselves - just because of this endurance requirement.)

Friday, February 08, 2013

Some advise to the young and keen...

On 06/02/13 8:07 PM, David wrote: 
My thirteen year old son has a fascination with Blacksmithing and can see himself as a sword smith.
He enters high school next year and I would like to ask you if there are any recommended courses that might benefit him should he decide to follow this path.
Sightly edited from what I wrote back

That is a very difficult question - although I suspect you do not mean it to be. How does one start, to equip yourself as a sword smith?

First thing - I am going to suggest some reading off my own web site for you.
Check the articles in the section 'On Blacksmithing' :

Two main things to think about :
1) Getting started - and when?
'Teens as Students' :

Now the truth is that the best smith is not really the *strongest*, but the one with the best *control*. "It don't matter how hard you can hit - if you miss!" This is especially true with bladesmithing. To prevent warping, the force applied on one side needs to be as close as possible as the force to the other side. As blades get longer and longer, even small distortions start to really magnify.
But you do need to understand that at your age, your body has not finished growing, your bones are not completely set. It is extremely important that you do nothing to damage either bones, or worse still your tendons. Tendon injuries *never* completely heal! (Learn this from someone who partially tore the tendons in his own right elbow, years ago.)
It is not necessary however to be physically huge. I have been smithing for over 35 years, full time professional since about 1988. I stand 1.75 cm, and only weigh 70 kg. 

'Work SMART, not HARD'

2) Smithing as a job?
'A Career as an Artist Blacksmith' :

The truth is that you will work long and hard. You will never really make much money. * You have to do this because you love it. *
Some of the very best blade makers do make fairly good money. There is an awful lot of competition. 'Luck' is often a big factor. Although excellent work is always valued, there is much more to being 'successful' than just being able to make things. You need inspired designs. You need to know how to promote yourself. 


So - now going back to your original question: What courses might prove helpful ? 


I would suggest that to become a good bladesmith there are going to be four things you need to gain knowledge of:

A) Design :
So here, take all the art classes you can manage!
Honestly, you are going to need to learn how to draw. Enough to record your ideas and communicate them to others. The more other types of artistic work you learn, the wider your imagination, so the more original your blade designs will become. You never really know where an idea might come from.
Second - take some history courses, especially anything in 'Ancient and Medieval'.
Big piece of advise here? Steal ideas for designs from 'dead guys'. Living artists work hard for their original designs, and we are very protective of those. Something from 1000 years ago? Who knows or cares!

B) Technique :
If your school does offer any shop type classes, take them.
A blade combines work with steel and iron, both in the forge as blacksmith and later with machines in polishing. So learning how to run tools in machine shop will assist you later.
A knife needs a handle, so you also need to understand how to work with wood, bone, antler - maybe even plastics. So take wood shop too.
Hilts often incorporate the fine skills of jewellery making. Your school may not have any courses here, but fine metalworking skills are extremely important. Look at the top blade makers, you will see there is more work *decorating* than actually in making the blade itself.

C) Promotion :
Read here *computers*. In our modern world, you absolutely need to know how to utilize the internet. (Just how did you find me?)
Writing (English). You need to know how to effectively describe your work, communicate your skills. (Look at what I am writing you right now!)
Photography. You do need to know how to record your work, both as a record and how to display your work.

Take a look at these two web sites of some excellent sword makers:
Jake Powning : http://powning.com/jake/
Jesus Herandez : http://jhbladesmith.com/

D) Business
Believe it or not, its not enough just to make the stuff. You have to be able to sell it to.
So at least some basic business courses will prove helpful in the long run.

Best single piece of advise?

Get yourself one of those black empty page sketch books. 

Start drawing, cutting out magazine photos, making notes. You are recording your ideas. The drawings don't need to be art. Just good enough that YOU can remember your idea, what you saw that interested you. 
Truth is, if you start packing enough ideas into your brain, eventually they start leaking out of your fingers
Other Truth, drawing is mainly about practice, start now and you will be amazed how good you get.
 

'Gut Ripper' - c. 1979. NOT my first knife (!) but the oldest I have an image of.
Frequent readers know, the price of the often long return e-mails from me is the chance your question might show as a blog post!

Wednesday, February 06, 2013

'Recent' Work published

I am very, very behind in adding 'recent' work to the main Wareham Forge web site. 
Here is a copy of the descriptions of the latest pieces in the larger ' Hallucigenia ' sculptural series :
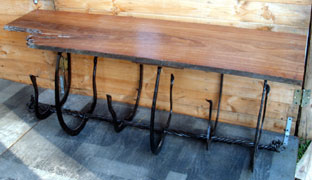
'Spine Bench' - Hallucigenia No. Two
Summer 2010
(this object available - $700)
The inspiration for this piece started with seeing fish skeletons washed up along a bearch. Imagine a series of curved ribs, linked along a spine. But here the creature has not yet develped a boney spine like modern animals, but instead has a cable like nerve cord, twined together to permit maximum flexibility. The individual ribs are made from aggressively forged flat bar. To finish, the metal is painted a dark chocolate brown.
Initially the piece had as a top a heavy piece of solid pine, some three inches thick. On the advice of friend and fellow smith John Burton, I replaced the massive slab with a thinner wide plank of African Paduk wood. One end of the plank had been eatten away by termites, a distortion that adds to the primitive feel of the table.
The finished table stands about 18 inches tall, with the top about 15 inches wide by 48 long (38 x 40 x 120 cm)
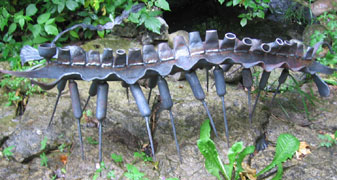
'Hallucigenia' - Hallucigenia No. Five
Summer 2012
(this object available - $500)
The starting point here was actually a pail full of offcut pieces of forged pipe, left over from work on the architectural project on the Reade-Maxwell House. Returing to the various illustrations of the defining 'Hallucigenia' organism, the sauceage shaped tubes were attached to short forged spikes to form the legs. A body was formed by agressively forging a lenght of channel, plus two pieces of angle. The short pinched pieces became the ridges along the spine.
The whole scupture runs about 36 inches (90 cm) long. Like most of the series, it has been left un-treated so it will naturally weather with time.
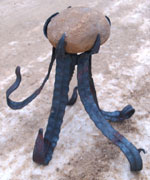
'Pentapus' - Hallucigenia No. Six
Winter 2013
(this object available - $300)
During a workshop session with Kelly Probyn-Smith, I started playing around with using various dies and surface texturing tools to alter the surfaces of bars. One prototype that emerged from this suggested a line of suckers down a long tenticle. I had a number of smoothly polished beach stones I had picked up somewhere on my travels, intending to incorporate these into forged pieces.
One of the stones forms the body of 'Pentapus'. In keeping with the general concept of alternative animal body plans in this series, this playfull creature has five tenticles, not the eight of modern squids and octopi.
This sculputure stands about 35 cm (14 inches) tall. Again it has been left with the natural fire scale finsih to allow it to weather with time..
 

February 15 - May 15, 2012 : Supported by a Crafts Projects - Creation and Development Grant

COPYRIGHT NOTICE - All posted text and images @ Darrell Markewitz.
No duplication, in whole or in part, is permitted without the author's expressed written permission.
For a detailed copyright statement : go HERE