Tuesday, September 30, 2014

Custom Knife ?


Readers:
I have most certainly gone over these details here in the past - as well as covering these points at various spots on the web site:


On 30/09/14 4:04 AM, Peter wrote:

I am looking for a knife for a while now and have not yet found one which met my requirements for a price I’m willing to pay.
"Layered Drop Point" - 1997 : This is the blade Peter referenced. It has a 3 1/2 inch long blade and a specifically shortened handle and one piece construction
A true statement is always 'you get what you pay for'
This cuts both ways - as you *should* expect higher quality at a higher price.
I need a knife which will cut my fire wood as well chops 1 tot 2 inch branches which wont turn blunt in 2 days. I only need 4 inch length of blade.
These three requirements may work against each other.
At 4 inches, the blade would have to be considerably thick to create the kind of impact you would need for this kind of heavy hacking task. This not necessarily a problem, as a blade with 5mm or more in thickness along the back, and a relatively wide blade can certainly be forged.
A larger concern is balancing your requirement for edge holding against the requirement for excessive durability.
The problem is that a harder metal is required to produce a cutting edge that retains sharpness. However, harder metal is also more brittle - more prone to breaking if subjected to extreme use. (Consider a scalpel or box cutter blade  = extremely sharp, holds that edge, but also extremely fragile.)
Generally 'heavy hacking blades' are created from a middle carbon steel, to balance edge holding with shock resistance.
One solution is to create a sandwich with a high carbon core (edge holding) layered between two pieces of mild steel (shock resistant).

Be aware that a blade formed of * just * layered steel will  * not * have the edge holding ability of a plain high carbon one.
Because the layered block alternates hard and softer metal, the cutting edge created will actually alternate (in fine detail) between areas of hard and soft. This in fact creates a cutting edge that will wear unevenly.
The true value of layered steel is not in its edge holding - but in greatly increasing shock resistance. This effect most functional in very large blades (read sword sized).

My current method of creating layered steel blades (cross section)

XXX
XXX
XXX
FVF
FVF
V

X = layered and twisted
F = flat stack layered
V = high carbon slab

You can see that in effect, the back area of the blade is composed of the more flexible (and highly decorative) twisted 'pattern welded' material.
The blade area is composed of a slab of hard carbon steel, protected by two blocks of layered material
On sharpening, the hard carbon steel is exposed to form the actual cutting edge.
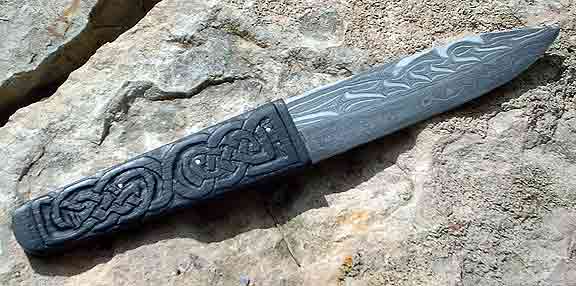
"Pattern Welded Sgian Dubh" - 2006 : This blade is constructed in the method described above.
An alternate solution to these functional requirements would be to use some exotic alloy steel. I personally do * not * work with those kind of materials. Most require specialized forming and most especially heat treating steps or equipment that I just to not have access too. (This is the approach used by most 'commercial' knife producers, with ground blades from stock bars, which are then industrially heat treated.)

  I like to know how much it costs to make a Layered drop point knife of layered steel, could you give me a estimation of the costs?
Specific quote will be determined by the exact details of a specific design.
Typically, it will take me three working days to forge up the starting billet of layered material as described - enough to then forge out two knives (depending on blade size). The process of forging, then grinding and polishing a single knife takes another two and a half days.
Hilting adds both more time and materials costs, so needs to be quoted separately.

The current rough estimates (blade only) is posted on the web site :
Flat stack 'Damascus' = $200 / 4 inches plus $40 per inch larger
Twisted core 'Pattern Weld' = $250 / 4 inches plus $50 per inch larger
http://www.warehamforge.ca/knife.html

Note that for the one piece knives seen on the web site - the price is calculated for the * entire * length (blade plus handle)
(You might notice that this is a stupid small amount - considering the amount of time expended on each knife - in a seven day 'shop week' I can basically only produce TWO blades.)
And the final question do I understand correctly that you charge in Canadian dollars?
Yes - prices quoted in CDN funds.
If paying in alternate currency, there will be a conversion fee added (cover bank losses)
50 % deposit required on order 'non refundable against work undertaken'
balance due in full before shipping
Shipping costs added on top as required your destination
(HST added within Canada)
Any Customs Duties remain customers responsibility
Production time dependant on current commissions


  One of the continuing problems any artisan maker has is sorting the serious from the casual. 
I do normally treat every initial request as if it was serious and going to lead to an actual commission. In actual fact at best only one in ten leads to actual paid work.

Friday, September 26, 2014

Pattern Weld Sword (continues...)


 Thursday I ground down the welded billet to remove the lumps and gaps. 
These come from the edges of the individual rods, which have been forged down to * roughly * square from either round (spring steel edges) or octagon (central layered and twisted). Imagine what would happen if you compressed a pile of O shapes:

OOOO

You can see that this would result in a set of small v shapes between each of the rods. 
My own experience is that these can vary a lot in size, depending on the actual shape of the individual rods, success of the welding (skill of the smith?). Sometimes these gaps will collapse in and weld up correctly in later forging steps, but I have found it better just to grind down to solid metal before proceeding to actually forging the blade shape.

What might prove of interest here is the effective * loss * of material.
Starting rough forged billet (after welding) = 3.2 kg
As ground to remove gaps = 2.8 kg
Loss = .5 kg

Next : Forging the blade itself

Thursday, September 25, 2014

a Pattern Welded Sword...

Since my return to Wareham, I have been working seriously on a (slightly) postponed commission : A Norse type pattern welded sword *

The two starting blocks were composed of a total of 13 individual plates :

M-I-M-L-H-L-M-L-H-L-M-I-M

M = MILD STEEL, inner at 1/8", outer at 3/16"
I = WROUGHT IRON, 1/4"
L = L-6 (nickel mid carbon alloy), 1/16"
H = 1095, 1/8"
All pieces at 1" wide x 6" long

After welding to blocks, each was drawn to a rod roughly 70 cm long x 12 cm.
Next each was facetted to octagon, then given three sets of twists (alternating with straight sections).
The two  cores were forged square, and fitted to two pieces of 1045 (coil spring) and prepared for the next stage.

Rods wired, prepared for welding
Showing starting length
Detail of tip construction


At start of welding, the bundled rods were roughly 80 cm long X 5 cm wide X 12 cm thick.
There are two possible ways to fit the mid carbon steel cutting edges, a one piece wrap or two separate pieces. Both present their own forging problems, in the past I have chosen the two piece method. (The challenge here is welding tight the small triangle where the four pieces interlock.)

The welding process took me 3 1/2 hours, something like 16 (or more?) individual welding heats. The first cycle over overlapping 'travelling welds' were all done by hand. This was followed by a second series of heavy compaction welds using the air hammer.

After welding, note length and width change
Detail - The tip after welding
The finished billet produces roughly 95 cm of solid material (it is expected to cut at least 5 cm from the tip end).  At this point the billet is roughly 4 cm wide and 12 cm thick. It currently has a weight of 3.2 kg.

The next step will be to grind the surface down, removing surface flaws in the welds. These are primarily caused by the slightly rounded edges of the individual cores and edges. Some of the excess weight will be lost at this step.

In the creation of the final sword, this represents close to 2/3 of the actual work - and most certainly the majority of the difficulty.


* There is a lot of confusion on language here.
I use 'pattern weld' the way I first learned the term - as the archaeological definition :
Two or more layered rods, twisted, which form the core of the blade.
The starting stacks combine separate low and higher carbon plates, usually as low layer count.
The twists will alternate and match with clockwise and counter-clockwise direction, often including straight sections.
Most commonly a separate mid to high carbon rod is welded to each side of the cores to form the actual cutting edge.
The method was used primarily in Saxon and Norse blades, known samples ranging roughly from about 400 - 1000 AD. The ultimate example is the complex blade from the Sutton Hoo burial (a royal status object, consisting of eight individual cores, mirrored in pairs side to side and top to bottom. It was most likely created in modern day north Germany or south Denmark, about 600 - 625 AD.)

The Sutton Hoo Sword (in the British Museum)
 from : http://dailymythogies.files.wordpress.com/2011/03/p10102341.jpg

Replica created by Scott Langton
from : http://i292.photobucket.com/albums/mm36/cerishields/SuttonHoosword-resized4.jpg

Saturday, September 20, 2014

Turf to Tools - Input and Output

Regular Readers -  I am way behind in documenting my recent 5 weeks in Scotland, primarily at the Scottish Sculpture Worskhop and the Turf to Tools project!

One thing those interested in the mechanics of the visual arts / historical work might find illuminating : How 'what you say' gets formed into 'what they read'.
The following were my original responses to a series of questions from Emily Wyndham Grey - fully intended to be re-shaped into a blog entry.

The final blog posting (with images) that Emily crafted can be seen on the SSW blog.
It might be useful for comparison to open that link in a separate tab / window...

 Darrell, you and Eden are both collaborating for an SSW Slow Prototype, how did this come about?

Eden had send a sort request abour advice for finding natural 'primary bog iron ore' to an discussion group 'Early Iron' (on Yahoo). Since I was one of the moderators (and instigators!), and had some small experience in looking for bog iron in Canada, I answered him back. This lead to a back and forth, as he worked up to his first epxerimental iron smelt last year. One thing lead to another, gradually shapping into the Turf to Tools project. I was quite flattered to be asked to lead the project, and certainly jumped at the chance too come to Scotland and SSW.
From a rough concept last fall, a lot of pre-event planning and background research was undertaken over this last winter. I also did some experimental and prototype work on both Pictish Late Iron Age iron smelting methods and towards the Rhynie Man Axe in particular in early spring at my home workshop.


Can you give us an overview of some of the roles, responsibilities and activities that are taking place?

The *end* result of Turf to Tools is intended to be a replica of the (somewhat puzzling) Rhynie Man Axe, carved some point about 600 AD. The outline of the methods undertaken are based on the archaeology of the Culduthel site, just outside Inverness. Guiding the project are concepts of how the local environment, through available raw materials, shapes possible process. Overall, the technical and cultural references are centred on the local region, and to what could be called 'Pictish Late Iron Age' (so post Roman and pre Viking).
The whole is also an exercise in experimental archaelogy. As much as possible, we will be working with individual elements at least suggested by historic methods, attempting to reduce more modern practice as the project progresses.
There are four major components to the chain of Turf to Tool : Gathering materials / smelting ore to iron bloom / compressing the bloom to working bar / forging bar to object.
We are intending three individual iron smelting attempts. A first smelt needs to include the building of a furnace, in this case patterned after the archaeological remains of those found at Culduthel. (A site with a longer occupation, but with a total of 9 furnaces uncovered, the latest dated roughly 200 + AD.) The plan for the second smelt is to utilize the specialized 'Macaulayite' ore, a type distinctive to only the local area around Lumsden / Rhynie. (Scheduled for Saturday August 16.) For the last smelt we hope to utilize human powered air - using an early period drum bellows. Scheduled for Saturday August 23, this will be more of a public demonstration event, with planned assistance of staff from the  Scottish Crannog Centre and visiting archaeologists and researchers.
A less understood element is the conversion process of compacting a raw iron bloom down into a working bar. There is more art than science here, as each bloom can be quite distinctive in terms of quality, size and shape. In simple terms, the spongy bloom needs to be cut to working sized pieces, then compacted down. This is all done at a high 'welding heat, formed under the hand hammer, and repeatedly drawn, folded and welded to remove slag impurities and seal voids and cracks. 'Bloom to Bar' work is scheduled after each of the individual smelts, working with the blooms produced.
It is only once all that is accomplished that the work turns to actually forging out a replica of the Rhynie axe. Before the valuable bloom iron is used, several prototypes of modern steel will be made. The axe is actually an 'unusual' object, for which there no existing examples are known from Scotland. Just what the Rhynie Man represents, or what the axe might have been intended for, is open to several interpretations. Those in turn effect the possible shape in detail of the object, which also effects the possible way the forging itself needs to be undertaken. The intent is to make a number of replicas, so to examine these possibilities. Finally, one axe will be made from the bloom / bar material created within the project.

What in particular inspired you regarding the archaeological finds in Rhynie?

For myself, my primary research and practical experimentation as been with slightly later Vikng Age / Norse archaeology. The raw technology utilized to smelt iron ore, then compress it to working bar, is certain to be much the same for the Picts of the post Roman era. Axes themselves are working tools, and as such generally conform to basic shapes and methods of production. If anything, one of the overall problems in shaping Turf to Tools is the how uncommon axe finds are for pre Viking Age, with only 15 found, all to the south in England. Rhynie Man's Axe thus depicts a 'rare' and quite distinctive object in itself.
The technical requirements of a correctly functioning iron smelting furnace are always modified by the interplay of available raw materials. Even in ancient times, there would be modifications required from a kind of 'theoretical template' furnace into something best suited to those precise local resources. One of the challenges of any attempt to replicate past process is having an awareness of how centuries of human activity have in fact modified, or in fact totally consumed, what where the original resources.
One of the most interesting aspects to the puzzle of history is attempting to get some understanding of just what might be the original intent of a figure like Rhynie Man. A king at cerimony? A mythic figure 'chained' in a representation? The defeat of an invader memorialized?
Creating a working replica of the Rhynie Man Axe may yield some clues. An object in hand can often tell you far more than a carving by some long dust ancient artist.

How have you found your experience of collaborating with SSW so far?

I am long used to working quite alone inside my interest in ancient object and processes. I extremely excited by the chance to put my past experience in 'Early Iron' into the mix for the Turf to Tool project. (And honestly, at first a bit intimitated by a potential leadership role.)
There is nothing like SSW existing in my home region of Ontario in Canada. So, as an artist, the concept of working inside a larger collaborative group is outside my noral experience. The oportunity to shape a project within a larger framework of working artists is one I know will enrich my own practice, even after this project is over. 

Saturday, September 06, 2014

As Rhynie Man - 2

Image by David Porter

the Rhynie Man


February 15 - May 15, 2012 : Supported by a Crafts Projects - Creation and Development Grant

COPYRIGHT NOTICE - All posted text and images @ Darrell Markewitz.
No duplication, in whole or in part, is permitted without the author's expressed written permission.
For a detailed copyright statement : go HERE